


Models
>
8610PB
8610PB Magic Chef Cooktop
Jump to:
Find Part by Name
Keep searches simple, eg. "belt" or "pump".
Diagrams for 8610PB
Viewing 2 of 2

Keep searches simple, eg. "belt" or "pump".

$10.95
This chrome drip bowl is an OEM approved replacement part sourced directly from the manufacturer. Drip bowls are a part for your cooktop, positioned underneath the burner to catch spills. This drip bo...
In Stock
Order now and your part arrives by Aug 2

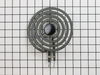
$15.26
The drip bowl is used for electric ranges or cooktops with the coiled style burners, to catch any drips, spills, or crumbs that may occur while cooking. If your bowls have become discolored, corroded,...
In Stock
Order now and your part arrives by Aug 2

The manufacturer suggests replacing the receptacle at the same time.
In Stock
Order now and your part arrives by Aug 2

In Stock
Order now and your part arrives by Aug 2

$27.83
This infinite switch knob is two inches in diameter. It is black and is made of color. This knob has a red indicator line as well as light gray lettering denoting the temperature level and the off, lo...
On Order

In Stock
Order now and your part arrives by Aug 2

In Stock
Order now and your part arrives by Aug 2

In Stock
Order now and your part arrives by Aug 2


Common Problems and Symptoms for 8610PB
Viewing 2 of 2Element will not heat
Fixed by these parts

How to fix it
Will Not Start
Fixed by these parts
How to fix it


Keep searches simple. Use keywords, e.g. "leaking", "pump", "broken" or "fit".
- Customer:
- Liza from College Point, NY
- Parts Used:
- WPW10196405, W10196406RW
- Difficulty Level:
- Really Easy
- Total Repair Time:
- Less than 15 mins
Replaced drip bowls in stove
Took out the old drip bowls and replaced with new bowls.
Was this instruction helpful to you?
Thank you for voting!
- Customer:
- Grace Mary from Canton, OH
- Parts Used:
- WPW10196405, W10196406RW
- Difficulty Level:
- Really Easy
- Total Repair Time:
- Less than 15 mins
Rented appartment in which none of the drain pans were the proper size making it very difficult to cook
I removed the element and then the drain pan and replaced with the new correct pans. I replaced the element and all was well.
Was this instruction helpful to you?
Thank you for voting!
- Customer:
- Edward from Malvern, AR
- Parts Used:
- W10900107
- Difficulty Level:
- A Bit Difficult
- Total Repair Time:
- 30 - 60 mins
- Tools:
- Pliers, Screw drivers
Burner would not heat
First i shut off the power since this is an electric cook top/range. I then removed the knob and the two screws that hold the burner switch in place. I removed the wires one at a time and connected each to the new switch. I then reattached the screws to the switch. The most difficult part to me was breaking off the switch stem at the
... Read more
right level. I got that done and finally selected the appropriate adapter for the stem/knob fit.
Read less
Was this instruction helpful to you?
Thank you for voting!