


Models
>
62922114
62922114 Kenmore Cooktop
Jump to:
Find Part by Name
Keep searches simple, eg. "belt" or "pump".
Keep searches simple, eg. "belt" or "pump".

$7.60
This is a multi-use screw and can be used on a variety of appliances. The measurements of the screw are: 8/18 x 3/8. *Please note: the screw is sold individually. Refer to the manual provided by the m...
In Stock
Order now and your part arrives by Jul 31

$75.36
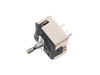
This surface element control switch regulates the heat level of your range’s surface burner. It features a double flat shaft and a nut-mounted design for easy installation. If your burner is not heati...
In Stock
Order now and your part arrives by Jul 31

In Stock
Order now and your part arrives by Jul 31

Special Order

This part is used as a support for the grill element. Sold individually.
No Longer Available

$55.18
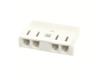
This cartridge receptacle is almost four inches long. It is white in color and is made of ceramic.
In Stock
Order now and your part arrives by Jul 31

In Stock
Order now and your part arrives by Jul 31


Special Order

This grease jar lid is used for some of Maytag/Jenn-Air's brands of ranges and cooktops. This lid is not quite an inch high and is three inches in diameter.
No Longer Available

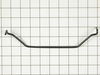
This is the grate that sits over the burner for your pots and pans to rest on while cooking.
No Longer Available

In Stock
Order now and your part arrives by Jul 31
Common Problems and Symptoms for 62922114
Viewing 3 of 3Element will not heat
Fixed by these parts
How to fix it
Will Not Start
Fixed by these parts
How to fix it
Touchpad does not respond
Fixed by these parts
How to fix it
Keep searches simple. Use keywords, e.g. "leaking", "pump", "broken" or "fit".
- Customer:
- Malcolm from White House, TN
- Parts Used:
- W11120795
- Difficulty Level:
- Really Easy
- Total Repair Time:
- 15 - 30 mins
- Tools:
- Screw drivers, Wrench set
Burner Switch Broke were Knob attached
First I cut off power supply, removed screws that held panel on, pulled the switch up and disconnected wires. Installed new switch, being sure to connect wires in the correct places. Refastened panel to stove top. Turned power back on and tested switch and it Worked.
Was this instruction helpful to you?
Thank you for voting!
- Customer:
- Susan from Chino, AL
- Parts Used:
- WP5701M122-60
- Difficulty Level:
- Really Easy
- Total Repair Time:
- Less than 15 mins
Just ugly this time`
It's wonderful to get accessories for this 20 year old Jenn-Air. I love it and now it looks like new.
Was this instruction helpful to you?
Thank you for voting!
Infinite switch ran more than one burner
Purchased 1 infinite switch and installed it on the left front burner. problem still there so I used the switch that I replaced on the rear burner and all was ok. The front switch had been sending full heat to the rear burner,but the problem ended up with the rear switch. The switches are interconnected and all are the same part number.Di
... Read more
agrams on partsselect were the key to a successful repair.To access the switch you need only to remove the fan cover, remove the 2 screws holding the switch assembly and move it foreward and then lift to reveal slide on connectors. Power to the unit is off at the main panel during the entire process.
Read less
Was this instruction helpful to you?
Thank you for voting!