


Models
>
79043043401
79043043401 Kenmore Cooktop
Jump to:
Find Part by Name
Keep searches simple, eg. "belt" or "pump".
Diagrams for 79043043401
Viewing 4 of 4


Keep searches simple, eg. "belt" or "pump".

$41.29
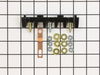
Terminal blocks (also called terminal boards or strips) provide a convenient means of connecting individual electrical wires.
In Stock
Order now and your part arrives by Aug 3

In Stock
Order now and your part arrives by Aug 3

$223.98
You can adjust the size of the burner you want to use to match your pots/pans.
In Stock
Order now and your part arrives by Aug 3

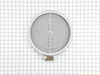
This 6-inch surface heating element delivers steady, even heat for everyday cooking tasks. Designed for consistent performance, it is commonly replaced when a burner fails to heat, heats unevenly, or ...
In Stock
Order now and your part arrives by Aug 3

This infinite control switch regulates power to a surface burner, allowing smooth and adjustable heat control. Reliable switching improves cooking accuracy and safety. Replacing a faulty switch helps ...
In Stock
Order now and your part arrives by Aug 3

In Stock
Order now and your part arrives by Aug 3

In Stock
Order now and your part arrives by Aug 3

Special Order

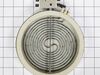
This dual radiant surface bridge element provides targeted heat to electric cooktops and ranges by activating a radiant coil beneath the glass surface. Rated at 1800/2600 watts, it ensures efficient a...
In Stock
Order now and your part arrives by Aug 3

In Stock
Order now and your part arrives by Aug 3


Common Problems and Symptoms for 79043043401
Viewing 5 of 5Little to no heat when baking
Fixed by these parts
How to fix it
Element will not heat
Fixed by these parts
How to fix it
Will Not Start
Fixed by these parts
How to fix it
Oven not heating evenly
Fixed by these parts
How to fix it
Little to no heat when broiling
Fixed by these parts
How to fix it

Keep searches simple. Use keywords, e.g. "leaking", "pump", "broken" or "fit".
- Customer:
- Timothy from Spring Valley, AL
- Parts Used:
- 5304409888
- Difficulty Level:
- Really Easy
- Total Repair Time:
- 15 - 30 mins
- Tools:
- Screw drivers, Socket set
Cord was not tightened enough by delivery crew.
PF alarm appeared on display. Noticed clicking when cord was moved. Had arced for some time and melted original block. New part slightly different. Only has 3 lugs, old one had six. Stack using washers provided. Take note of colors before disassembly. Use caution while working through access opening. The edges are sharp. Only tools neede
... Read more
d are phillips screwdriver, deep socket for lug nuts. Nut driver optional. Hope this is helpful.
Read less
Was this instruction helpful to you?
Thank you for voting!
- Customer:
- Debra from DISPUTANTA, VA
- Parts Used:
- 316282100
- Difficulty Level:
- Really Easy
- Total Repair Time:
- 15 - 30 mins
- Tools:
- Nutdriver, Pliers, Screw drivers
The smaller element of a dual element stove would not heat up.
Unplug the unit or turn off power at the electrical panel!!!! I removed the 2 screws that hold the top surface of the stove down. On my range, these are located in the front, under the the top surface. You have to open the oven door to remove them. I propped the top up with a couple of 10 inch pieces of 1 x 2 then removed the screws o
... Read more
n each end of the bracket that holds the elements in place. I used a 1/4 inch nut driver for these. With needle nose pliers, I removed the 3 retaining clips from the bracket and removed them from the element with a screwdriver and transferred them to the new heating element. The holes around the outside of the element are numbered so it's easy to know where they go. Laying the new element next to the old one, I moved each paddle-type electrical connection one at a time to the corresponding place on the new one. Put the retaining clips back in the slots. Screw the mounting bracket back in. Put the top down and secure it with screws. Very easy repair.
Read less
Was this instruction helpful to you?
Thank you for voting!
- Customer:
- Tanya from KALISPELL, MT
- Parts Used:
- 5304409888
- Difficulty Level:
- Really Easy
- Total Repair Time:
- 15 - 30 mins
- Tools:
- Screw drivers
The elements were not heating up
It was really easy just unplugged it took off the back cover changed the part out put back cover on plugged it in and the elements were working great!
Was this instruction helpful to you?
Thank you for voting!