


Models
>
79041212903
79041212903 Kenmore Cooktop
Jump to:
Find Part by Name
Keep searches simple, eg. "belt" or "pump".
Diagrams for 79041212903
Viewing 3 of 3


Keep searches simple, eg. "belt" or "pump".

$14.25
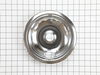
This OEM drip bowl fits under 8-inch burner elements and has a diameter of approximately 10-inches. Drip bowls catch any spills, and are a quick, easy, and cheap way to improve your cooktop aesthetic....
In Stock
Order now and your part arrives by Jul 31

$13.15
This drip bowl is an OEM approved replacement part designed for use with various electric ranges and cooktops. This part is located underneath the burner to contain any spills while cooking. It fits ...
In Stock
Order now and your part arrives by Jul 31

$15.35
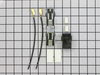
This kit comes with the necessary components to replace your burner terminal block. It includes interchangeable mounting brackets, a terminal box, ceramic wire nuts, heat shrink protective tubing, and...
In Stock
Order now and your part arrives by Jul 31

$80.50
This infinite switch controls the heat level of an 8-inch surface burner on electric ranges and cooktops. It regulates power to the element for accurate temperature control. Replacing a worn switch re...
In Stock
Order now and your part arrives by Jul 31


Special Order

This infinite control switch regulates power to a surface burner, allowing smooth and adjustable heat control. Reliable switching improves cooking accuracy and safety. Replacing a faulty switch helps ...
In Stock
Order now and your part arrives by Jul 31

Special Order

$152.68
This genuine OEM 6-inch electric surface burner element is designed to provide reliable heat for smaller cooking areas on your range or cooktop. Featuring a durable coil design with plug-in terminals,...
In Stock
Order now and your part arrives by Jul 31

Special Order

Special Order

Common Problems and Symptoms for 79041212903
Viewing 3 of 3Element will not heat
Fixed by these parts

How to fix it
Will Not Start
Fixed by these parts
How to fix it
Oven not heating evenly
Fixed by these parts
How to fix it

Keep searches simple. Use keywords, e.g. "leaking", "pump", "broken" or "fit".
Old pans/bowls were corroded
Very easy---simply unplug the burners, remove the old pans and replace with the new ones
I was extremely pleased with the easy ordering and prompt delivery of parts that actually fit as they should!
I was extremely pleased with the easy ordering and prompt delivery of parts that actually fit as they should!
Was this instruction helpful to you?
Thank you for voting!
- Customer:
- Gary from Herrick, IL
- Parts Used:
- 318293827
- Difficulty Level:
- Really Easy
- Total Repair Time:
- 15 - 30 mins
- Tools:
- Screw drivers
Burner would consistantly go to high no matter where the dial was positioned.
First I unplugged the stove.Removed the upper control panel back (10 phillips screws). Removed the plastic dial( pulls straight off). Removed the 2 screws behind the dial that is holding the switch in the control panel. Took one wire at a time off the old switch and put them on the new switch according to each electrical spade marking. L1
... Read more
, L2, H1, H2 and P. Installed the new switch in the control panel securing it with the 2 screws. Installed the dial, installed the upper back panel using the old screws. Plugged the stove back in and tested it.
Note: My new switches shaft was 1/8 of an inch longer so it does put the dial a little further away from the control panel. Wife says: It's OK, don't worry about it.
Note: My new switches shaft was 1/8 of an inch longer so it does put the dial a little further away from the control panel. Wife says: It's OK, don't worry about it.
Read less
Was this instruction helpful to you?
Thank you for voting!
- Customer:
- Gary from hollywood, FL
- Parts Used:
- 5303935058
- Difficulty Level:
- Easy
- Total Repair Time:
- 15 - 30 mins
corroded terminals
was more of a job of splicing wires together than anything else. Loved the heat shrink electrical tubing
to put over the wires for insulation. used a hair
dryer. must buy more of that amazing stuff
to put over the wires for insulation. used a hair
dryer. must buy more of that amazing stuff
Was this instruction helpful to you?
Thank you for voting!