


Models
>
91132229101
91132229101 Kenmore Cooktop
Jump to:
Find Part by Name
Keep searches simple, eg. "belt" or "pump".
Keep searches simple, eg. "belt" or "pump".

$15.26
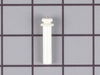
Sourced directly from the manufacturer, this OEM replacement grate foot is for ranges and cooktops. The grate foot attaches to the bottom of the burner grate to prevent the cooktop from being scratche...
In Stock
Order now and your part arrives by Jul 27

$18.54
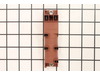
This Genuine OEM GE Electrode Clip is a precision-engineered component designed for use across a wide range of gas ranges. Constructed from durable metal, the clip plays a critical role in securing th...
In Stock
Order now and your part arrives by Jul 27

$62.95
Also known as spark electrode. This part helps your burner ignite and produce flame.
In Stock
Order now and your part arrives by Jul 27

In Stock
Order now and your part arrives by Jul 27

$72.95
This spark module delivers reliable ignition signals to ensure consistent startup. Proper ignition enhances safety and performance. Replacing a faulty module restores dependable ignition.
In Stock
Order now and your part arrives by Jul 27

In Stock
Order now and your part arrives by Jul 27

$53.95
This comes set from the manufacturer for Natural Gas. It also includes the conversion to Liquid Propane.
This valve automatically cuts off the flow of gas at a certain pressure.
On Order


In Stock
Order now and your part arrives by Jul 27

$15.26
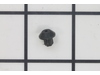
This orifice spud changes the burner from natural gas, to liquid propane. This orifice is sold individually. Size: .74mm
Special Order

$27.95
This orifice spud changes the burner from natural gas, to liquid propane. This orifice is sold individually.
In Stock
Order now and your part arrives by Jul 27
Common Problems and Symptoms for 91132229101
Viewing 3 of 3Will Not Start
Fixed by these parts

How to fix it
Gas igniter glows, but will not light
Fixed by these parts
How to fix it
Touchpad does not respond
Fixed by these parts
How to fix it
Keep searches simple. Use keywords, e.g. "leaking", "pump", "broken" or "fit".
- Customer:
- Jeffrey from Freehold, NJ
- Parts Used:
- WB13X27058
- Difficulty Level:
- Really Easy
- Total Repair Time:
- Less than 15 mins
- Tools:
- Pliers, Screw drivers
Burner wouldn't light
I removed the old igniter by working a thin screwdriver under the edge of the igniter, and carefully prying it up. I then used pliers to pull off the electrical wire. Connected up the new igniter, and pushed it back into the hole. A very simple repair.
I've replaced 2 igniters on this stove. My symptoms were that when I tried ... Read more to light one of the bad burners I heard clicking, and could see the spark on the other (working) burners. So I knew the basic sparking function was working. Just that the igniter on the broken burner would not spark.
I've replaced 2 igniters on this stove. My symptoms were that when I tried ... Read more to light one of the bad burners I heard clicking, and could see the spark on the other (working) burners. So I knew the basic sparking function was working. Just that the igniter on the broken burner would not spark.
Read less
Was this instruction helpful to you?
Thank you for voting!
- Customer:
- Kathryn from Star City, AR
- Parts Used:
- WB02T10461
- Difficulty Level:
- Really Easy
- Total Repair Time:
- Less than 15 mins
Grate Foot had worn out
A rubber grate foot on my range top had worn out. I pulled the worn foot out and installed the new grate foot with no tools or accessories. Good as new! Now I don't have to worry about the grate scraping my range top and scratching the paint. I also ordered extras so I won't have to wait if another wears out.
Was this instruction helpful to you?
Thank you for voting!
- Customer:
- RICHARD from HERNDON, VA
- Parts Used:
- WB13X27058
- Difficulty Level:
- Really Easy
- Total Repair Time:
- Less than 15 mins
- Tools:
- Pliers
Replacing Spark Igniter
Pulled the old one out. Disconnected the wire. Repaired the frayed wire cover with Liquid Tape. Connected the wire. Inserted the new part into the hole. This is after installing a new spark module earlier. But that was dumb easy too. So for about $100 bucks in parts and an hour of my time I saved myself the appliance repairman money and
... Read more
agonizing scheduling and dealing with them for the price of gold. I also replaced all the gaskets on the burners in that time. It so easy even a financial planner could do it.
Read less
Was this instruction helpful to you?
Thank you for voting!