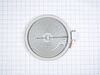
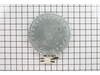
If your stovetop isn’t heating evenly or has stopped working altogether, this dual ceramic burner might be the fix you need. It’s about 10 inches wide and includes two heating elements—one for larger ...
This 6-inch radiant heating element fits beneath the glass surface of electric cooktops and ranges, supplying heat to the cooking zone. It operates at 1500 watts and 240 volts and measures slightly un...
Designed for use with electric ranges, this surface element provides dependable heat to a specific burner area, helping you cook meals with precision and efficiency. Positioned under the cooktop surfa...
This part is the replacement spring for the radiant element in your range. It is black in color, curved in shape, and is approximately 1 inch by 1/2 an inch. The radiant element spring is found beneat...
This power supply board serves as the central electrical hub for a cooktop or range, converting household voltage into the steady, low-voltage power needed for key components to operate reliably. It s...
Ask our experts a question about this part and we'll get back to you as soon as possible!
2 questions answered by our experts.
< Prev
1
Next >
Sort by:
Search filter:
Clear Filter
Your search term must have 3 or more characters.
Keep searches simple. Use keywords, e.g. "leaking", "pump", "broken" or "fit".
Sorry, we couldn't find any existing answers that matched. Try using some different or simpler keywords, or submit your new question by using the "Ask a Question" button above!
Don
October 14, 2021
Heating element are working. Lighting on element control only works from medium up to high heat. No lights on lower half. Unit purchased at Lowes 2years ago. Recommendations please
For model number PP9030DJ2BB
Hello Don, Thank you for the question. This is normally an indication the Display Board is defective and may need to be replaced. We hope this helps!
On the large 6"/9" burner, when the unit is turned on, the outer ring comes on at full power even if the only the inner circle is turned on. All other burners work fine. Is this likely to be the relay board or the control board?
For model number PP9030DJ2BB
Hi Pete,
Thank you for your question. You will need to check each board and the connections between them to see what part is causing the issue. Check the wiring to see if it is damaged or frayed. If it is, replace it. Check the boards for signs of damage, wear, scorching or burn marks. If they show any of these signs, you will need to replace them. We hope this helps! If you have any questions, please let us know.
Was this helpful?
Thank you for voting!
Ask a Question
Ask our experts a question on this part and we'll respond as soon as we can.
First; turn off breaker to stove. Second; remove two Phillips head screws that hold the top on, located in front, underneath, will have to open the oven door to see. Third; prop the top up. Four; disconnect wire clips of old element. Five; plug in new wire clips of new element. Six; unprop the top and realign
... Read more the top. Seven; replace the two Phillips head screws to secure the top, then close oven door. Eight; turn breaker back on. Done and Back in Action! You Can Do This!


 – Part Number: WB30X24134")