


Models
>
PP932BM3BB
PP932BM3BB General Electric Cooktop
Jump to:
Find Part by Name
Keep searches simple, eg. "belt" or "pump".
Diagrams for PP932BM3BB
Viewing 1 of 1
Manuals & Guides for PP932BM3BB
Click to downloadInstall
Installation Instructions
(1.07MB)
Install
Installation Instructions
(2.26MB)
Manual
Owner's Manuals
(2.96MB)
Keep searches simple, eg. "belt" or "pump".

In Stock
Order now and your part arrives by Aug 3

$121.38
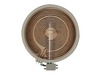
This dual radiant element provides heat from beneath the cooktop and is 9 inches in diameter. It’s the larger burner and is ideal for bigger pots and pans. If your element isn’t heating, replacing it ...
In Stock
Order now and your part arrives by Aug 3

In Stock
Order now and your part arrives by Aug 3

In Stock
Order now and your part arrives by Aug 3

In Stock
Order now and your part arrives by Aug 3

$115.09
Designed for use with electric ranges, this surface element provides dependable heat to a specific burner area, helping you cook meals with precision and efficiency. Positioned under the cooktop surfa...
In Stock
Order now and your part arrives by Aug 3

In Stock
Order now and your part arrives by Aug 3

In Stock
Order now and your part arrives by Aug 3
 – Part Number: WB09T10005")
Special Order


In Stock
Order now and your part arrives by Aug 3
Common Problems and Symptoms for PP932BM3BB
Viewing 2 of 2Element will not heat
Fixed by these parts

How to fix it
Will Not Start
Fixed by these parts
How to fix it
Keep searches simple. Use keywords, e.g. "leaking", "pump", "broken" or "fit".
- Customer:
- Andrea from ORLANDO, FL
- Parts Used:
- WB30T10133
- Difficulty Level:
- Easy
- Total Repair Time:
- 30 - 60 mins
- Tools:
- Screw drivers
9" Radiant Element did not heat up.
I started by Unscrewing the range top. 2 small screws. I took off the old piece by unclipping the piece . Then I color coded each wire so that I would know exactly where I would place the wires for the new part. 30 min maximum time spent changing the part. Please don't forget to unplug the range before you start.
Was this instruction helpful to you?
Thank you for voting!
- Customer:
- John from Fresno, CA
- Parts Used:
- WB24T10119
- Difficulty Level:
- A Bit Difficult
- Total Repair Time:
- 30 - 60 mins
- Tools:
- Nutdriver, Pliers, Screw drivers
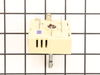
Switch failed
I turned off the circuit breaker and tested the cook top. I pulled the cook top out and laid a piece of plywood over the opening to work on the cook top and not scratch the granite counter top. The mistake I made was to turn the cook top upside down and separate the top from the housing. The dampening springs came off the burners and I
... Read more
could have damaged the elements (but they checked out ok). I turned the whole assembly right side up again and replaced the switch and put it all back together. It works great...thank you for the part.
Read less
Was this instruction helpful to you?
Thank you for voting!
- Customer:
- Rodney from Erath, LA
- Parts Used:
- WB24T10119
- Difficulty Level:
- Really Easy
- Total Repair Time:
- 15 - 30 mins
- Tools:
- Screw drivers, Socket set
Electric range burner not working due to control switch
Turned off power to counter top range and pulled-up from counter. Set range on counter and removed 16 screws from around the housing allowing me to pull-up and remove range top. Used socket to remove 4 screws holding control switch bracket in place and 2 screws holding bad switch in place. Disconnect wires from bad switch and reconnected
... Read more
to new switch. Placed and screwed switch bracket back in place. Before placing range top back I turned power back on to to test burner operation. Burner and switch operated correctly and I completed screwing range top back in place, setting back down into counter top. Done
Read less
Was this instruction helpful to you?
Thank you for voting!