


Models
>
JP300N4AD
JP300N4AD General Electric Cooktop
Jump to:
Find Part by Name
Keep searches simple, eg. "belt" or "pump".
Diagrams for JP300N4AD
Viewing 1 of 1
Keep searches simple, eg. "belt" or "pump".

In Stock
Order now and your part arrives by Jul 24

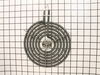
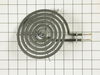
This Y-frame six inch surface burner element has five turns and a metallic center medallion.
In Stock
Order now and your part arrives by Jul 24

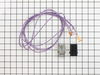
This kit comes with the terminal block, mounting clip and wires.
In Stock
Order now and your part arrives by Jul 24

Special Order
Special Order
Special Order
Common Problems and Symptoms for JP300N4AD
Viewing 2 of 2Element will not heat
Fixed by these parts
How to fix it
Little to no heat when broiling
Fixed by these parts
How to fix it


Keep searches simple. Use keywords, e.g. "leaking", "pump", "broken" or "fit".
- Customer:
- Shaohui from East Lansing, MI
- Parts Used:
- WB17X210
- Difficulty Level:
- Easy
- Total Repair Time:
- 15 - 30 mins
- Tools:
- Pliers
There was no heat on the coils.
I opened the lid, and found that the terminal blocks were burnt, the wires were melted. I ordered one set of terminal block to replace the burnt one, and it worked. Before I started, I shut off the electricity in the whole house to be safe.
Was this instruction helpful to you?
Thank you for voting!
Replacement of Coils
Removed by slightly wiggling out of the coupling. No tools needed, seriously, (and I'm a contractor). Basically, pull out and snap back in.
Was this instruction helpful to you?
Thank you for voting!
- Customer:
- Gregory from Mont Belvieu, TX
- Parts Used:
- WB17X210
- Difficulty Level:
- Easy
- Total Repair Time:
- 30 - 60 mins
- Tools:
- Nutdriver, Screw drivers, Socket set
Surface burner coil did not work.
TURN OFF ALL POWER TO KITCHEN. Took off all burner coils and plates below them. Lift hood. Locate part. Remove old part and replace with new part in same way as was previously installed. The wire that comes with the kit is actually too much wire, but just arrange it the best you can and leave it....no big deal. I didn't have a magnet
... Read more
, but needed one. The wire from burner coil to switch runs through a harness which is screwed on to the body of the oven (below the range). Be careful NOT to drop it behind oven when taking it out. I dropped it and took forever to get it. That turned a 20 minuate job into an hour and a half. Otherwise this is an easy job that anyone can do. Refrigerator compressor is next. Have fun.
Read less
Was this instruction helpful to you?
Thank you for voting!