


Models
>
GLEC36S8ASA
GLEC36S8ASA Frigidaire Cooktop
Jump to:
Find Part by Name
Keep searches simple, eg. "belt" or "pump".
Diagrams for GLEC36S8ASA
Viewing 4 of 4


Manuals & Guides for GLEC36S8ASA
Click to downloadInstall
Installation Instructions
(0.39MB)
Manual
Owner's Manuals
(0.68MB)
Specs
Product Specifications Sheet
(0.04MB)
Wiring
Wiring Diagram
(0.09MB)
Keep searches simple, eg. "belt" or "pump".

$130.48
This dual radiant surface element features both 9-inch and 6-inch heating zones, making it versatile for different cookware sizes. It provides fast, even heating and includes a sturdy metal temperatur...
In Stock
Order now and your part arrives by Mar 21

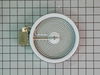
The 6” radiant cooking element with limiter fits under the glass cooktop and supplies heat to the cooking area. If your element is not heating, you can test the element for continuity with a multimete...
In Stock
Order now and your part arrives by Mar 21


$7.30
This is an authentic mounting screw, which works with ranges, wall ovens, cooktops and warming drawers.
In Stock
Order now and your part arrives by Mar 21

In Stock
Order now and your part arrives by Mar 21

$75.43
A burner that won’t heat—or one that only stays on high—can make cooking frustrating. This dual-element infinite switch helps fix that by restoring full temperature control to your cooktop. It adjusts...
In Stock
Order now and your part arrives by Mar 21


This dual radiant surface bridge element provides targeted heat to electric cooktops and ranges by activating a radiant coil beneath the glass surface. Rated at 1800/2600 watts, it ensures efficient a...
On Order

Special Order


In Stock
Order now and your part arrives by Mar 21

Questions and Answers
We're sorry, but our Q&A experts are temporarily unavailable.
Please check back later if you still haven't found the answer you need.
Common Problems and Symptoms for GLEC36S8ASA
Viewing 2 of 2Element will not heat
Fixed by these parts


How to fix it
Will Not Start
Fixed by these parts
How to fix it


Keep searches simple. Use keywords, e.g. "leaking", "pump", "broken" or "fit".
- Customer:
- Lori from Winter Haven, FL
- Parts Used:
- 318178110
- Difficulty Level:
- Easy
- Total Repair Time:
- Less than 15 mins
- Tools:
- Pliers, Screw drivers
burned out burner
First we removed two screws under the rim of the range top to open the lid. Lifted the lid and removed the screws from the bracket that holds the elements, Be careful with the clips that hold the element in, if you break them or bend them there aren't any more! Also note which holes they were in, they are marked according to the differ
... Read more
ent sizes of elements. Disconnected the wires, needed needlenose pliers to grip them...connected new element, popped it back in place, replaced bracket, closed top ...Easy peasy!!!
Read less
Was this instruction helpful to you?
Thank you for voting!
- Customer:
- Tom from Wallingford, CT
- Parts Used:
- 316555800
- Difficulty Level:
- Really Easy
- Total Repair Time:
- Less than 15 mins
- Tools:
- Nutdriver, Screw drivers
Burned element
Flip up top, remove wires and two screws. Replace in opposite way. Turn off power to stove first.
Was this instruction helpful to you?
Thank you for voting!
- Customer:
- Frederic from KILLEEN, TX
- Parts Used:
- 316555800
- Difficulty Level:
- A Bit Difficult
- Total Repair Time:
- 30 - 60 mins
- Tools:
- Pliers, Screw drivers, Socket set
Old element connections different from new element
Disconnected power at breaker. Removed cooktop mounting screws, lifted top and propped in up position. Removed two screws and lowered two front burners mounting frame. Wiggled dual element free at the clips and proceeded to swap wires one at a time and realized the difference with connectors 1a and 2b much later when only the center porti
... Read more
on was heating up. Finally figured out the problem and everything works as advertised. Pay attention if you own a Kenmore product.
Read less
Was this instruction helpful to you?
Thank you for voting!