


Models
>
FEC32S6ABC
FEC32S6ABC Frigidaire Cooktop
Jump to:
Find Part by Name
Keep searches simple, eg. "belt" or "pump".
Diagrams for FEC32S6ABC
Viewing 4 of 4


Manuals & Guides for FEC32S6ABC
Click to downloadInstall
Installation Instructions
(0.39MB)
Manual
Owner's Manuals
(4.55MB)
Wiring
Wiring Diagram
(0.22MB)
Keep searches simple, eg. "belt" or "pump".

$74.75
This part is the heatsource. This surface element is for ranges.
Surface element supplies the heat to a cooking area on top of the range.
Unplug the range or shut off the house circuit breaker ...
On Order


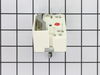
This switch controls the large surface burner. As per manufacture the original screws will damage new switch. New screws are needed.
In Stock
Order now and your part arrives by Jul 31

$8.75
This is an authentic mounting screw, which works with ranges, wall ovens, cooktops and warming drawers.
In Stock
Order now and your part arrives by Jul 31

In Stock
Order now and your part arrives by Jul 31

This large radiant surface element provides consistent, even heat for your cooktop, making it ideal for everyday cooking. With a powerful 2200-watt output and an 8-inch design, it delivers reliable pe...
In Stock
Order now and your part arrives by Jul 31

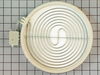
This 6-inch surface heating element delivers steady, even heat for everyday cooking tasks. Designed for consistent performance, it is commonly replaced when a burner fails to heat, heats unevenly, or ...
In Stock
Order now and your part arrives by Jul 31

Special Order

Special Order


In Stock
Order now and your part arrives by Jul 31

Common Problems and Symptoms for FEC32S6ABC
Viewing 1 of 1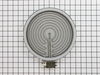
Keep searches simple. Use keywords, e.g. "leaking", "pump", "broken" or "fit".
- Customer:
- STEPHEN from GREENBUSH, ME
- Parts Used:
- 316135401
- Difficulty Level:
- Easy
- Total Repair Time:
- 30 - 60 mins
- Tools:
- Pliers, Screw drivers
9" radiant burner element stopped working.
VERY IMPORTANT! kill the circuit breaker to the unit and/or unplugged it! 2 screws hold the ceramic glass top to the lip @ top of oven--remove them and the top can be lifted up to expose all the burner elements and wiring--remove the 2 end screws that hold the retainer bracket for the burners - then remove the 2 screws that hold the burne
... Read more
r in question to the bracket-there's also a retainer pin that needs a bit of fussing with to completely free the burner--once totally free remove the wires from the bad unit to the good unit exactly as they are situated --install new unit onto bracket with screws and bracket back to its original location on the ceramic top-put top back down and replace both anchor screws--initiate power back to unit and yeeehahh--You just saved yourself lottsa money from repair bills!!!
Read less
Was this instruction helpful to you?
Thank you for voting!
- Customer:
- Larry from Wenatchee, WA
- Parts Used:
- 316135401
- Difficulty Level:
- Easy
- Total Repair Time:
- 30 - 60 mins
- Tools:
- Pliers, Screw drivers, Socket set
right front element burned out
FIRST I UNPLUGGED THE GLASS TOP RANGE. While locating the part on the PartSelect diagram I was also able to determine how to access the burned out element. It was very simply to remove three phillips head screws in the front top( above the oven)area of the range, slide the topof the range forwardand lift it up, remove one screw holding th
... Read more
e metal bar under the element, replace the element by usinga a pair of pliers to remove the electrical wires and then reversed the process. I saved a tidy amount doing the job myself.
Read less
Was this instruction helpful to you?
Thank you for voting!
- Customer:
- Ed from Winthrop, MA
- Parts Used:
- 316135401
- Difficulty Level:
- Easy
- Total Repair Time:
- 1- 2 hours
- Tools:
- Screw drivers, Socket set
burner would not heat
killed the 50 amp power. removed 3 screws from above oven door slid out cook top, dropped brace holding 2 front burners. The connector corroded off had to look for a high heat connector to connect to the element, after that just screwed everything back together.
Was this instruction helpful to you?
Thank you for voting!