


Models
>
GT19X7A
GT19X7A (DC58A) Admiral Refrigerator
Jump to:
Find Part by Name
Keep searches simple, eg. "belt" or "pump".
Diagrams for GT19X7A
Viewing 6 of 6


Keep searches simple, eg. "belt" or "pump".

$19.75
This is a genuine OEM 40-Watt replacement light bulb that is compatible with various types of appliances. It has a frosted glass bulb with a standard metal socket base, making it easy to screw and uns...
In Stock
Order now and your part arrives by Aug 6

In Stock
Order now and your part arrives by Aug 6

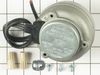
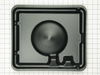
This condenser fan motor is used with frost-free refrigerators with a condenser coil. When the compressor runs, so does this fan, circulating air through the refrigerator grille, cooling the compresso...
In Stock
Order now and your part arrives by Aug 6

$21.82
This is a screw and it is made for multiple appliances in your home. This model is called a sheet metal screw because it has sharp points, and the threads are closer together. This screw is designed t...
In Stock
Order now and your part arrives by Aug 6

In Stock
Order now and your part arrives by Aug 6

$125.31
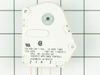
This defrost timer will cycle for twenty-one minutes after every ten hours of run time.
The defrost timer acts like a clock. It continually advances and alternates between activating the cooling cy...
In Stock
Order now and your part arrives by Aug 6

In Stock
Order now and your part arrives by Aug 6

$10.88
This is a genuine OEM replacement part. This is a door shelf trim retainer designed for use with refrigerators. The purpose of the retainer is to hold the door shelf in place on the door. This replace...
In Stock
Order now and your part arrives by Aug 6

$40.65
This fourteen cube ice cube tray is eleven inches long. It is all white in color and is made entirely of plastic.
In Stock
Order now and your part arrives by Aug 6

$21.82
This is an authentic OEM replacement part. This screw is commonly used in the assembly of refrigerators, microwaves, ice makers, ranges, and smokers. Due to varied uses we recommend you refer to model...
In Stock
Order now and your part arrives by Aug 6

$145.05
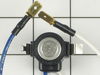
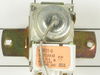
This is an authentic OEM replacement part. This temperature control thermostat is used in refrigerators. This thermostat cycles on and off regularly to help regulate the temperature inside your fridge...
Special Order

$17.44
This is an OEM part sourced directly from the manufacturer. This leveling leg is commonly used with refrigerators, dryers, freezers, ranges, cooktops, and microwaves. This leveling leg ensure that you...
Special Order
Common Problems and Symptoms for GT19X7A
Viewing 11 of 11Light not working
Fixed by these parts
How to fix it
Fridge too warm
Fixed by these parts
How to fix it
Freezer section too warm
Fixed by these parts
How to fix it
Noisy
Fixed by these parts
How to fix it
Fridge runs too long
Fixed by these parts
How to fix it
Fridge and Freezer are too warm
Fixed by these parts
How to fix it
Will Not Start
Fixed by these parts
How to fix it
Freezer not defrosting
Fixed by these parts
How to fix it
Leaking
Fixed by these parts
How to fix it
Fridge too cold
Fixed by these parts
How to fix it
Too warm
Fixed by these parts
How to fix it


Keep searches simple. Use keywords, e.g. "leaking", "pump", "broken" or "fit".
- Customer:
- Tom from Franklin, WI
- Parts Used:
- 833697
- Difficulty Level:
- A Bit Difficult
- Total Repair Time:
- 15 - 30 mins
- Tools:
- Nutdriver, Pliers
Sometimes the condenser fan would start causing the refrigerator to overheat.
Unplug the appliance.
Removed the screws holding the back panel.
Removed the fan blade.
removed 3 screws holding the condenser fan.
Remove the 3 metal brackets attached to the fan.
(First note which studs the brackets are attached to. Attach the 3 metal brackets to the new fan. (New screws were supplied)
Cut ... Read more and strip the wire about two inches from the fan.
Cut and strip the new wire. I cut the new wire in half (about 6 inches.) Connect the two wires, twist and used 2 wire nuts. Tie wrap the wire to the wire harness. Mount the new fan (three screws)
Screw the back panel back on.
Mount the new
Read less
Was this instruction helpful to you?
Thank you for voting!
- Customer:
- Clint from Rayville, MO
- Parts Used:
- W11384469
- Difficulty Level:
- Really Easy
- Total Repair Time:
- Less than 15 mins
- Tools:
- Screw drivers
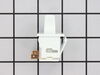
Lights inside refrigerator not working
I used a flat-head screwdriver to pop out the old light rocker switch. Then, I unplugged the wires, plugged them into the new light rocker switch, and then popped the new switch into the hole. That's it! Lights began working again.
Was this instruction helpful to you?
Thank you for voting!
- Customer:
- Leon from Chaparral, NM
- Parts Used:
- WP68233-3
- Difficulty Level:
- Really Easy
- Total Repair Time:
- Less than 15 mins
- Tools:
- Nutdriver
Would not exit defrost mode (continual defrost)
Unplug the refrigerator. Remove face plate located in the upper back of the refrigerator compartment. Remove face place bracket on the right using nut driver. Removing these screws also frees the metal case enclosing the Defrost Timer. Pull the case away from the back of the refrigerator exposing the Defrost timer. Remove the electri
... Read more
cal plug from the Defrost Timer. Then remove the Defrost Timer from the case by removing the two screws securing it. Reverse the procedure to install the new Defrost Timer.
Read less
Was this instruction helpful to you?
Thank you for voting!