


Models
>
HMG19814
HMG19814 Admiral Refrigerator
Jump to:
Find Part by Name
Keep searches simple, eg. "belt" or "pump".
Keep searches simple, eg. "belt" or "pump".

$19.75
This is a genuine OEM 40-Watt replacement light bulb that is compatible with various types of appliances. It has a frosted glass bulb with a standard metal socket base, making it easy to screw and uns...
In Stock
Order now and your part arrives by Aug 6

In Stock
Order now and your part arrives by Aug 6

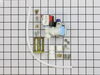
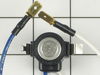
The water inlet valve is a solenoid-operated switch located at the bottom of the refrigerator. When it is energized by electrical power, water is released from the supply line through the water valve ...
In Stock
Order now and your part arrives by Aug 6

This is a genuine OEM replacement part. This kickplate mounting clip is designed for use with refrigerators. The purpose of this clip is to hold the kickplate in place, they also make it easy to remov...
No Longer Available

$85.41
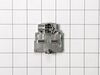
This part is both the start relay and the overload. The start relay boosts the compressor, and then shuts off as soon as the motor gets up to speed and the overload provides extra protection against e...
In Stock
Order now and your part arrives by Aug 6

$10.88
This is a genuine OEM replacement part. This is a door shelf trim retainer designed for use with refrigerators. The purpose of the retainer is to hold the door shelf in place on the door. This replace...
In Stock
Order now and your part arrives by Aug 6

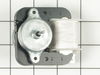
This evaporator fan motor assembly is just over three inches long. It is made of both metal and plastic, and is made up of black, white, and metalllic pieces.
On Order

$145.05
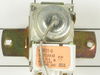
This is an authentic OEM replacement part. This temperature control thermostat is used in refrigerators. This thermostat cycles on and off regularly to help regulate the temperature inside your fridge...
Special Order

$17.44
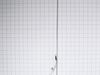
This is an OEM part sourced directly from the manufacturer. This leveling leg is commonly used with refrigerators, dryers, freezers, ranges, cooktops, and microwaves. This leveling leg ensure that you...
Special Order

$71.11
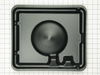
This is an OEM part sourced directly from the manufacturer. This defrost heater is designed for use in refrigerators. The defrost heater is one of three components that helps to regulate the temperatu...
Special Order

This is an authentic OEM replacement part. This defrost evaporator fan is commonly used in refrigerators and freezers. When the defrost heater is at work melting frost on the evaporator coils the wate...
No Longer Available

This is an authentic OEM replacement part. This defrost thermostat is designed for used with refrigerators. When evaporator coils start building up frost the defrost heater kicks in to warm them up an...
Special Order
Common Problems and Symptoms for HMG19814
Viewing 11 of 11Light not working
Fixed by these parts
How to fix it
Ice maker not making ice
Fixed by these parts
How to fix it
Fridge too warm
Fixed by these parts
How to fix it
Leaking
Fixed by these parts
How to fix it
Freezer section too warm
Fixed by these parts
How to fix it
Will Not Start
Fixed by these parts
How to fix it
Noisy
Fixed by these parts
How to fix it
Clicking sound
Fixed by these parts
How to fix it
Fridge too cold
Fixed by these parts
How to fix it
Fridge and Freezer are too warm
Fixed by these parts
How to fix it
Ice maker won’t dispense ice
Fixed by these parts
How to fix it


Keep searches simple. Use keywords, e.g. "leaking", "pump", "broken" or "fit".
- Customer:
- Clint from Rayville, MO
- Parts Used:
- W11384469
- Difficulty Level:
- Really Easy
- Total Repair Time:
- Less than 15 mins
- Tools:
- Screw drivers
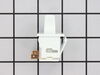
Lights inside refrigerator not working
I used a flat-head screwdriver to pop out the old light rocker switch. Then, I unplugged the wires, plugged them into the new light rocker switch, and then popped the new switch into the hole. That's it! Lights began working again.
Was this instruction helpful to you?
Thank you for voting!
- Customer:
- Kevin from Boston, MA
- Parts Used:
- 4318047
- Difficulty Level:
- Really Easy
- Total Repair Time:
- Less than 15 mins
- Tools:
- Screw drivers, Wrench (Adjustable)
no water getting to ice maker
The ice maker had been slowly dying and one day just stopped making ice. No water was getting to the trays.
I read that this could be caused by a failure of the valve, even though the continuity test indicated that the solenoid was okay.
I ordered the part Friday afternoon. It was delivered Saturday. I did the repai ... Read more r in 10 minutes.
I pulled the fridge away from the wall.
I unplugged the fridge. I closed the water supply valve.
I unscrewed the two mounting screws using a flat head screwdriver.
I pulled the old valve out from refrigerator.
Using an adjustable wrench I detached the water supply from the valve. I detached the hose leading to the ice maker from the valve.
I pulled the electrical connectors from the connectors on the valve.
I attached the hoses to the new valve, attached the electrical connector, screwed the new valve in its place, opened the water supply, plugged the fridge back in, checked for leaks, and waited for a few hours.
My ice maker is working better than it has in at least two years.
Read less
Was this instruction helpful to you?
Thank you for voting!
- Customer:
- Anna from Lincoln, RI
- Parts Used:
- WPW10189190
- Difficulty Level:
- Easy
- Total Repair Time:
- Less than 15 mins
- Tools:
- Screw drivers
Our Refrigerator and freezer stopped working
I had read on a fix it site that the start device for the compressor on this particular model was known to fail after 3-5 years. When we received the part it looked like something that just plugged into the compressor. My husband unscrewed the panel in the back of the fridge and saw the part on the compressor. He first removed the thre
... Read more
e wires that it was connected to, and the wires were inside a plug so all he had to do was remove the plug from the start device. He then removed the old start device from the compressor. Plugged in the wire plug into the new start device, and pushed in the new start device into the compressor. There was also another black part plugged into the old start device that he plugged inot the new start device that connected to the compressor. Our freezer and refrigerator starting working. Within a couple of hours our freezer had made ice.
Read less
Was this instruction helpful to you?
Thank you for voting!