


Models
>
HMG191657
HMG191657 Admiral Refrigerator
Jump to:
Find Part by Name
Keep searches simple, eg. "belt" or "pump".
Keep searches simple, eg. "belt" or "pump".

$19.75
This is a genuine OEM 40-Watt replacement light bulb that is compatible with various types of appliances. It has a frosted glass bulb with a standard metal socket base, making it easy to screw and uns...
In Stock
Order now and your part arrives by Aug 6

$15.26
This is an authentic OEM replacement part. This door shelf retainer is designed for use with refrigerators. There is one retainer on each side of the shelf holding the retaining bar in place. This rep...
On Order

This is a genuine OEM replacement part. This door shelf retainer bar is designed for use with refrigerators. This retainer bar is designed for and cut-to-fit the door shelf on the inside of your refri...
Special Order

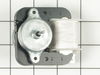
This evaporator fan motor assembly is just over three inches long. It is made of both metal and plastic, and is made up of black, white, and metalllic pieces.
On Order

$145.05
This is an authentic OEM replacement part. This temperature control thermostat is used in refrigerators. This thermostat cycles on and off regularly to help regulate the temperature inside your fridge...
Special Order

$71.11
This is an OEM part sourced directly from the manufacturer. This defrost heater is designed for use in refrigerators. The defrost heater is one of three components that helps to regulate the temperatu...
Special Order

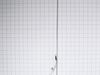
This is an authentic OEM replacement part. This defrost evaporator fan is commonly used in refrigerators and freezers. When the defrost heater is at work melting frost on the evaporator coils the wate...
No Longer Available

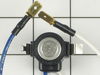
This is an authentic OEM replacement part. This defrost thermostat is designed for used with refrigerators. When evaporator coils start building up frost the defrost heater kicks in to warm them up an...
Special Order

This is an OEM part sourced directly from the manufacturer. This door gasket is used on the fresh food portion of your refrigerator. The gasket is installed on the inside edge of the door, it creates ...
No Longer Available

This shelf fits on top of a refrigerator's two bottom side by side crisper drawers.
No Longer Available

This is the most shallow drawer in your refrigerator and is generally used to hold your meat/deli foods.
No Longer Available

$130.05
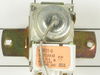
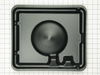
This device acts like a clock. It continually advances and alternates between activating the cooling cycle and the defrost heater.
In Stock
Order now and your part arrives by Aug 6
Common Problems and Symptoms for HMG191657
Viewing 5 of 5Fridge too warm
Fixed by these parts
How to fix it
Noisy
Fixed by these parts
How to fix it
Freezer section too warm
Fixed by these parts
How to fix it
Fridge too cold
Fixed by these parts
How to fix it
Leaking
Fixed by these parts
How to fix it


Keep searches simple. Use keywords, e.g. "leaking", "pump", "broken" or "fit".
- Customer:
- Paul from Millboro, VA
- Parts Used:
- WP68601-6
- Difficulty Level:
- A Bit Difficult
- Total Repair Time:
- 30 - 60 mins
- Tools:
- Screw drivers, Wrench set
Thermostat ceased to function. Fridge very cold.
I removed control knobs and a couple of screws and forced the assembly down enough to remove the old thermostat, and insert the new one. Lucky me it was a identical replacement item. Job took about an hour.
Was this instruction helpful to you?
Thank you for voting!
- Customer:
- chuck from dudley, NC
- Parts Used:
- WP60106-35
- Difficulty Level:
- Very Difficult
- Total Repair Time:
- More than 2 hours
- Tools:
- Pliers, Screw drivers, Socket set
freezer would not keep food frozen
First you must unplug the refrigerator, then remove the top hinge and freezer door, then you must remove the middle hinge to remove the refrigerator door, after that there are 4 screws located in the refrigerator compartment that must be removed that are holding the plastic control knob trim in place. When you remove these screws and drop
... Read more
the trim piece you can unplug the wiring on it, to completly remove it, next right above the plastic trim previously removed there is a metal trim with 3 screws holding it in place they will be removed now. Now you need to remove all of the shelving in the freezer compartment these pieces will just snap out , at the lower left and right sides of the freezer compartment there are two plastic tips that are attached to the main plastic body of this compartment they will need to be snapped out from behind the metal body of the refrigerator this can be done with a flat head screwdriver. Now pull straight out on the plastic body and it should come out , this will expose an insulating cover over the freezer coil where the defrost heater is located,if this is covered with ice you will need a heat gun which is a overgrown hair dryer basically. To melt the ice you will have to remove a insulating cover that is located behind the previously removed front metal trim it will come out by gently snapping it out of place, use caution during this step so not to break the cover in half. This will expose the front of the freezer coil and you can now use the heat gun to melt the ice, keep a check on the drain pan beneath the refrigerator as it will have to be emptied depending on the amount of ice build up. As the ice melts it should release the top cover of the coil and this will lift out of place also again use caution when removing the cover. With the coil exposed melt the remaining ice, if you look in the coil you will see the defrost heater, if the glass tube on the heater is broken please use extreme caution so you will not get cut by it , now you can unplug each wire from each side of the heater you may need a pair of pliers for this. when the wires are unplugged you can now lift out the bad heater again use caution if the glass is broken. There is a gaurd over the heater that will have to be removed by sliding it off the end wires when you have this off, slide it over the wires on the new element, now gently install the new heater back in the coil reconnect the 2 end wires and make sure they are connected good. you can now assemble all of the covers and parts in the reverse order you removed them, when assenbly is complete plug the refrigerator back in and in about three hours or so you should here the fan and compressor stop and the unit should go into a defrost cycle during this you should here the water running to the drain pan as it melts.
Read less
Was this instruction helpful to you?
Thank you for voting!
- Customer:
- BettyJo from Culpeper, VA
- Parts Used:
- WP70111-108
- Difficulty Level:
- Really Easy
- Total Repair Time:
- Less than 15 mins
door shelf retainer bars were broken
I received the door shelf bars. They were 26 inches. I used a hack saw and cut them to 22 inches. Put them on.
Perfect fit!!
Perfect fit!!
Was this instruction helpful to you?
Thank you for voting!