


Models
>
RBD306PDB4
RBD306PDB4 Whirlpool Wall Oven
Jump to:
Find Part by Name
Keep searches simple, eg. "belt" or "pump".
Diagrams for RBD306PDB4
Viewing 5 of 5


Keep searches simple, eg. "belt" or "pump".

$102.54
The glass panel on the door of your range allows you to see your food as it is being cooked in the oven. If it has become damaged, broken, or so grimy that it is beyond cleaning, it should be replaced...
In Stock
Order now and your part arrives by Apr 9

$63.68
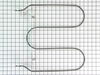
The bake element is located in the bottom of the oven and is used to heat the oven for cooking and baking. If the element is not heating up, providing little or inconsistent heat, or is getting too ho...
In Stock
Order now and your part arrives by Apr 9

$81.65
This chrome oven rack is a genuine replacement component designed to fit a variety of standard ovens. Measuring approximately 24.76 inches wide by 15.78 inches deep, it provides a stable surface for b...
In Stock
Order now and your part arrives by Apr 9

$11.98
This 18 ml bottle of white appliance touch-up paint is used to cover scratches or marks on your appliance. The white touch-up paint can be used on refrigerators, microwaves, ranges, clothes dryers, an...
In Stock
Order now and your part arrives by Apr 9

$7.60
This is a multi-use screw mostly used in dryers. It has a diameter of #10, length of one inch, and thread size of 16. Remember to follow safety practices and instructions provided in the manufacturer ...
In Stock
Order now and your part arrives by Apr 9

In Stock
Order now and your part arrives by Apr 9

On Order
 – Part Number: W11675844")
$46.07
This part is the replacement door gasket for your oven. It is made of gray rubber and is sold individually. The door gasket runs along the circumference of the oven door and creates a seal that insula...
In Stock
Order now and your part arrives by Apr 9

In Stock
Order now and your part arrives by Apr 9

In Stock
Order now and your part arrives by Apr 9

In Stock
Order now and your part arrives by Apr 9

In Stock
Order now and your part arrives by Apr 9
Questions and Answers
We're sorry, but our Q&A experts are temporarily unavailable.
Please check back later if you still haven't found the answer you need.
Common Problems and Symptoms for RBD306PDB4
Viewing 6 of 6Element will not heat
Fixed by these parts

How to fix it
Little to no heat when baking
Fixed by these parts
How to fix it
Oven not heating evenly
Fixed by these parts

How to fix it
Door won’t close
Fixed by these parts

How to fix it
Little to no heat when broiling
Fixed by these parts
How to fix it
Will Not Start
Fixed by these parts
How to fix it


")


Keep searches simple. Use keywords, e.g. "leaking", "pump", "broken" or "fit".
- Customer:
- Robert from Wildwood, MO
- Parts Used:
- WP4449259
- Difficulty Level:
- Easy
- Total Repair Time:
- 30 - 60 mins
- Tools:
- Screw drivers
Broke the glass panel inside the oven door -- dropped a baking dish on the glass!
Easily removed the door from the oven by releasing clips attached to the door hinge -- very nicely engineered. Removed about 6 philips head screws to allow the door assembly to be taken apart for access to the glass. Lifted out the broken glass, cleaned the inside of the door, installed the new glass, reassembled the door (a two minute
... Read more
project), and reattached the door to the oven. Cleaning the inside of the door took longer than the actual repair!
Read less
Was this instruction helpful to you?
Thank you for voting!
- Customer:
- Daniel from Cheraw, SC
- Parts Used:
- WPW10207397
- Difficulty Level:
- Really Easy
- Total Repair Time:
- Less than 15 mins
- Tools:
- Screw drivers
I broke the Bake Element while cleaning the oven.
I removed the two screws that held the bake element in place. Next I removed the Bake Element. I had to unscrew the oven to go behind it because when one piece off of the element broke, it slide back behind the oven. I pushed the wire back thru the piece holes, connected the Element, and pushed the element with the wires back through the
... Read more
holes. I rescrewed the element in place and the oven. PartSelect helped me to save this year's Christmas.
Read less
Was this instruction helpful to you?
Thank you for voting!
- Customer:
- James from Renton, WA
- Parts Used:
- WP4449259
- Difficulty Level:
- Easy
- Total Repair Time:
- 30 - 60 mins
- Tools:
- Screw drivers
Cracked the inner door glass by wiping with wet rag when hot
Removed the oven door by following the straightforward instructions in the user's manual. Removed philips head screws to take the door assembly apart. Removed clips holding the two inner door glass plates, and the two plates. Removed the clamp holding the broken glass plate, then the glass and associated glass fragments. Then cleaned
... Read more
and re-installed the three glass plates and their clamps in reverse order. Re-assembled the door and re-attached to the oven. Only cautionary note is to be careful when removing, handling and re-installing the various glass plates. Watch out for fragments from the broken plate; they can cut you and/or fall on the floor.
Read less
Was this instruction helpful to you?
Thank you for voting!