


Models
>
JDPSG244LS1
JDPSG244LS1 Maytag Dishwasher
Jump to:
Find Part by Name
Keep searches simple, eg. "belt" or "pump".
Diagrams for JDPSG244LS1
Viewing 9 of 9


Keep searches simple, eg. "belt" or "pump".

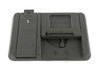
$15.26
The mounting bracket is used to secure the top part of your dishwasher to the underside of your counter or cabinet. If you have solid surface counters (granite, quartz, etc.) you will likely need to s...
In Stock
Order now and your part arrives by Mar 28

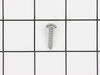
$7.60
This hose clamp extends from half an inch to an inch in diameter. It is made entirely of metal and is intended for use with Maytag brand washing machines.
In Stock
Order now and your part arrives by Mar 28

$11.98
This 18 ml bottle of white appliance touch-up paint is used to cover scratches or marks on your appliance. The white touch-up paint can be used on refrigerators, microwaves, ranges, clothes dryers, an...
In Stock
Order now and your part arrives by Mar 28

In Stock
Order now and your part arrives by Mar 28

In Stock
Order now and your part arrives by Mar 28

In Stock
Order now and your part arrives by Mar 28

In Stock
Order now and your part arrives by Mar 28

In Stock
Order now and your part arrives by Mar 28

$22.91
Includes power cord and all necessary parts needed for complete installation of cord.
In Stock
Order now and your part arrives by Mar 28

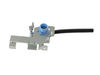
$56.24
The water inlet valve assembly (part number W11434044) supplies water to the dishwasher. It includes the valve, inlet hose, and hose clamp.
In Stock
Order now and your part arrives by Mar 28

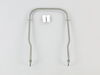
$66.86
Improve your dishwasher’s cleaning efficiency with this genuine heating element, which warms water during key cycles to help remove food residue and stains. Located beneath the lower rack at the botto...
In Stock
Order now and your part arrives by Mar 28

In Stock
Order now and your part arrives by Mar 28
Questions and Answers
We're sorry, but our Q&A experts are temporarily unavailable.
Please check back later if you still haven't found the answer you need.
Common Problems and Symptoms for JDPSG244LS1
Viewing 10 of 10Leaking
Fixed by these parts


How to fix it
Door latch failure
Fixed by these parts


How to fix it
Not cleaning dishes properly
Fixed by these parts

How to fix it
Will not fill with water
Fixed by these parts
How to fix it
Door won’t close
Fixed by these parts

How to fix it
Not draining
Fixed by these parts


How to fix it
Will not dispense detergent
Fixed by these parts
How to fix it
Not drying dishes properly
Fixed by these parts
How to fix it
Will Not Start
Fixed by these parts

How to fix it
Will not drain
Fixed by these parts
How to fix it


Keep searches simple. Use keywords, e.g. "leaking", "pump", "broken" or "fit".
- Customer:
- Judith from Essex, MA
- Parts Used:
- WP8269145
- Difficulty Level:
- Easy
- Total Repair Time:
- 15 - 30 mins
- Tools:
- Screw drivers
Lost dishwasher brackets
I called an experienced plumber, who balanced and installed my new dishwasher properly, using the brackets I ordered from Parts Select, after an INEXPERIENCED plumber had tossed the factory-provided mounting brackets out with the shipping carton. Relief!
Was this instruction helpful to you?
Thank you for voting!
- Customer:
- Scott from ISLE, MN
- Parts Used:
- W11537778
- Difficulty Level:
- Easy
- Total Repair Time:
- 30 - 60 mins
- Tools:
- Screw drivers, Wrench (Adjustable)
Leaking Dishwasher
After pulling the dishwasher out, I was able to determine the leak was occurring around the plastic nuts on the end of the heating element. I removed the heating element and saw that even though there were washers on the ends that protruded through the backside of the machine, they really weren't sealing the holes the element was sticking
... Read more
through. Looking at YouTube videos on the installation procedure, I noticed the element being installed had a sort of metal grommet permanently affixed to each end and the rubber washers were between the grommet and the dishwasher body. I ordered the new part and saw this to be when I received the new part. This grommet allowed the washer to seal the hole, once the plastic nuts were installed on the backside of the dishwasher. This seems to have stopped the leak. I don't know how the original part ever worked correctly, since the washers freely sat on the element with nothing to force them up against the body of the dishwasher and seal the holes. It may have been leaking long before I discovered the problem.
Read less
Was this instruction helpful to you?
Thank you for voting!
- Customer:
- Michelle from Richardson, TX
- Parts Used:
- 72017
- Difficulty Level:
- Really Easy
- Total Repair Time:
- Less than 15 mins
Scratches in Surface
This product comes in a bottle with a brush like Liquid Paper. It goes on incredibly easy. A second coat might be needed. I wanted to prevent rust from setting in so I covered the scratches and dings. The paint is a little brighter since my washer is 10 years old but it still looks great.
Was this instruction helpful to you?
Thank you for voting!