


Models
>
7751
7751
Jump to:
Find Part by Name
Keep searches simple, eg. "belt" or "pump".
Models for 7751
Click on the best match to narrow your results.
- 7751 Norge Dryer (DRYER)
- 7751 (Type 3) Porter Cable Electric Drill (Hammer Drill)
- 7751 (Type 1) Porter Cable Electric Drill (Hammer Drill)
- 7751 (Type 2) Porter Cable Electric Drill (Hammer Drill)
- 7751 Milwaukee Drill
- 77515TA (400000000 - 999999999) Toro Lawn Tractor (Mr 5075 T 50 Inch Timecutter Max Zero-Turn Mower)
- 7751688336 Beko Cooktop (30 Inch Gas Built-In Cooktop Bctg30500ss)
- 7751688338 Beko Range (Prgrt30500ss 30-Inch Stainless Steel Pro-Style Built-In Gas)
- 7751688350 Blomberg Cooktop (36 Inch Gas Cooktop Ctg36500ss)
- 7751688351 Blomberg Cooktop (30 Inch Gas Cooktop Ctg30500ss)
- 7751688359 Beko Cooktop (36 Inch Gas Built-In Cooktop Bctg36500ss)
- 7751688361 Blomberg Cooktop (30 Inch Gas Cooktop Ctg30400ss)
- 7751A71 Norge Dryer (DRYER)
- 7751A77 Norge Dryer (DRYER)
Exact Part matches for your search term
Viewing 4 of 4
Special Order
Keep searches simple, eg. "belt" or "pump".

$15.26
This multi rib belt is an OEM replacement part for a dryer. It attaches to the drum, idler pulley, and motor pulley, and is responsible for spinning the drum. Over time, the belt can become frayed, br...
In Stock
Order now and your part arrives by Jun 20

$52.50
This dryer lint filter is a critical component designed to trap lint and debris from the exhaust air during drying cycles. Positioned within the lint trap housing, it helps maintain proper airflow, re...
In Stock
Order now and your part arrives by Jun 20

$45.00
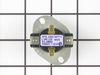
This kit comes with three separate thermal fuses and is usually used with clothes dryers that have a fan mounted on the motor shaft. Included within this kit is the high limit (Limit: 258) the gas hig...
In Stock
Order now and your part arrives by Jun 20

In Stock
Order now and your part arrives by Jun 20

Ensure your dryer performs at its best with this 4750-watt, 240-volt heating element kit. It’s responsible for producing the heat needed to dry laundry effectively. Common signs of a failing element i...
In Stock
Order now and your part arrives by Jun 20

This cord protector or reliever fits the end of your cord to protect the base of the cord from getting damaged and bent. If your cord is not aligned and protected it can become a safety hazard. If you...
No Longer Available

$7.60
This is a multi-use screw and can be used on a variety of appliances. The measurements of the screw are: 8/18 x 3/8. *Please note: the screw is sold individually. Refer to the manual provided by the m...
In Stock
Order now and your part arrives by Jun 20

$6.90
This is a self threading bolt designed for snowblowers. This OEM part is sourced directly from the original manufacturer. It is sold individually and has a thread of 5/16-inches. The self threading bo...
In Stock
Order now and your part arrives by Jun 20

$6.51
This is a lock nut and it is used in a variety of outdoor lawn equipment. This lock nut has a nylon insert, making it a nyloc nut. The insert allows the nut to be resistant to turning caused by strong vibrations.
In Stock
Order now and your part arrives by Jun 20

$11.98
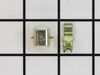
This blower wheel clamp is less than an inch long and is used for some clothes dryers to hold the blower wheel firmly in place. This green clamp is made of metal.
In Stock
Order now and your part arrives by Jun 20

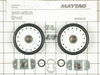
Included in this rear drum support roller kit are 4 screws, 1 spacers, 2 washers, 2 retaining rings, 2 rear rollers, and 2 cylinder support shafts.
*** Note: Per manufacturer this kit has been upd...
No Longer Available

$30.75
This is a genuine part that is sourced directly from the original equipment manufacturer for use with Toro and Lawn Boy garden tractors and riding lawn mowers. The pulley-idler applies tension on the ...
In Stock
Order now and your part arrives by Jun 20
Common Problems and Symptoms for 7751
Viewing 12 of 12Noisy
Fixed by these parts


How to fix it
Drum Not Spinning
Fixed by these parts
How to fix it
Door won’t close
Fixed by these parts
How to fix it
Too hot
Fixed by these parts


How to fix it
Won’t Start
Fixed by these parts
How to fix it
Not Heating
Fixed by these parts
How to fix it
Heat stays on after drum has stopped
Fixed by these parts
How to fix it
Door Pops Open
Fixed by these parts
How to fix it
Will Not Start
Fixed by these parts
How to fix it
Marks left on clothes
Fixed by these parts

How to fix it
Will not agitate
Fixed by these parts

How to fix it
Touchpad does not respond
Fixed by these parts
How to fix it


Keep searches simple. Use keywords, e.g. "leaking", "pump", "broken" or "fit".
- Customer:
- Jane from Grand Forks, ND
- Parts Used:
- WP53-0918
- Difficulty Level:
- Really Easy
- Total Repair Time:
- Less than 15 mins
lint filter broke
I pulled out the broken lint filter and put the new one back in, real easy. I am so happy with the prompt delivery I got from PartsSelect.com. I ordered on a Monday and and it was delivered on a Wednesday
Was this instruction helpful to you?
Thank you for voting!
- Customer:
- Ronald from Fredericksburg, VA
- Parts Used:
- LA-1053
- Difficulty Level:
- Easy
- Total Repair Time:
- 30 - 60 mins
- Tools:
- Nutdriver, Pliers, Screw drivers
Electric dryer would not heat - Thermal fuses - $25 fix - I love DIY
1. Unplug dryer from power outlet
2. Lift dryer top from front (hinged in rear). Just friction holding top down. Use flat scewdriver wrapped in cloth to help lift.
3. Locate heating element - rear top behind drum
4. Unplug red wires to the high limit thermal fuse
5. Unplug red wires to the heating element
6. Unlug ... Read more white wires to the high limit fuse
7. Remove high limit thermal fuse
8. Remove heating element
9. Remove high limit fuse
10 Clean heating box
Installation is reverse order but do the following first!
Clean lint trap - Remove front of dryer
1. Unplug white door switch wires. inside front top right
2. remove two screws securing the front of dryer - inside front top left and top right. Front of dryer is hinged at bottom
3. Clean all the lint you can find. If you have never cleaned out the lint, there might be a lot and the cause of over heating (shorting fuse life). Add to your yearly things to do list.
4. While your at it check the alignment of the plastic glides the drum sits on.
5. Also check the foam gasket between the fan housing and lint trap. Mine was off a bit. Realigned with doubled sided tape.
Read less
Was this instruction helpful to you?
Thank you for voting!
- Customer:
- Brianna from Littleton, CO
- Parts Used:
- LA-1044
- Difficulty Level:
- Really Easy
- Total Repair Time:
- Less than 15 mins
- Tools:
- Socket set
Dry stopped heating - still had good air flow
I was about to purchase a new dryer because of the age of my dryer and not wanting to hire someone to fix it. After a little web research, I saw several do-it -yourself stories indicating this was a very easy repair.
This was an extremely easy repair and it save me lots of $$:
(1) Disconnected power
(2) Opened the ... Read more top of the dryer
(3) Disconnected wires to temperature sensor.
(4) Used a 1/2" socket wrench with extension and a drill to remove 2 screws holding down the temperature sensor
(5) Removed 1 screw holding down the heating element.
(6) Removed wires connected to heating element and pulled out old element.
(7) Reassembled new element.
(8) Turned on empty dryer for 30 minutes to burn off smell from the new element.
Worked like a charm!
Read less
Was this instruction helpful to you?
Thank you for voting!