


Models
>
6540A
6540A
Jump to:
Find Part by Name
Keep searches simple, eg. "belt" or "pump".
Models for 6540A
Click on the best match to narrow your results.
- 6540A (REV) Admiral Refrigerator (REFRIGERATOR)
- 6540A (REV K) Norge Washer (WASHER)
- 6540A (REV J) Norge Washer (WASHER)
- 6540A (REV D) Norge Washer (WASHER)
- 6540A (REV F) Norge Washer (WASHER)
- 6540A (REV A) Norge Washer (WASHER)
- 6540A (REV E) Norge Washer (WASHER)
- 6540A (REV G) Norge Washer (WASHER)
- 6540A (REV H) Norge Washer (WASHER)
- 6540A Norge Washer (WASHER)
- 6540A (REV B) Norge Washer (WASHER)
- 6540A (REV C) Norge Washer (WASHER)
- 6540A REV A Norge Washer (Norge Washing Machine Model 6540A REV A (6540AREVA) Parts)
- 6540A REV B Norge Washer (Norge Washing Machine Model 6540A REV B (6540AREVB) Parts)
- 6540A REV C Norge Washer (Norge Washing Machine Model 6540A REV C (6540AREVC) Parts)
- 6540A REV D Norge Washer (Norge Washing Machine Model 6540A REV D (6540AREVD) Parts)
- 6540A REV E Norge Washer (Norge Washing Machine Model 6540A REV E (6540AREVE) Parts)
- 6540A REV F Norge Washer (Norge Washing Machine Model 6540A REV F (6540AREVF) Parts)
- 6540A REV G Norge Washer (Norge Washing Machine Model 6540A REV G (6540AREVG) Parts)
- 6540A REV H Norge Washer (Norge Washing Machine Model 6540A REV H (6540AREVH) Parts)
- 6540A REV J Norge Washer (Norge Washing Machine Model 6540A REV J (6540AREVJ) Parts)
- 6540A REV K Norge Washer (Norge Washing Machine Model 6540A REV K (6540AREVK) Parts)
Keep searches simple, eg. "belt" or "pump".

$96.81
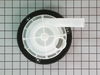
If your freezer has stopped making ice cubes, it may be time to replace your ice maker. Normal wear and tear, or accidental damage may be the cause of this. This model includes the control device and ...
In Stock
Order now and your part arrives by Apr 2

$16.35
This is a V-style drive belt that measures approximately 51-inches long and 3/8-inches wide. This part connects the drive motor to the drive system in the washer to turn the basket. It is prone to wea...
In Stock
Order now and your part arrives by Apr 2

$14.16
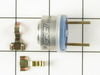
This lid hinge in an inch and a half long and is used for some washing machines. It is all white in color and it is made entirely of plastic.
In Stock
Order now and your part arrives by Apr 2

$19.63
This lid hinge pin is just over an inch long. It is all white in color and is made entirely of plastic. Sold individually.
In Stock
Order now and your part arrives by Apr 2

$99.17
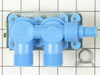
This pump has 2 ports. This pump helps expel water from the washing machine and is activated after the spin speed is maintained for a specific period of time.
In Stock
Order now and your part arrives by Apr 2

$10.88
This snubber ring fits washers and is located between the leg and dome assembly. The ring has a diameter of 9 inches. It is used to reduce noise and vibration for stability when the washer is operatin...
In Stock
Order now and your part arrives by Apr 2

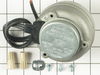
This condenser fan motor is used with frost-free refrigerators with a condenser coil. When the compressor runs, so does this fan, circulating air through the refrigerator grille, cooling the compresso...
In Stock
Order now and your part arrives by Apr 2

In Stock
Order now and your part arrives by Apr 2

$21.82
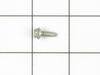
This is a screw and it is made for multiple appliances in your home. This model is called a sheet metal screw because it has sharp points, and the threads are closer together. This screw is designed t...
In Stock
Order now and your part arrives by Apr 2

Also known as Thrust Bearing Kit. This kit includes the pulley, washer, thrust bearing, 2 upper race washers and 1 lower race washer. These parts are NOT available separately - they are ONLY availab...
In Stock
Order now and your part arrives by Apr 2

$7.60
This is a multi-use screw and can be used on a variety of appliances. The measurements of the screw are: 8/18 x 3/8. *Please note: the screw is sold individually. Refer to the manual provided by the m...
In Stock
Order now and your part arrives by Apr 2

$7.60
This hose clamp extends from half an inch to an inch in diameter. It is made entirely of metal and is intended for use with Maytag brand washing machines.
In Stock
Order now and your part arrives by Apr 2
Common Problems and Symptoms for 6540A
Viewing 26 of 26Leaking
Fixed by these parts


How to fix it
Ice maker not making ice
Fixed by these parts

How to fix it
Burning smell
Fixed by these parts


How to fix it
Will not drain
Fixed by these parts
How to fix it
Fridge too warm
Fixed by these parts


How to fix it
Lid or door won’t close
Fixed by these parts


How to fix it
Spins slowly
Fixed by these parts

How to fix it
Freezer section too warm
Fixed by these parts
How to fix it
Ice maker won’t dispense ice
Fixed by these parts

How to fix it
Will not agitate
Fixed by these parts
How to fix it
Noisy
Fixed by these parts
How to fix it
Will Not Start
Fixed by these parts
How to fix it
Freezer not defrosting
Fixed by these parts
How to fix it
Fridge runs too long
Fixed by these parts
How to fix it
Fridge and Freezer are too warm
Fixed by these parts
How to fix it
Ice maker dispenses too much ice
Fixed by these parts
How to fix it
Spinning Issues
Fixed by these parts
How to fix it
Shaking and Moving
Fixed by these parts
How to fix it
Ice maker dispenses too little ice
Fixed by these parts
How to fix it
No hot or cold water
Fixed by these parts
How to fix it
Frost buildup
Fixed by these parts
How to fix it
Won’t start
Fixed by these parts
How to fix it
Door latch failure
Fixed by these parts
How to fix it
Freezer too cold
Fixed by these parts
How to fix it
Too warm
Fixed by these parts
How to fix it
Draining Issues
Fixed by these parts
How to fix it


Keep searches simple. Use keywords, e.g. "leaking", "pump", "broken" or "fit".
- Customer:
- Bernie from Diamond Bar, CA
- Parts Used:
- D7824706Q
- Difficulty Level:
- Easy
- Total Repair Time:
- 30 - 60 mins
- Tools:
- Nutdriver
Icemaker producing few or no cubes and often leaving "kling-ons" on ice tray
Interior surface of ice tray felt rough & flaky (coating deteriorated) so cubes would not release.
Unplug appliance.
Remove timer cover by hand pressure @ edge.
Remove single attachment screw & bracket at lower front of icemaker.
Disconnect wiring harness from socket @ rear of compartment.
Tricky part was determin ... Read more ing what type of connection held the other two attachment points along the long edge of the icemaker. I did not have repair manual or useful drawing but looked @ PartsDirect pic of side brackets & used a small mirror to confirm that mine were also some sort of "snap in" attachment.
Remove icemaker unit by pushing upward and outward on the unit. I takes a good bit of pressure and will pop loose, but be careful not to break attachment bracket from freezer wall.
Scavenge shut off bar and wiring harness from old icemaker once you have it out & attach to new one before installing it back in freezer.
Again, you might find a mirror useful to align those pesky snap-in brackets with the new unit.
Since you probably kept your freezer running while waiting for the part, the plastic snap-ins will be cold and brittle. I warmed them up first by applying a dampened cloth heated in the microwave to make them a little more pliable.
A good push of the new unit towards the snap-ins along with some upward force will get it stable.
Reattach the metal screw in bracket & connect the wiring harness to rear plug... and don't forget to plug the whole thing back in.
It will take awhile for the first batch of cubes dump as the timer may need to cycle completely around to get to the fill cycle... be patient.
Dump the first couple of batches of cubes just to make sure you're free of any residue.
Read less
Was this instruction helpful to you?
Thank you for voting!
- Customer:
- David from Boca Raton, FL
- Parts Used:
- WP35-6465
- Difficulty Level:
- Easy
- Total Repair Time:
- Less than 15 mins
- Tools:
- Screw drivers, Wrench set
washing machine was making alot of noise
I found the water pump bearings were going bad from humidity. I replaced the pump with a new one and it runs quiet again.
Was this instruction helpful to you?
Thank you for voting!
One of the plastic hinge pins brroke
I used a flat screw driver to push in on the releases so I could raise the top of the machine. I then used a torx tool to remove both parts of the hinge, and then used a #2 phillips screw driver, on the new screws I'd also ordered, to re-attach both of the hinge parts. Every thing went just as anticipated.
Was this instruction helpful to you?
Thank you for voting!