


Models
>
1635
1635
Jump to:
Find Part by Name
Keep searches simple, eg. "belt" or "pump".
Models for 1635
Click on the best match to narrow your results.
- 16350 (9000001-9999999 - 1979) Toro Lawn Mower (Lawn Mower)
- 16350 (1000001-1999999 - 1981) Toro Lawn Mower (Lawn Mower)
- 16350 (0000001-0999999 - 1980) Toro Lawn Mower (Lawn Mower)
- 16350 (9000001 - 9999999) Toro Lawn Mower (Lawnmower)
- 16350 (0000001 - 0999999) Toro Lawn Mower (Lawnmower)
- 16350 (1000001 - 1999999) Toro Lawn Mower (Lawnmower)
- 16350 ( 000000001 - 000999999 1980 ) Toro Lawn Mower (Walk-Behind Mower)
- 16350-1 General Electric Range
- 1635000 Litton Microwave
- 1635001 Litton Microwave
- 16358-1 General Electric Range
Exact Part matches for your search term
Viewing 2 of 2
Keep searches simple, eg. "belt" or "pump".

$7.60
This is a multi-use screw and can be used on a variety of appliances. The measurements of the screw are: 8/18 x 3/8. *Please note: the screw is sold individually. Refer to the manual provided by the m...
In Stock
Order now and your part arrives by Apr 9

$6.51
This is a lock nut and it is used in a variety of outdoor lawn equipment. This lock nut has a nylon insert, making it a nyloc nut. The insert allows the nut to be resistant to turning caused by strong vibrations.
In Stock
Order now and your part arrives by Apr 9

$6.51
This is a replacement screw, also known as a shear pin that is used in several pieces of outdoor power equipment. It is made of metal and is approximately 2 inches in length. It is a hex head screw an...
In Stock
Order now and your part arrives by Apr 9

$18.54
This is an OEM part sourced directly from the manufacturer. This white silicone adhesive caulk is commonly used on ranges, microwaves, and cooktops. This adhesive sealant works to form a bond between ...
In Stock
Order now and your part arrives by Apr 9

$6.51
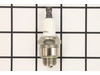
This is a spark plug and it is found in various lawn equipment. If your engine is not starting or running poorly, you may need to replace the spark plug. This part is a RJ9LM. Meaning, it is a resisto...
In Stock
Order now and your part arrives by Apr 9

$8.96
An authentic replacement part that is specially manufactured for use with Toro lawn mowers. This is the knob that is secured to the heigh-adjustment arm assembly, for correct location and uses make su...
In Stock
Order now and your part arrives by Apr 9

In Stock
Order now and your part arrives by Apr 9

$6.51
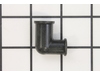
This is an OEM replacement part, sold individually. This Grommet is an elbow for the crankcase breather tube. These rubber elbows were just a convenient way to make a 90 degree bend back when they us...
In Stock
Order now and your part arrives by Apr 9

$6.51
This is a genuine manufacturer-sourced part which is specially designed for use with Toro snow throwers. It is a standard hardware which is utilized to secure the shoulder screw. Please make sure to r...
In Stock
Order now and your part arrives by Apr 9

In Stock
Order now and your part arrives by Apr 9


$6.51
This is an authentic Toro replacement part, sourced from the original manufacturer for use with snowthrowers. The metal washer is commonly used to disperse pressure put on the auger housing by the nut...
In Stock
Order now and your part arrives by Apr 9
Common Problems and Symptoms for 1635
Viewing 4 of 4Leaking
Fixed by these parts

How to fix it
Will Not Start
Fixed by these parts
How to fix it
Element will not heat
Fixed by these parts
How to fix it
No heat
Fixed by these parts

How to fix it
Keep searches simple. Use keywords, e.g. "leaking", "pump", "broken" or "fit".
- Customer:
- JoAnn from Auburn, WA
- Parts Used:
- WB2X2058
- Difficulty Level:
- Easy
- Total Repair Time:
- 15 - 30 mins
- Tools:
- Screw drivers
The gasket needed to be replaced in top oven, it was brittle and broken.
We took out the philips screws on the right and left side of inside of the oven and two hex head screws on the clip on the top of the oven in the front. Then using a slot screw driver pryed the oven liner out enough to remove old gasket and replace the new gasket. We did see in some online directions that we were suppose to remove enti
... Read more
re oven from cabinet and loosen bolts in the back. But, we were able to get enough space to get the old gasket out and new one installed. We did use a 1/4" thick piece of wood on face of oven to prevent any denting of oven when prying out the liner of the oven.
Read less
Was this instruction helpful to you?
Thank you for voting!
- Customer:
- Karen from Yakima, WA
- Parts Used:
- WB2X2058
- Difficulty Level:
- Really Easy
- Total Repair Time:
- 15 - 30 mins
- Tools:
- Screw drivers
Oven Gasket Worn and Brittle
Took oven door off. Removed screws that were holding oven insert. Pulled out oven insert. Removed old gasket. Installed new gasket. Push oven insert back. Installed screws. Replaced oven door.
Was this instruction helpful to you?
Thank you for voting!
- Customer:
- Dorothy from Santa Rosa, CA
- Parts Used:
- WB2X2058
- Difficulty Level:
- A Bit Difficult
- Total Repair Time:
- 15 - 30 mins
- Tools:
- Screw drivers
Gasket around rim of oven broke while cleaning
Son-in-law unscrewed oven compartment; broken gasket was easy enough to remove and new gasket easy to replace; only problem was oven door would not shut tight. Tried shoving gasket harder into groove, tried turning on oven and heating new gasket to see if it would soften. Finally got it to close by pushing hard on left side of oven and
... Read more
inside light would at least go off and stay off.
Read less
Was this instruction helpful to you?
Thank you for voting!