


Models
>
FS17
FS17
Jump to:
Find Part by Name
Keep searches simple, eg. "belt" or "pump".
Models for FS17
Click on the best match to narrow your results.
- FS17 (P1302105M) Menumaster Microwave
- FS17-P1302105M Amana Microwave (Amana Microwave Model FS17-P1302105M (FS17P1302105M, FS17 P1302105M) Parts)
- FS1748LS LG Range (LG Range/Stove/Oven Model FS1748LS Parts)
- FS1748LS (ASTLLGA) LG Range (Model Lg Fs1748ls.Astllga – Common Parts And Diagrams)
- FS1775LS (ABDLLGA) LG Range (Model Lg Fs1775ls.Abdllga – Common Parts And Diagrams)
- FS1775LS LG Range (LG Range/Stove/Oven Model FS1775LS Parts)
- FS1787SS LG Range (LG Range/Stove/Oven Model FS1787SS Parts)
- FS1787SS (AS1LSGN) LG Range (Model Lg Fs1787ss.As1lsgn – Common Parts And Diagrams)
- FS1787US (AB6LSTD) LG Range (Model Lg Fs1787us.Ab6lstd – Common Parts And Diagrams)
- FS1787US (ABDLSTD) LG Range (Model Lg Fs1787us.Abdlstd – Common Parts And Diagrams)
- FS1787US (AS6LSTD) LG Range (Model Lg Fs1787us.As6lstd – Common Parts And Diagrams)
- FS1787US LG Range (LG Range/Stove/Oven Model FS1787US Parts)
- FS17EVP (P1185902M) Menumaster Microwave (Commercial)
Keep searches simple, eg. "belt" or "pump".

$20.95
This is a screw and it is made for multiple appliances in your home. This model is called a sheet metal screw because it has sharp points, and the threads are closer together. This screw is designed t...
In Stock
Order now and your part arrives by Mar 22

$7.30
This is a multi-use screw and can be used on a variety of appliances. The measurements of the screw are: 8/18 x 3/8. *Please note: the screw is sold individually. Refer to the manual provided by the m...
In Stock
Order now and your part arrives by Mar 22

In Stock
Order now and your part arrives by Mar 22

$73.39
If your appliance isn’t heating or cooling the way it should, this temperature sensor might be the issue. Also known as a thermistor, it helps your appliance stay at the right temperature by working w...
In Stock
Order now and your part arrives by Mar 22

$7.30
This screw is a little under an inch long and is made of metal. It is used with a refrigerator's ice maker assembly. Sold individually.
In Stock
Order now and your part arrives by Mar 22

$91.95
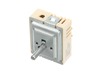
This rotary switch controls burner heat by adjusting power levels as you turn the knob. It’s a durable replacement for ranges with unresponsive or inconsistent burners. Be sure to confirm compatibility before installing.
In Stock
Order now and your part arrives by Mar 22

In Stock
Order now and your part arrives by Mar 22

In Stock
Order now and your part arrives by Mar 22

In Stock
Order now and your part arrives by Mar 22

In Stock
Order now and your part arrives by Mar 22

$91.95
Designed for use in electric ranges, this rotary switch controls the heat level of surface burners by regulating power flow. It allows for smooth temperature adjustments and consistent cooking. If you...
In Stock
Order now and your part arrives by Mar 22

In Stock
Order now and your part arrives by Mar 22
Common Problems and Symptoms for FS17
Viewing 8 of 8Element will not heat
Fixed by these parts

How to fix it
Little to no heat when baking
Fixed by these parts

How to fix it
Oven not heating evenly
Fixed by these parts
How to fix it
Oven is too hot
Fixed by these parts
How to fix it
Door won’t open after self cleaning cycle
Fixed by these parts
How to fix it
Won’t turn on
Fixed by these parts
How to fix it
Will Not Start
Fixed by these parts
How to fix it
No heat
Fixed by these parts

How to fix it
Keep searches simple. Use keywords, e.g. "leaking", "pump", "broken" or "fit".
- Customer:
- Barry from PIERRE, SD
- Parts Used:
- EAU62343001
- Difficulty Level:
- A Bit Difficult
- Total Repair Time:
- 30 - 60 mins
- Tools:
- Nutdriver, Screw drivers
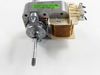
Convection Fan stopped working, would spin but not continuously on its own
Unplugged oven electric and turned gas off. Removed all back covers from the unit. Removed the cover on the inside covering the burner and fan in the back of the convection oven. Removed the nut securing the fan to motor shaft with helper holding the motor. Removed the three electrical wires attached to motor, making note where they go.
... Read more
Removed screws mounting the motor to oven. Removed motor cooling fan and shaft spacer from old motor. Fit in same orientation on new motor. Replace all parts in reverse order, restore gas and electric, turn on and test.
Read less
Was this instruction helpful to you?
Thank you for voting!
- Customer:
- Richard from CHESAPEAKE, VA
- Parts Used:
- MEE62385201
- Difficulty Level:
- Easy
- Total Repair Time:
- 30 - 60 mins
- Tools:
- Screw drivers
Hammer 1, Glass range top and heating element 0
Dropped a hammer on the range while removing a ceiling light. Viewed a How-To video on Google. Ordered the needed parts. Followed the steps from the How-To video. Reinstall was a bit tricky by myself - could have used an extra set of hands. I have a few words of caution:
1) Put something between the range top and range - like a ... Read more sheet or drop cloth - to prevent a dropped screw from falling into a crevice in the stove. I dropped a screw and was unable to retrieve it, even with a magnet.
2) Makes sure you remove all bumpers, screws, clips, etc. from the item being replaced and put them on the new item if the new item does not come with replacement bumpers, screws, etc.
Read less
Was this instruction helpful to you?
Thank you for voting!
- Customer:
- Jeffrey from CERRITOS, CA
- Parts Used:
- 4890W1N005L
- Difficulty Level:
- Really Easy
- Total Repair Time:
- 30 - 60 mins
- Tools:
- Screw drivers
Replace Inner Oven glass because it shattered
Go onto youtube, such as https://www.youtube.com/watch?v=-ITkrwhDNMQ and watch similar videos for DYI. The process is very similar to other models.
Once the door is removed, place oven door on a towel or soft place so it does not scratch the door. Unscrew the screws and make sure you notice where each screw goes, so you know ... Read more the process of where each screw goes when you re-assemble.
Once the inner cover is removed, remove the insulation, too so you don't damage it. Use Wet/Dry Shop Vac to clean the shattered glass. (WORD OF ADVICE: I did not remove the insulation and the suction of the Shop Vac removed part of the insulation, so now instead of a quick turn around repair turns into a few weeks repair, because the insulation is on back order 10-14 days from the supplier. DON"T MAKE THE SAME MISTAKE!)
Once the glass has been removed, the new inner glass is replaced, begin by re-assemble the oven door with the correct screws and attached the oven door to the range.
Hope this helps
Read less
Was this instruction helpful to you?
Thank you for voting!