


Models
>
634
634
Jump to:
Find Part by Name
Keep searches simple, eg. "belt" or "pump".
Models for 634
Click on the best match to narrow your results.
- 634 Hoover Range Hood
- 634 (Type 1) Porter Cable Electric Drill (1/2IN Drill)
- 634 (Type 2) Porter Cable Electric Drill (1/2IN Drill)
- 634 (Type 3) Porter Cable Electric Drill (1/2IN Drill)
- 634 (590-634-100) Cub Cadet Lawn Tractor Accessories (Sub Frame)
- 634 Broan Bath & Ventilation Fan (Venting System)
- 634 (590100) Cub Cadet Lawn Tractor (634 Sub Frame 590-634-100)
- 6340 ( TYPE 1 F012634000 ) Bosch Cordless Drill (Drill)
- 6340 (TYPE 1 F012634000) Skil Electric Drill (TYPE 1 (F01200) Electric Drill)
- 6340 (SER 177-1001) Milwaukee Miter Saw (7-1/4" Miter Saw)
- 6340001 (2004) Weber Grill (Genesis Gold B NG SS Grill)
- 6343 Kenmore Toaster Oven (Kenmore 6343 Toaster Oven)
- 6343-01 Briggs and Stratton Charger (6343-01 - Battery Warmer)
- 6343D Makita Cordless Drill (Cordless Drill)
- 6343DWAE Makita Drill (Drill)
- 6343DWDE Makita Cordless Drill (Cordless Drill)
- 6345 (Type-2) Skil Drill (Skil 6345-Type-2 Parts)
- 6345-78 (TYPE 2 F01263453) Skil Electric Drill (Electric Drill)
- 6345-78 ( TYPE 2 F01263453K ) Bosch Cordless Drill (Drill)
- 63456-01 Dyson Fan (Support For Your Dyson Cool™ Tower Fan)
- 63458-01 (AM08) Dyson Fan (Support For Your Dyson Cool Am08 Pedestal Fan)
- 6346 (Type-1) Skil Drill (Skil 6346-Type-1 Parts)
- 6347B Frigidaire Washer (WASHER)
- 6347D Makita Drill (Drill)
- 6347DWDE Makita Cordless Drill (Drill)
- 6348A Frigidaire Washer (WASHER)
- 6349 Maytag Washer (MAYTAG AUTOMATIC WASHER)
- 63494 Craftsman Power Motor (Motor)
- 6349D Makita Drill (Drill)
- 6349DWDE Makita Cordless Drill (18V Cordless Drill)
Exact Part matches for your search term
Viewing 5 of 5 – Part Number: 634")
This part number matches the current model number 634
No Longer Available
Special Order
Special Order
Keep searches simple, eg. "belt" or "pump".

$27.56
This power cord is used for power tools and some of the following tools: electric drills, reciprocating saws, jig saws, biscuit joiners, and routers. The power cord is made for double insulated tools ...
In Stock
Order now and your part arrives by Apr 9

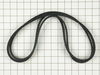
$33.20
Over time, the belts in your washer can either stretch out and sag, or become brittle and snap. When this happens, it can result in the belt losing its grip and will not be able to spin or drain the t...
In Stock
Order now and your part arrives by Apr 9

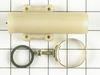
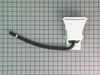
$12.08
This is a strain reliever for your power tools. It found at the meeting place between your cord, and the outer tool housing. The relief is an important part for your power tool because it protects you...
In Stock
Order now and your part arrives by Apr 9

$14.45
This CB430) Makita carbon brush set contains two individual carbon brushes. The set contains genuine Makita replacement parts, and comes packaged in a Makita retail box. This brush set will fit the Ma...
In Stock
Order now and your part arrives by Apr 9

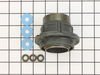
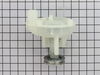
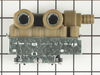
$105.88
This water inlet valve assembly is designed for use in washing machines and regulates the flow of both hot and cold water into the appliance during wash cycles. It ensures the correct amount of water ...
In Stock
Order now and your part arrives by Apr 9

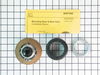
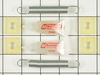
This kit comes with hub assembly, agitator seal and spanner nut. If your washer leaks once full (with or without clothes in it) or leaks during agitation, then you should replace the seal.
No Longer Available

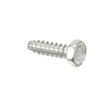
$21.82
This is a screw and it is made for multiple appliances in your home. This model is called a sheet metal screw because it has sharp points, and the threads are closer together. This screw is designed t...
In Stock
Order now and your part arrives by Apr 9

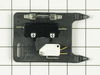
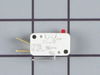
$22.91
This lid or door switch kit helps ensure your washer or dryer only runs when the door is properly closed. It’s a safety feature that prevents spills and keeps your appliance working as it should. The ...
In Stock
Order now and your part arrives by Apr 9

$7.60
This is a multi-use screw and can be used on a variety of appliances. The measurements of the screw are: 8/18 x 3/8. *Please note: the screw is sold individually. Refer to the manual provided by the m...
In Stock
Order now and your part arrives by Apr 9

$16.77
Genuine Porter Cable replacement part This brush is sold individually, 2 are needed for the tools shown below It is always best to replace both brushes, even if only one is worn. Worn brushes frequ...
On Order

$13.07
This part includes a caster with an insert for a grill. It consists of a plastic wheel and metal shaft. The caster measures approximately 2-15/16-inches in diameter and has a wheel-locking mechanism. ...
In Stock
Order now and your part arrives by Apr 9

$24.16
This is a Genuine Manufacturer Sourced replacement part used on a variety of Weber Grills. This is a Metal (Aluminum) assembly used to prevent drippings and food particles from marring your deck or patio.
In Stock
Order now and your part arrives by Apr 9
Common Problems and Symptoms for 634
Viewing 14 of 14Leaking
Fixed by these parts
How to fix it
Burning smell
Fixed by these parts
How to fix it
Will not drain
Fixed by these parts

How to fix it
Will not agitate
Fixed by these parts
How to fix it
Will Not Start
Fixed by these parts
How to fix it
Spins slowly
Fixed by these parts
How to fix it
No hot or cold water
Fixed by these parts

How to fix it
Noisy
Fixed by these parts

How to fix it
Spinning Issues
Fixed by these parts
How to fix it
Shaking and Moving
Fixed by these parts
How to fix it
Water Filling Issues
Fixed by these parts
How to fix it
Lid or door won’t close
Fixed by these parts

How to fix it
Won’t Start
Fixed by these parts
How to fix it
Noisy and Marks Left on Clothes
Fixed by these parts
How to fix it


Keep searches simple. Use keywords, e.g. "leaking", "pump", "broken" or "fit".
Drum would not drain and there was a banging noise when the drum spun
I removed the 2 phillips screws on the bottom of the front panel. Then checked around to find the belts were actually below the floor panel.
I pulled the washing machine away from the wall and tilted it bacwards and found the pump belt was off the pully and the drive belt was badly damaged. I replaced the 2 belts which took no tools ... Read more and about 3 minutes to accomplish then resecured the front panel, pushed back in place and leveled. Complete repair from diagnosis to back in operation took less than 15 minutes.
I pulled the washing machine away from the wall and tilted it bacwards and found the pump belt was off the pully and the drive belt was badly damaged. I replaced the 2 belts which took no tools ... Read more and about 3 minutes to accomplish then resecured the front panel, pushed back in place and leveled. Complete repair from diagnosis to back in operation took less than 15 minutes.
Read less
Was this instruction helpful to you?
Thank you for voting!
- Customer:
- douglas from bonita springs, FL
- Parts Used:
- 6-2095720
- Difficulty Level:
- A Bit Difficult
- Total Repair Time:
- 1- 2 hours
- Tools:
- Nutdriver, Pliers, Socket set
water leaking from around center shaft below fixed tub
My washer is 5 years old and water began to leak on the floor. I took off the front panel and filled the tub. Water did not leak immediately, but after the tub filled with about 3-4 inches of water, the water began to leak from a rubber washer between the fixed tub and the drive shaft. I looked online for exploded diagrams of Maytag wa
... Read more
shers, when I came across your site. By looking at your diagrams, I determined what parts I needed and ordered them. The parts arrived in 2 days, and I installed them. There were no leaks and it cost me under $70 (a repairman would have cost at least $250). The only thing I would recommend to those in similar situations, is to purchase a spanner wrench (your site does not sell, but others do). The stem seal and hub assembly is reverse threaded (clockwise to loosen) and is difficult to remove due to tight quarters in the tub.
Read less
Was this instruction helpful to you?
Thank you for voting!
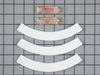
Damper pads wore-out and had metal to metal contact which caused the washer to spin out of balance.
1: Disconnected all water and electrical connections.
2: Removed front panel.
3: Disconnected all wires leading from the control panel and removed the top of the washer.
4: Removed the springs that holds the drum down on the damper pads.
5: Flipped washer upside-down so the drum would hang from the bottom of the wash. ... Read more This made it easy to clean the area since it was full of dirt and ground metal dust.
6: Glued new pads (per the instructions) to the cone that protrudes up from the bottom of the washer and allowed to dry.
7: Lubricated the pads with the provided grease and added additional silicon grease to insure smooth operation.
8: Replaced drive belt.
9: Flipped the washer back up-right and installed the drum springs.
10: Reconnected all wires and attached the top of the washer.
11: Reconnected all electrical and water lines and tested operation.
12: Replaced the front panel.
Washer now runs as quite and smooth as it did when it was new.
Read less
Was this instruction helpful to you?
Thank you for voting!