


Models
>
1015
1015
Jump to:
Find Part by Name
Keep searches simple, eg. "belt" or "pump".
Models for 1015
Click on the best match to narrow your results.
- 1015 (400000001-499999999 - 1974) Lawn Boy Trimmer (9" Edger/Trimmer)
- 1015 (300000001-399999999 - 1973) Lawn Boy Trimmer (9" Edger/Trimmer)
- 1015 (200000001-299999999 - 1972) Lawn Boy Trimmer (9" Edger/Trimmer)
- 1015 (100000001-199999999 - 1971) Lawn Boy Trimmer (9" Edger/Trimmer)
- 1015 (000000001-099999999 - 1970) Lawn Boy Trimmer (9" Edger/Trimmer)
- 1015 (126001-207400,138-200-100,131-200D100,139-) Cub Cadet Lawn Mower (Lawn Tractor)
- 1015 Jenn-Air Range (Jenn Air Range/Stove/Oven 1015)
- 1015 (126001-207400-130200100-131200D100-138200100-139200100) Cub Cadet Lawn Tractor (1015 S/N 126, 001 - 207, 400 130-200-100 131-200d100 138-200-100 139-200-100)
- 1015-0 Briggs and Stratton Pressure Washer (1015-0 - 1,250 Psi)
- 1015-0 Generac Pressure Washer (1250 Psi Pressure Washer)
- 1015-A Generac Welder (1015-A 350a Dc Welder)
- 1015000 Litton Microwave (Table Top)
- 101510 Jet Hoist & Winch (1 Ton 10 Foot Lift)
- 10151K Airmaster Industrial Fan / Circulator (30" 1/3HP Heavy-Duty, 2-Speed, Pull Chain Switch)
Exact Part matches for your search term
Viewing 4 of 4
$27.76
Cleaning brush for coils on refrigerator and freezers, dryer lint filter housings, and more.
This part number matches the current model number 1015
In Stock

This part number matches the current model number 1015
No Longer Available

This is a genuine OEM replacement part sourced directly from Patio Comfort. This electrode is commonly used in the burner assembly of patio heaters. An electrode like this is a conductor that works to...
This part number matches the current model number 1015
No Longer Available
Keep searches simple, eg. "belt" or "pump".

This carriage bolt fits a variety of tools and is sold individually. The square area under the head of the bolt is created to fit into a square hole in your tool. The hole makes sure to restrain the b...
In Stock
Order now and your part arrives by Mar 19

$46.87
This replacement handle is a genuine OEM sourced part. It is specially manufactured for walk behind and push lawn mowers. Upper handle allows user to control the lawn mower. It is attached to the lowe...
In Stock
Order now and your part arrives by Mar 19

$7.30
This is a multi-use screw and can be used on a variety of appliances. The measurements of the screw are: 8/18 x 3/8. *Please note: the screw is sold individually. Refer to the manual provided by the m...
In Stock
Order now and your part arrives by Mar 19

This is a Belleville washer, and it is used with various lawn and garden equipment around your home. This part has an inner diameter of 0.340 inches and an outer diameter of 0.872 inches. The convex s...
In Stock
Order now and your part arrives by Mar 19

$6.42
This lock washer is used to resist the loosening of bolted joints. Repair tip: It is difficult to install the lock washer in a tight place or when the bolt/screw is pointing down. This lock works with...
In Stock
Order now and your part arrives by Mar 19

In Stock
Order now and your part arrives by Mar 19

$23.25
This authentic component is specially designed for MTD riding lawn mowers and garden tractors. It is supplied directly from the original equipment manufacturer. The ball joint is an important part of ...
In Stock
Order now and your part arrives by Mar 19

In Stock
Order now and your part arrives by Mar 19

In Stock
Order now and your part arrives by Mar 19

$17.80
This is an OEM part sourced directly from the manufacturer. This white silicone adhesive caulk is commonly used on ranges, microwaves, and cooktops. This adhesive sealant works to form a bond between ...
In Stock
Order now and your part arrives by Mar 19

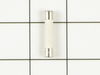
$5.32
This is a ceramic fuse for a microwave. It is just over 1 inch long. This fuse is 20 amps and 250 volts. This part powers your microwave. If your appliance is not heating properly, or is not turning o...
In Stock
Order now and your part arrives by Mar 19

$6.82
This screw is a high quality hardware that is specially manufactured for use on MTD and Yard Machines lawn and garden equipment. It is an authentic part that has multiple uses depending on the equipme...
In Stock
Order now and your part arrives by Mar 19
Common Problems and Symptoms for 1015
Viewing 3 of 3Leaking
Fixed by these parts

How to fix it
Won’t turn on
Fixed by these parts
How to fix it
Will Not Start
Fixed by these parts

How to fix it


Keep searches simple. Use keywords, e.g. "leaking", "pump", "broken" or "fit".
- Customer:
- tad from tamarack, MN
- Parts Used:
- WPM0805101
- Difficulty Level:
- Really Easy
- Total Repair Time:
- Less than 15 mins
- Tools:
- Pliers, Screw drivers
microwave oven blew fuse
First I removed upper front grill by removing two Philips head screws on top and pulling off. This exposed the Philips head screw which holds control panel in place. After removing screw I pushed up on panel and it came off to expose fuse. With needle nose pliers I removed old fuse and again with pliers held new fuse in position. With th
... Read more
e help of a bladed screwdriver, I pushed new fuse into holder, then replaced panel, screw and grill. This took less than 15 minutes even as one of the wires on control panel pulled out of connection and took some time to locate where to reconnect, otherwise was an easy fix
.
.
Read less
Was this instruction helpful to you?
Thank you for voting!
- Customer:
- Richard from Beverly Hills, CA
- Parts Used:
- 715230K
- Difficulty Level:
- Easy
- Total Repair Time:
- 15 - 30 mins
- Tools:
- Pliers, Screw drivers, Wrench set
bad element control switch
1. Turn off power to range at circuit breaker
2. Remove grate
3 Remove control knobs
4, Remove two screws holding control panel
5. With wrench, remove locking nuts from control switches
6. Lift panel, exposing switches
7. With new switch in hand, unattach old switch one terminal at a time, attaching new swi ... Read more tch exactly as old switch, terminal by terminal.
8. Replace everything in reverse order
9.Turn on power
Read less
Was this instruction helpful to you?
Thank you for voting!
- Customer:
- Richard from Sacramento, CA
- Parts Used:
- A406
- Difficulty Level:
- Really Easy
- Total Repair Time:
- 15 - 30 mins
- Tools:
- Screw drivers
Broken exhaust vent cover.
Just removed the broken vent cover.
Injected foaming sealant.
Pushed on the vent cover plate.
Screwed it in place.
More foaming sealant.
Clipped on the flapper and secured the cover.
Injected foaming sealant.
Pushed on the vent cover plate.
Screwed it in place.
More foaming sealant.
Clipped on the flapper and secured the cover.
Was this instruction helpful to you?
Thank you for voting!