Some vegetables and fruiting plants can stand on their own. Others need support. By providing durable supports for your plants to lean and climb on, you’ll be able to:
- Conserve space and fit more plants into your garden
- Encourage good air circulation and dry leaves, which helps to discourage pests and disease
- Lift fruit toward the sunlight for ripening
- Make crops easier to harvest
- Add beauty and visual interest to the garden
There’s no need to go out and buy expensive supports at the garden center. It’s possible to make durable supportive devices out of simple materials. You can also upcycle household items to add character and intrigue to your garden.
Before you start building supportive devices, it’s important to understand when to install them and which plants need them.
The Supporting Role
When you’re watering tiny seedlings, it’s hard to remember they’ll soon be sprawling plants with heavy fruit. But that’s when you should install your supports. Plants grow quickly, and you don’t want to miss your opportunity.
Plus, early supports help train plants to grow upward and prevent damage and disease.
Ideally, introduce supports when you transplant your starts outside. Or if you grow plants from seed, install them after you thin the seedlings.
Always err in favor of providing too much support. Flimsy structures collapse under heavy plants. Moreover, tall supports can dramatically increase crop yields by allowing plants more space to grow.
But be sure to design supports that make your job easier. You don’t want to drag out a ladder or squeeze yourself into a hard-to-reach place to harvest produce; keep produce as easily accessible as possible.
To determine which supports are best for different plants, it’s helpful to understand how they grow.

Building DIY Garden Supports
Ready to make your own supportive devices? First, gather all necessary supplies. Most can be found at a home improvement center or farm supply store, or you may already have what you need.
How to Stake a Plant
Tools and supplies
- Rubber mallet
- Stake
- Ties (string, pantyhose, wire, or zip ties)
Directions
- 1. Use a rubber mallet to drive a stake into the ground 2 to 3 inches from the plant’s stem.
- 2. Use ties to support the plant beside the stake.
- 3. Provide additional ties as the plant grows.http://www.wikihow.com/Stake-a-Plant
How to Build a Sturdy Cage
- Safety glasses
- Heavy gloves
- Wire cutters
- Concrete reinforcement mesh
- Pliers
- Stakes (optional)
- Zip ties or garden wire
- Ties for plants
Directions
- 1. Put on safety glasses and heavy gloves. With wire cutters, cut a section of concrete reinforcement mesh. A 5-foot section of mesh makes a cage with an 18-inch diameter. A 6-foot section makes one with a 23-inch diameter.
- 2. Leave a set of sharp prongs on one side, and use the pliers to bend the prongs at 90-degree angles to form hooks.
- 3. Leave a vertical wire on the other side.
- 4. Link the hooks to the vertical wire to form a round cage.
- 5. Cut and remove the bottom row of horizontal wires to leave 6-inch spikes for legs.
- 6. Plunge the legs into the ground.
- 7. In high-wind areas, attach the cage to two stakes using zip ties or wire (optional).
- 8. Gently tie the plant to the cage for support as needed.
How to Build a Bean Teepee
Tools and supplies
- Six 6-foot long bamboo stalks or sturdy poles
- Tape measure
- Marker
- String, garden wire, or zip ties
Directions
- 1. Locate the best place in your garden for a teepee and etch a 3-foot-diameter circle.
- 2. Mark a line on each pole 6 inches from the bottom.
- 3. Firmly push the ends of the poles a few inches apart all the way around the circle. Leave a gap between two poles for a door if desired. Plunge the poles into the soil until the lines you marked are even with the ground.
- 4. Firmly tie the poles together a few inches from the top with string, garden wire, or a zip tie.
- 5. Plant two beans per pole and water generously. As the beans grow, train them up the legs of the teepee.http://www.kiddiegardens.com/bean_teepee.htmlhttp://www.homegrownfun.com/bean-teepee/
How to Build a Simple Trellis
Tools and supplies
- Shovel or posthole digger
- 3 pieces of 1-inch x 1-inch x 8-foot or 2-inch x 4-inch x 8-foot untreated lumber
- 5x7-foot piece of trellis netting
- Staple gun, string, or wire to connect the trellis netting to the poles
- Deck screws
- Cordless drill or screwdriver
Directions
How to Build a Simple Bramble Trellis
Tools and supplies
- Four 6-foot-tall fence posts (wood or metal)
- Rubber mallet
- Tape measure
- Roll of 10- or 12-gauge galvanized wire
- Wire cutters
- Staple gun or 4 eyebolt screws (only needed if using wood posts)
Directions:
- 1. Drive a fence post 1 foot deep into each corner of the garden bed.
- 2. Pick a post and measure 18 inches from the ground. At this height, wrap the wire around the post several times. Or, if using wood posts, wrap the wire around several times and staple the wire to the post.
Alternatively, attach an eyebolt screw and wrap the wire firmly around it. Stretch the wire to the next pole and repeat the process.
Repeat all the way around the rectangle until you’ve returned to the original post. Wrap the wire around the first post again, and cut the wire.
- 3. Repeat the above process around the tops of the poles.
- 4. This simple device serves as a cage to contain brambles. Tuck stray brambles inside, and prune any branches that reach above it.http://mikesbackyardnursery.com/2015/02/diy-raspberry-trellis/
How to Build a Rebar and Mesh Arbor
Tools and supplies
- 6 pieces of 3/8-inch x 10-foot rebar
- Rubber mallet
- Tape measure
- Zip ties
- 5x17-foot piece of concrete reinforcement mesh
- Wire cutters
Directions:
- 1. Decide where you want your arbor, and etch out a 4-inch-wide, 5-inch-long rectangle.
- 2. Drive a piece of rebar into each corner of the rectangle with the rubber mallet. Bury 5 feet of rebar, and leave 5 feet above ground.
- 3. Now it’s time to bend the remaining two pieces of rebar to form a hoop. First, connect them tightly with a zip tie so you can bend them both at the same time.
Then put your foot in the middle and bring both ends up toward you to make a symmetrical hoop. (3/8-inch rebar bends relatively easily).
Bend until the ends are 4 feet apart, which is the width of your rectangle. Remove the zip tie to separate the two pieces of rebar.
- 4. With zip ties, attach the hoops to bridge the stakes that are 4 feet apart. Now you’ll have a hoop tunnel.
- 5. Stretch the piece of reinforcement mesh over the tunnel. Before you secure it, make sure it fits. If it’s too long, use wire cutters to shorten the mesh before you attach it.
- 6. Attach the mesh to the rebar hoops with zip ties. Affix it at the top first, then work down the sides, placing a zip tie every inch or so. (This is usually a two-person job.)
- 7. Cut the tails off the zip ties.http://www.nwedible.com/diy-concrete-mesh-and-rebar-trellis/
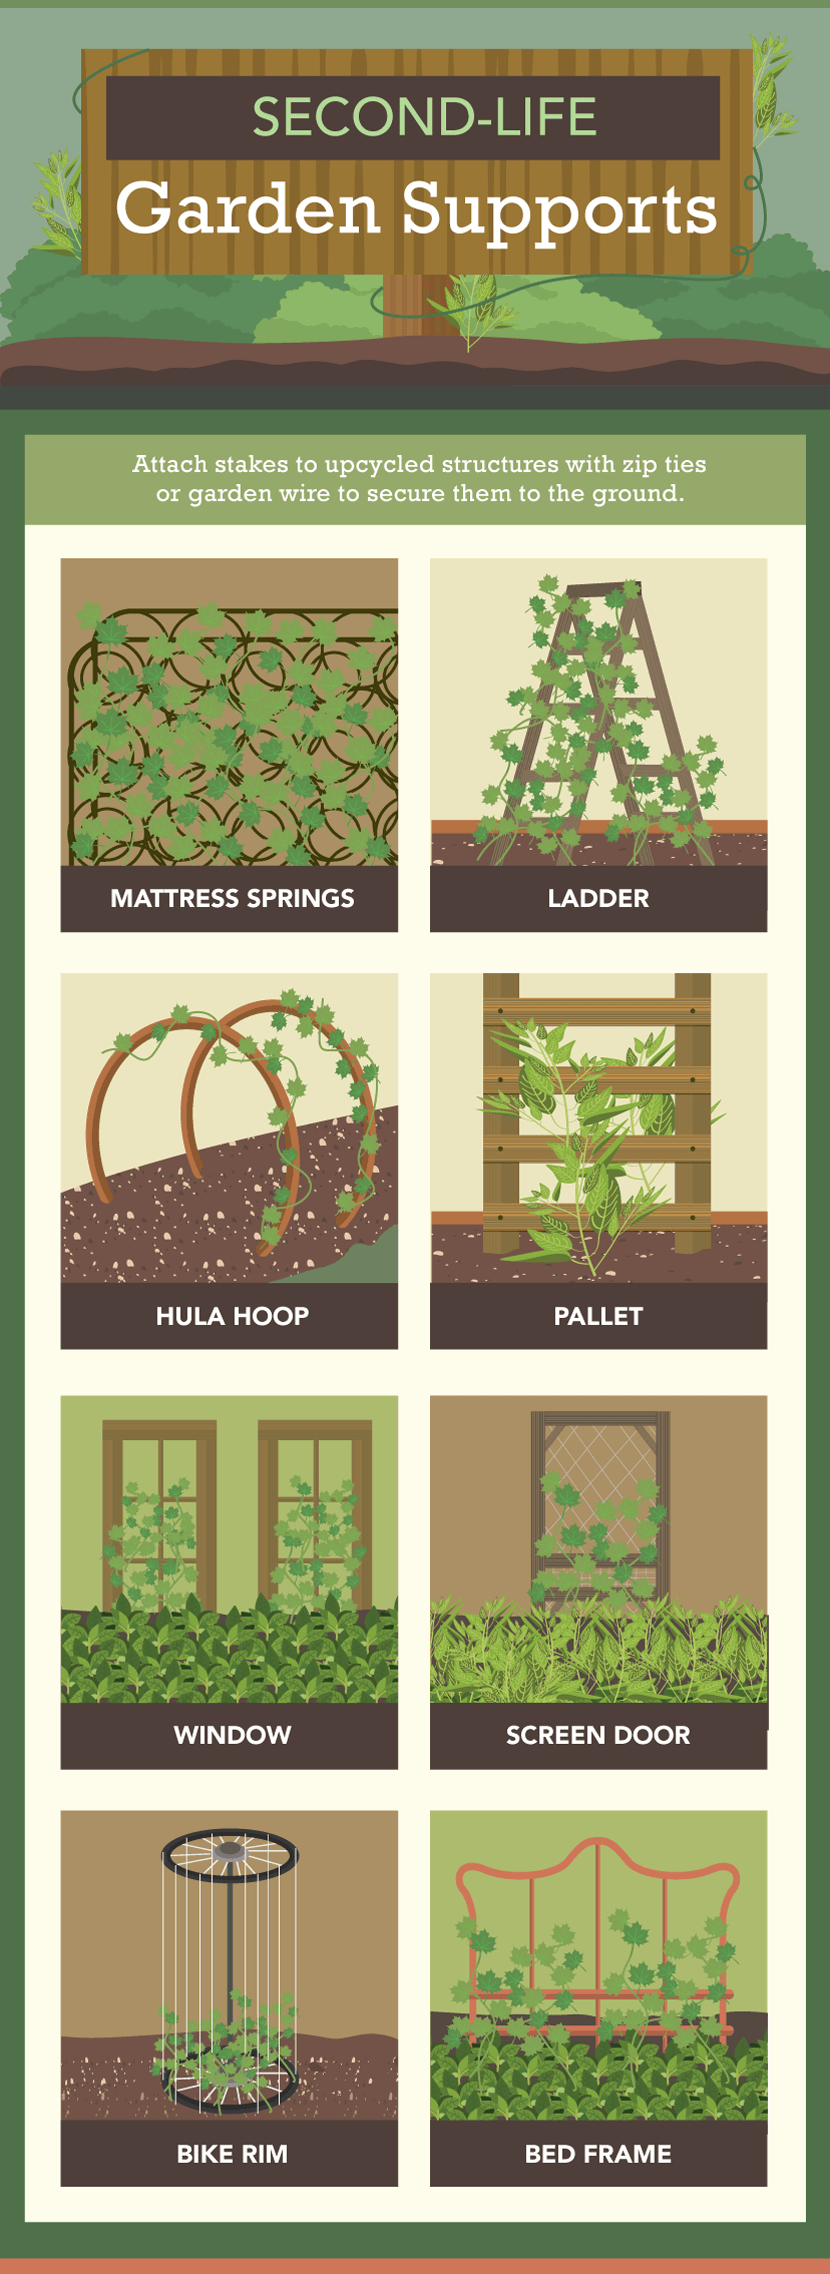
Upcycling Garden Supports
If you’re feeling creative, it’s fun to give old furniture or household items new life in the garden. Take a peek around your garage or basement, and you may find the perfect item to hold up your plants.
No matter which DIY structures you build and install, your plants will benefit from the extra support. You’ll be able to grow more plants in less space, keep them healthy, and easily reach and harvest produce.
Plus, vertical garden elements – especially unusual ones – add unbeatable charm and beauty to your garden.
Embed the article on your site