

Like what you're reading?
Get your fix of expert articles delivered straight to your inbox!
Oops! Please double check your email address.
No Thanks - I don't like cool stuff


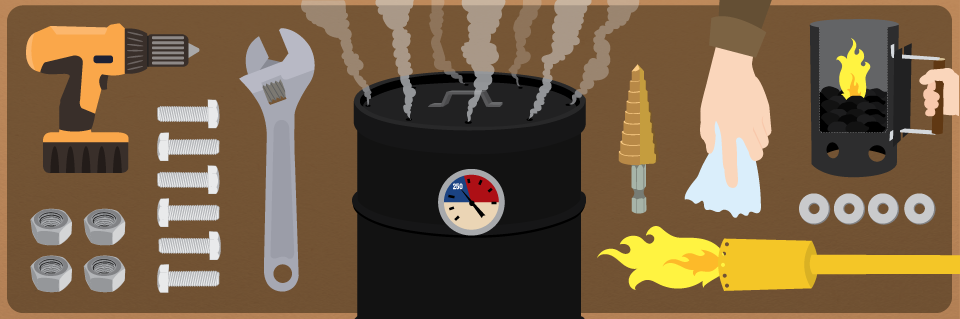
The ugly drum smoker is one of the easiest smokers to use. This smoker is truly a “set and forget” device – your only real concern will be occasionally tending to the meat. Once the charcoal has been lit and added, the smoker can easily cruise for 10-20 hours, holding a steady low temperature. The drum is large enough to fit two to three packer briskets and at least four pork shoulders, so it can feed quite a few people. Best of all, it can be built for well under $200, if you are up to building it yourself.
The general plan for building an ugly drum smoker is to buy a 55-gallon steel drum and burn the paint off the exterior. Once the paint is burnt off you’ll drill various holes around the drum and lid for hardware placement, air intake control, and exhaust. The bolts will hold the cooking grate; the air intake consists of plumbing fittings, such as a ball valve and pipe nipples with caps, to allow you to control air flow. The exterior of the drum will be painted with a high-heat-tolerant spray paint. Charcoal is held in a “no-weld” charcoal fire basket made from expanded steel, a charcoal grate, and hex bolt legs.
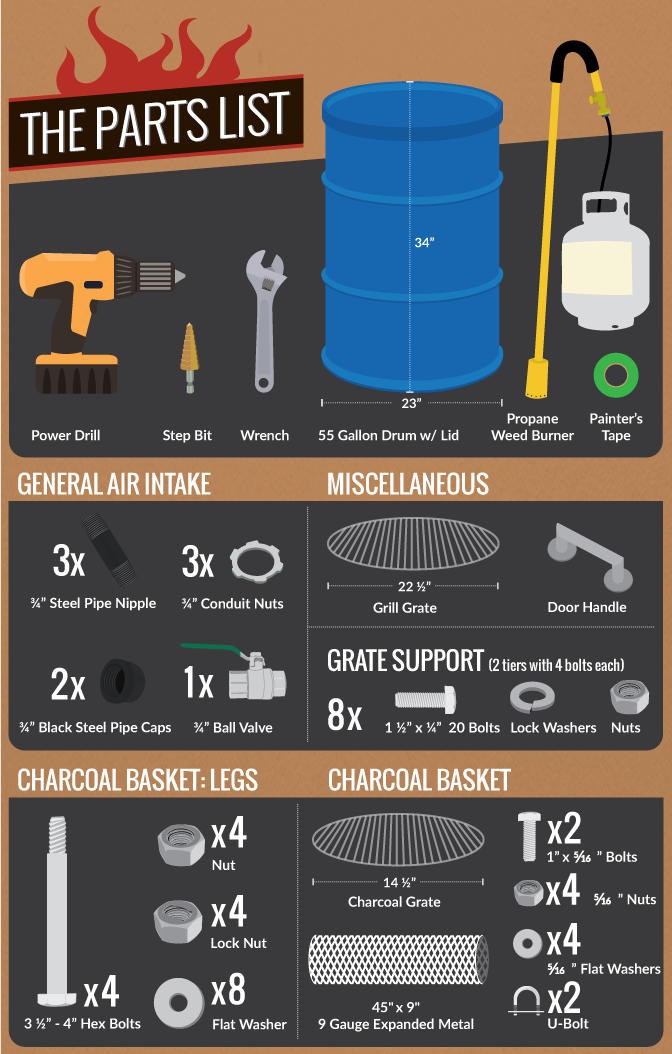
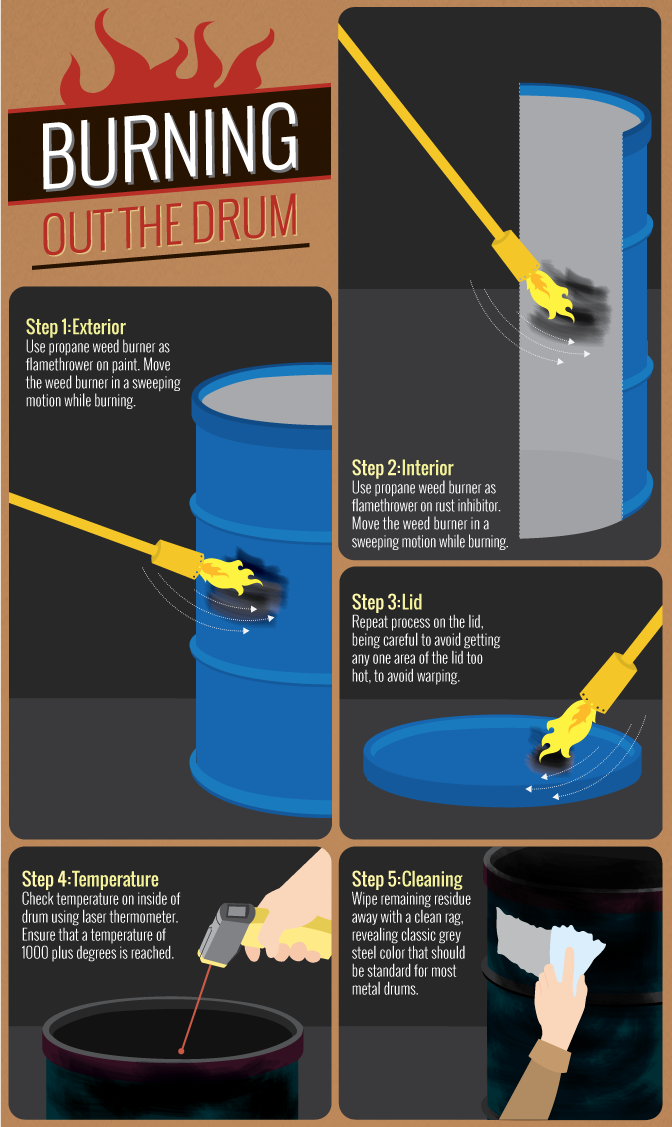
The safest and easiest way to tackle this project is to buy a new 55-gallon drum. Many people insist on finding a free 55-gallon drum that might have been used to hold anything from soda syrup to formaldehyde. When you buy a new drum (for only about $70) you have the benefit of knowing it wasn’t used for anything toxic, and exactly what type of lining, if any, is inside the drum. Drum liners are chemical liners that are very difficult to remove, requiring not only burning at high heat but also intense mechanical scrubbing. To avoid this, buy a new drum with no liner. The only thing inside of a new drum should be a mild rust inhibitor that can be easily burned out with a propane torch at the same time you are removing the original exterior paint.
Connect a propane tank to a propane weed torch and slowly apply a high heat flame to the exterior of the drum. Slowly move the torch in a sweeping motion. Both the original paint and the interior rust inhibitor will come right off with the high heat. Repeat the process for the lid of the drum, being careful not to apply too much heat in one location, as the thin lid might warp. Use a clean rag and wipe off the drum completely to remove any excess paint and dirt.
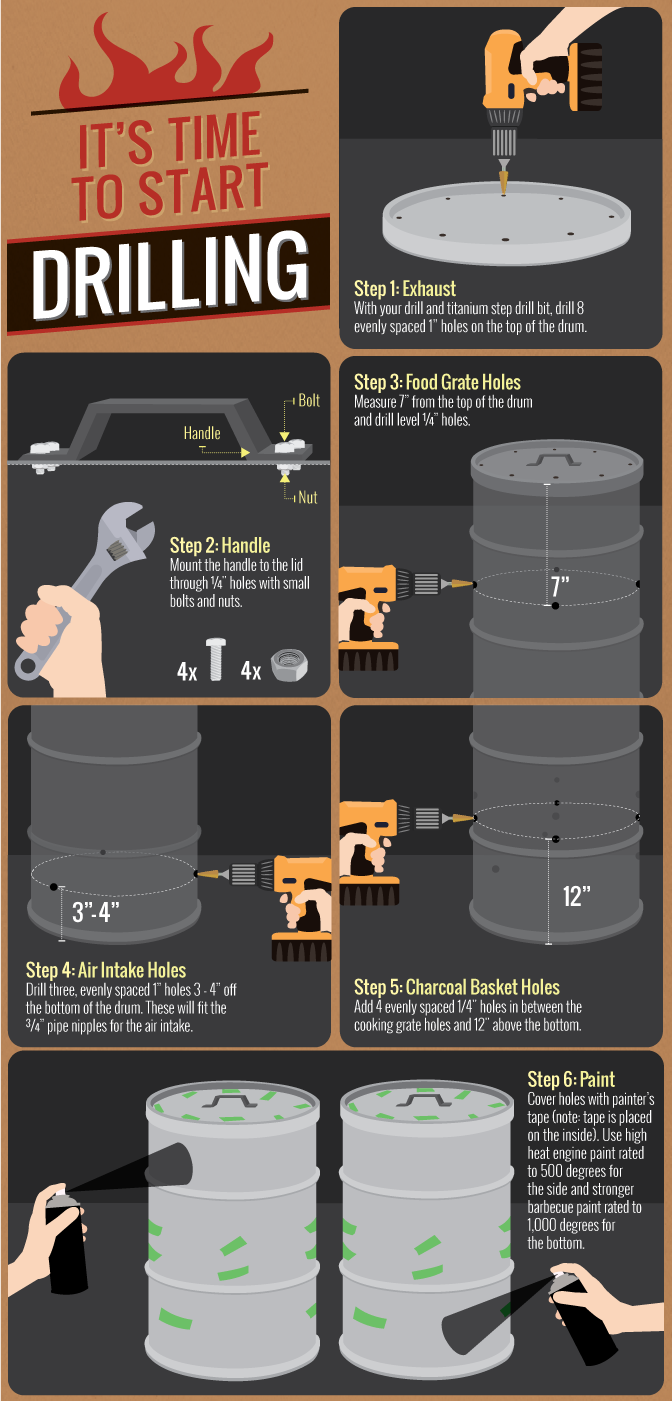
Once the exterior paint has been removed, measure and make small marks where the holes will be drilled. The holes should be drilled with a step bit, large enough to allow the ¼-inch diameter bolts to fit through, but not so large that the head of the bolt will slip through. Drill four holes, equally spaced, seven inches below the top of the drum. This is where the cooking grate will sit. Drill four additional holes 12 inches from the bottom of the drum. This provides the flexibility of adding an additional lower grate, which can be used for higher heat (closer-to-the-flame cooking), or even for holding a drip pan or heat deflector, if you choose. Drill three equally spaced holes three inches from the bottom, large enough for the ¾-inch pipe nipples and ball valve to be inserted securely.
For the exhaust, the easiest setup involves evenly spaced holes in a circular pattern around the drum lid, as opposed to a single larger hole with a chimney tube attached. This minimizes any chimney effects, which can increase draft and create hot and cold spots and an overall hotter fire. For this exhaust pattern, drill eight equally spaced one-inch holes a few inches from the edge of the lid. An easy way to get this right is to place eight coins in a circle around the lid and then measure the distance between them. Slightly move each one until the distance between each coin is equal. Then remove each coin one-by-one and drill the holes. Depending on the type of handle and smoker thermometer you find, drill an appropriate number of holes to attach both.
After all of the holes are drilled into the drum, remove any leftover steel shavings that might have fallen into the inside of the drum. Use painter’s tape and cover all of the holes you drilled from the inside. This will prevent spray paint from contacting the inside of your drum. Use high-heat engine paint, as this has been rated upwards of 500 degrees F. Spray paint the entire outside of the drum, including the bottom and the lid. Allow the paint to dry completely.
After the paint has dried, insert the one- and half-inch bolts and tighten them with the lock washers and nuts. Attach the ball valve and pipe nipples, and secure with ¾-inch conduit nuts. Finally, attach the lid handle and secure with necessary hardware, then install the thermometer.
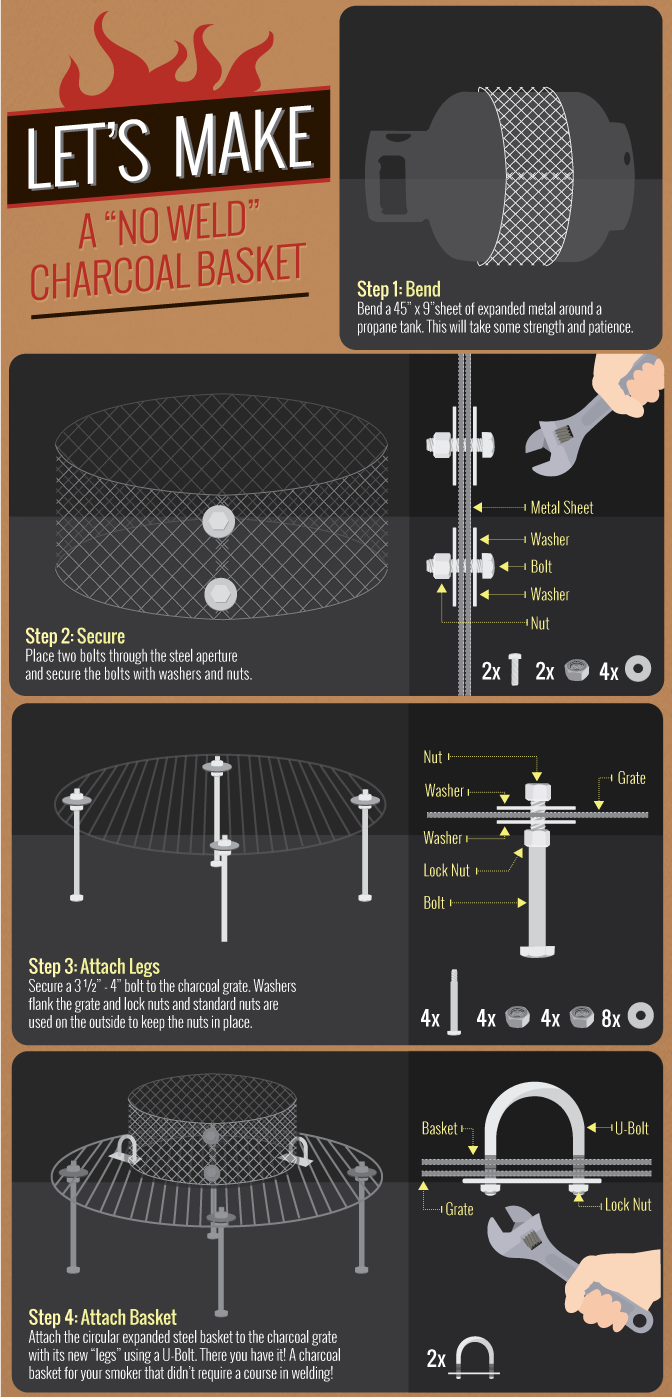
Most of us don’t have access to a welding machine. In this case, we can do a “no weld” charcoal basket made from a sheet of expanded steel bent into a circle and secured with bolts, flat washers, and nuts. The circular basket is then secured to a typical charcoal grate and hex bolts are used as “feet” to let the basket stand on the bottom of the drum. Begin with a 45-inch-by-9-inch sheet of nine-gauge expanded steel. If you can, have your steel fabricator bend this into a circle for you. If not, grab a propane tank and slowly bend the steel sheet around the tank until a circle is formed. The no-weld concept comes from attaching components via nuts, bolts, and flat washers.
Once the expanded steel is bent into a circle, insert a bolt with a large flat washer through two overlapping steel apertures (one from the original left and one from the original right side of the steel sheet) and quickly place another large flat washer and lock nut on the other side of the sheets. Once this is done, the steel will remain secure. Do this twice at different locations on the steel sheet. This circular basket will now be able to sit on a charcoal grate, which will be attached to 3.5- to 4-inch hex bolts. To attach the hex bolts to the charcoal grate, place a nut and flat washer on the hex bolt and insert it through the charcoal grate. Once the bolt is through the grate, use another flat washer and lock nut to secure it to the grate. The flat washers essentially “sandwich” the grate, and the nuts keep it tight. Attach the grate to the circular expanded steel with two U-bolts. Slip the “U” portion of the bolt through the expanded steel aperture and then fasten to the grate.
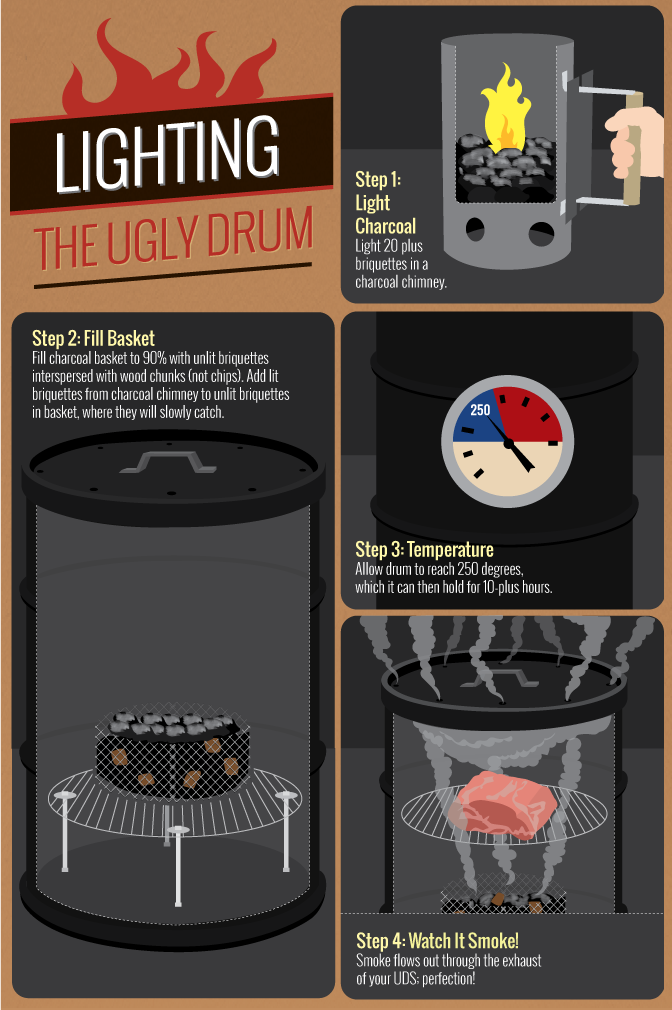
The first thing you must do when the paint is dry and the hardware is assembled is to light an initial fire and season the new smoker. This charcoal basket can handle an entire 20-pound bag of briquette charcoal. The way to light this smoker is to fill the charcoal basket to about 90 percent. Depending on your taste, you can intersperse chunks of smoke wood all throughout the basket so it will smoke for an entire 12-plus hours. Use a charcoal chimney and about 15-20 briquettes. Light the briquettes using a match and crumpled newspaper placed under the chimney. After about 15 minutes the coals should be lit and mostly ashed over. Dump these briquettes directly on top of the 90-percent-full basket loaded with unlit charcoal and smoke wood. Open all of the air intakes, secure the cooking grate, and close the lid. For the initial seasoning, select a very fatty piece of meat, such as a pound of raw bacon or a tube of breakfast sausage, placed directly in the center of the grate. Close the lid, sit back, and get a feel for how your smoker will hold temperature. If the temperature is too high, close one or two of the air intakes. If the temperature is too low, take the lid off for a while, or consider using more lit charcoal next time. When lit correctly, the ugly drum smoker should hover around 250 degrees F for the entire cooking process. After about one or two hours you will see a good bit of seasoning on the inside of the smoker and you are now ready to use it. At this point you can close the air intakes and cover the exhaust holes with magnets.
The assembly of an ugly drum smoker is a true barbecue experience. If you love a good “do it yourself” project and want a good, high-quality smoker for very little money, this project is perfect. The best part is that you are making one of the best smokers you can get, as it is simple to light and you can easily maintain a nice “low and slow” barbecue temperature. Depending on your creativity and painting skills, there is no reason your ugly drum smoker needs to be ugly! Pick your favorite sport team’s colors and be creative. You can also attach a bottle opener to the drum for convenient beverage opening as you smoke your afternoons away.
Embed the article on your site

Written by:
Grilling your turkey for Thanksgiving or Christmas this year will not only ...

Want to add something different to your next barbecue? Consider grilling pi...
Barbecue-goers often assume overcooked steak comes with the territory – no ...
Get your fix of expert articles delivered straight to your inbox!
No Thanks - I don't like cool stuff