How to Grill a Holiday Turkey
The Ultimate Outdoor Cooking Experience
For many people, the holidays mean a house full of family and a small kitchen putting out a lot of food. One problem never fails to arise in this scenario. Most houses only have one oven, so it becomes problematic and stressful to bake a turkey as well as all of the side dishes, breads, and pies that are also on the menu. The easy and fun solution is to grill or smoke your turkey outside! This not only provides you with a superior, great-tasting turkey, but also frees up your oven space and stove top, and gives you a great excuse to get out of the house (far away from your Aunt Dorothy) while enjoying the crisp air with a cold beverage.
Dry Rub and Butter Injection
The best turkey dry rubs have a nice depth – multiple savory flavors that complement the turkey. My favorite turkey dry rub mix includes two tablespoons each of hot dried red pepper flakes, dried parsley, fresh ground black pepper, kosher salt, and two teaspoons of garlic powder. Mix the ingredients together well. After the turkey is cleaned, generously apply the rub all over the skin of the turkey and place as much underneath the skin as you can.
Let‘s face it: no matter how you cook a turkey, it has the potential to be a bit on the dry side, as compared to a big juicy beef steak, for example. The only way to ensure a completely juicy turkey is to use a butter injection. Food injection kits are available at most grocery stores and consist of big syringes with large needles, barrels and plungers.
Melt one whole stick of salted butter and mix in one teaspoon of fresh, finely ground black pepper and one teaspoon of garlic powder. Draw the butter mixture up into the injection unit. Inject the butter mixture into the thickest part of the turkey breast and slowly withdraw the needle while carefully applying pressure to the plunger. Do this at least four or five times in each breast to ensure complete coverage. You can also repeat the process in the thickest area of each leg and thigh.

Charcoal Grilling
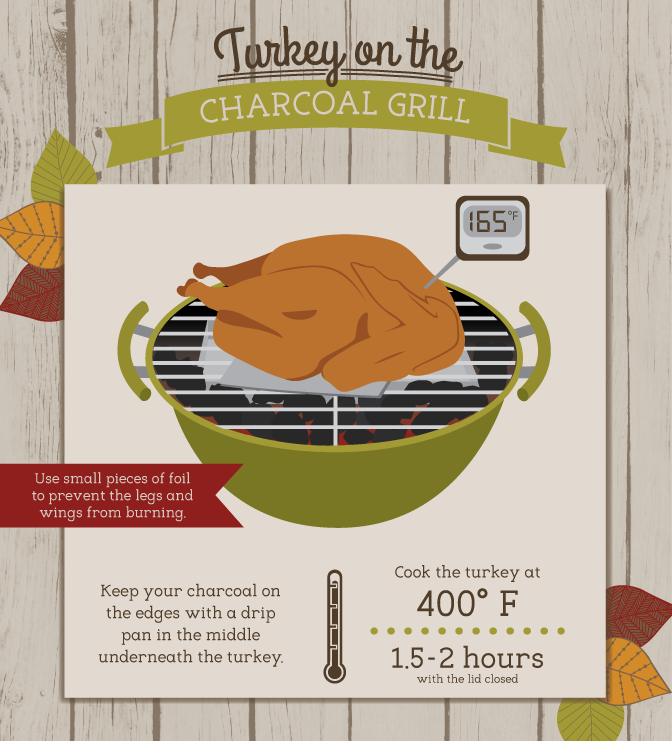
Many of us have a simple, black, kettle-style charcoal grill. Luckily, this type of grill works perfectly, even for a big 20-pound turkey. Turkeys are large birds and must be cooked over indirect heat. This means the heat source should be away from the turkey and not directly under it. The easiest way to arrange this with a charcoal grill is to place charcoal on the left and right side of the kettle, but not the center. Underneath the cooking grate, in the center of the grill, place a large aluminum drip pan to catch the turkey drippings and to provide an area under the bird from which no direct heat will emanate. Place enough charcoal on each side to get the barbecue to around 400 degrees F. Position the turkey directly on the grilling grate above the drip pan and close the dome. If you have a really large wide bird place a sheet of aluminum foil underneath each of the turkey legs, as they will probably hang over the direct charcoal heat and burn a little. The foil will protect the turkey legs and wings from burning by refracting some of the heat. A turkey will take about one-and-a-half to two hours at this temperature, and by the end of the cook the grill should have only dropped to about 350 degrees F. If the grill temperature drops too quickly, add some additional charcoal during the cook to keep the heat going. The turkey will be finished when the internal temperature is 165 degrees F. This applies to all cooking methods listed below as well.

Gas Grilling
A three-burner gas grill works the best for grilling a turkey because the left and right burners can be used to provide heat, while the middle burner remains turned off. Most gas grills do not have enough room under the grilling grate to position an aluminum drip pan, so simply sit the turkey inside of the aluminum tin above the middle, inactive burner. Adjust the left- and right-side burners so the grill reaches a temperature of 350–400 degrees F. If the turkey legs are hanging out of the aluminum tin, add a small piece of foil to protect the legs from the heat, as with the charcoal method. A turkey will take about one-and-a-half to two hours at this temperature range.

Smoking a Turkey
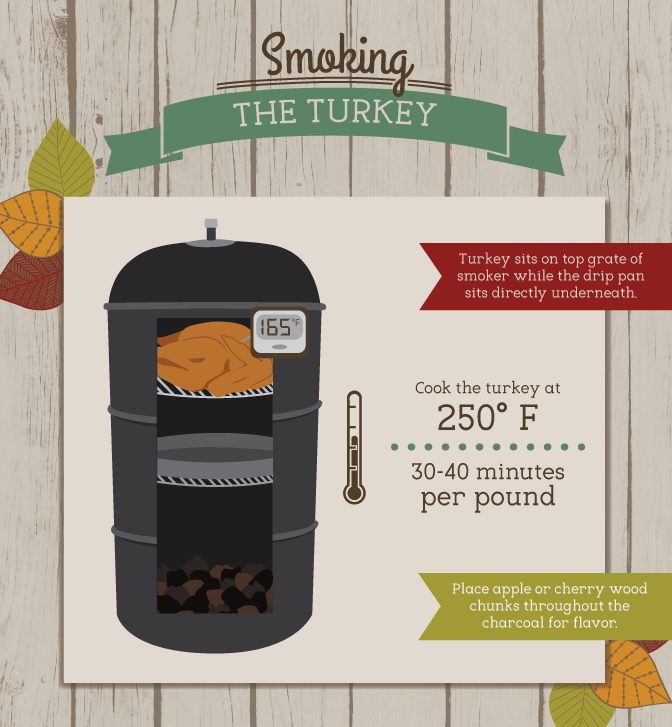
Smoking a turkey is an amazing experience. A turkey will take much longer to cook on a low-heat smoker, but the resulting pink smoke ring and corresponding mild taste of smokiness is priceless. There are many types of smokers with different cooking arrangements. Most smokers will allow for an indirect cooking process. Set up the smoker for a typical low-and-slow barbecue temperature of approximately 250 degrees F. Select a light smoke wood such as apple or cherry and place the wood chunks throughout the charcoal so an even mild smoke is distributed throughout the cook. On a multi-grate smoker, sit the turkey on the top grate and position an aluminum drip pan underneath it, on a bottom grate. Depending on your specific temperature for the cook, the turkey will take approximately 30–40 minutes per pound.

Rotisserie Turkey
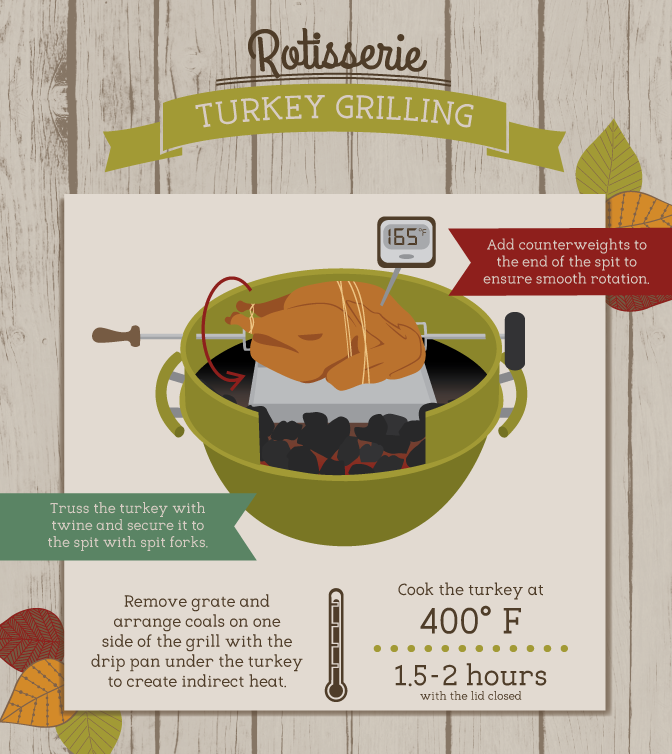
A very nice, reasonably priced, rotisserie attachment is available for the typical charcoal kettle grill. The attachment is strong enough to handle a large turkey. The rotisserie provides a unique way to keep a turkey extra moist and flavorful by allowing the juices to rotate or roll around the turkey while it spins on the rotisserie spit. It is helpful to truss the turkey with cotton butcher’s twine when using a rotisserie. Start with a long piece of twine about four to five feet long. At the center point of the twine, wrap it around the bottom of each drumstick twice, and pull tightly to bring the drumsticks into direct contact with each other. Flip the turkey over and wrap the twine around each wing, then flip the bird back over to tie the twine on top of the turkey breast. Different methods of trussing a turkey are acceptable; the goal is simply to keep the legs and wings from flopping around as the turkey rotates. Arrange charcoal on one side of the grill to achieve a heat of approximately 400 degrees F. Remove the grill grate and place an aluminum pan underneath the spot where the turkey will be rotating. Add the turkey securely to the rotisserie spit, then install the spit on the rotisserie attachment. Do not replace the grill grate, as you might need the extra room for the turkey to rotate without bumping into the grate. Counterweights can be attached to the end of the spit to keep smooth rotation. A turkey will take about one-and-a-half to two hours at this temperature and by the end of the cook the grill should have only dropped to about 350 degrees. If the grill temperature drops too quickly, add some additional charcoal during the cook to keep the heat going.

Grilling Gravy
No matter which turkey-grilling method you choose, be sure to save the drippings in the aluminum tin and use them to make gravy on the grill. Not only will this impress your family, it also provides a fantastic, unique grilled flavor while still keeping the stovetop free for other dishes. Once the turkey is done, remove the bird from the grill or smoker and cover it in aluminum foil to rest for about 20 minutes. Remove the aluminum tin, being careful not to spill any of the precious drippings. Add a few extra coals to the grill and rearrange them to the center. If you used a smoker, it’s best to light your regular grill for this step. In a small bowl, combine about half a cup of all-purpose flour with half a cup of hot water and mix well. Drain the drippings from the aluminum pan into a saucepan and place the pan over direct heat on the grill grate. Slowly add in a few tablespoons at a time of the flour mix and stir until the gravy starts to simmer and the desired thickness is achieved. You don‘t have to use all of the flour mix; it will depend on the thickness and fat content of the collected drippings. Taste the gravy and add a little salt if needed. Once the gravy is as thick as you like it, remove the saucepan from the grill and place the gravy in a serving dish. When the turkey dry rub mentioned above is used, no additional spice is needed other than a little salt, depending on your preference. The gravy is spicy and richly flavored from the parsley, hot pepper, black pepper, and turkey drippings.
Grilling or smoking a turkey is a fun way to create a unique holiday experience for your family and friends. Hanging out by the grill for a few hours while there is a packed house and a steamy kitchen has many advantages. Most importantly, however, the flavors rendered by a grill or smoker cannot be replicated by an indoor oven and will have your friends and family begging you to cook your grilled, butter-injected, holiday turkey for them every year.
Embed the article on your site

