

Like what you're reading?
Get your fix of expert articles delivered straight to your inbox!
Oops! Please double check your email address.
No Thanks - I don't like cool stuff


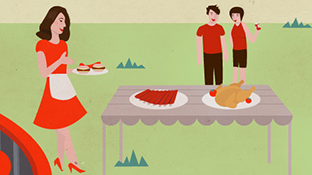
More and more people are getting back into enjoying the outdoors, and with summer in full swing, backyard cookery is adding to the experience.
Nothing beats the taste of cooking or baking with wood-fired flame. Wood-fire ovens are visceral, fun, and theatrical. They cook in a way your stove and barbecue can only dream about, and involve your guests and family in the cooking process. Everyone can partake in making their own “perfect pizza” to be cooked and enjoyed right in the backyard.
The concept of a wood-fire oven is a simple and proven technology from a bygone era. Clay and concrete materials form an oven chamber, retaining heat from a wood-based fire. The base of the chamber is flat and level, working both as the floor for the fire, and the cooking surface.
There are many different styles of wood-fire ovens – below I cover a simple build you can make without mortar!
In most urban landscapes, a typical oven can be a huge commitment due to limited space. A permanent structure can take up a 5’ x 5’ area and stand over 7 feet tall. Finding a method that allows you to construct an oven and disassemble it when not in use would be ideal for most people. If you prefer a more permanent structure, like an adobe style oven – a domed structure complete with chimney – then this may still be a good place to start. You can learn a lot of cooking techniques and experiment with cooking different foods in the oven by starting with a mortar-free quick build.
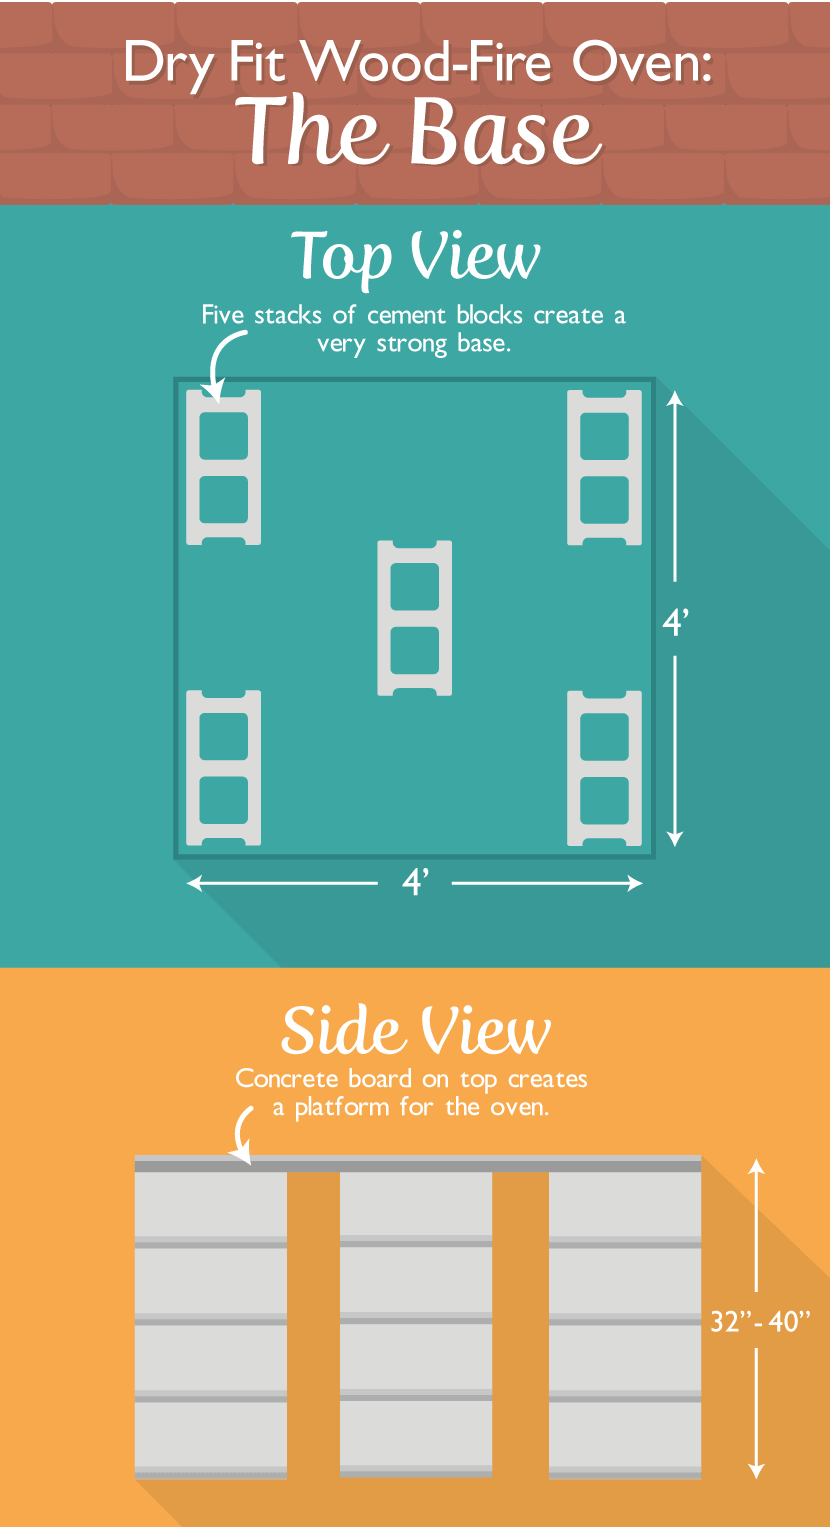
A mortarless pizza oven is a simple dry-stacked brick chamber that only takes an hour to build! We encourage you to use old clay brick, as the clay can take the high heat better than modern cement brick.
Dry fitting the brick allows you to set up and take down the structure at your convenience. Materials required are approximately (depending on the size of the oven you build) 100 to 250 clay bricks, 36” to 48” angle-iron, 2 pieces of 4’x4’ concrete board and approximately 20 to 25 8” concrete blocks.
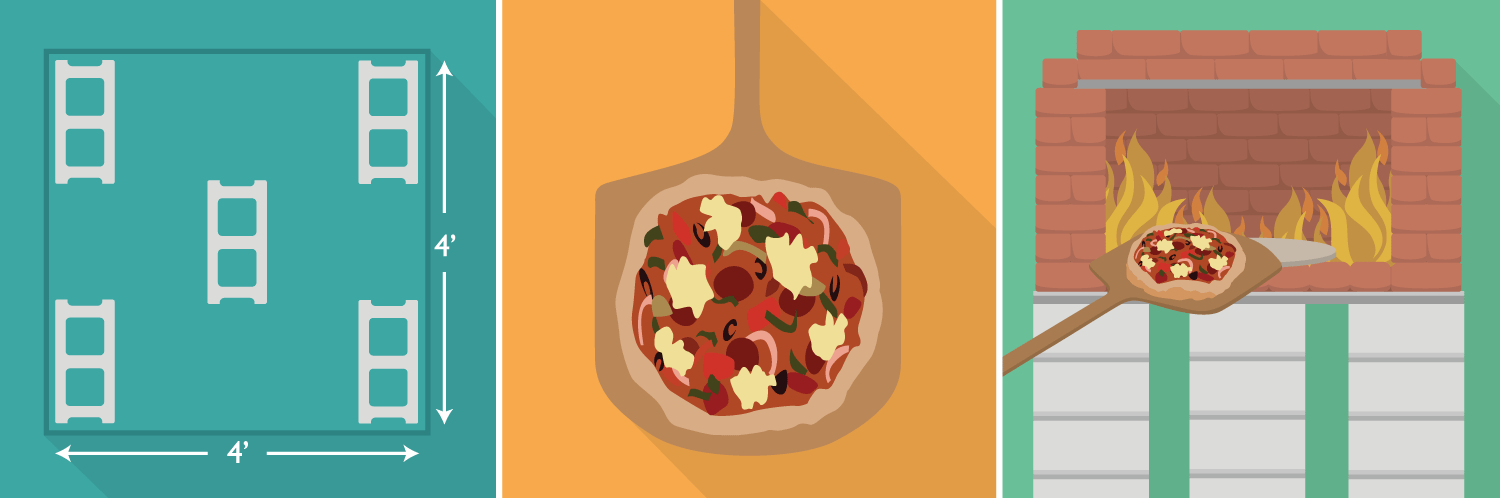
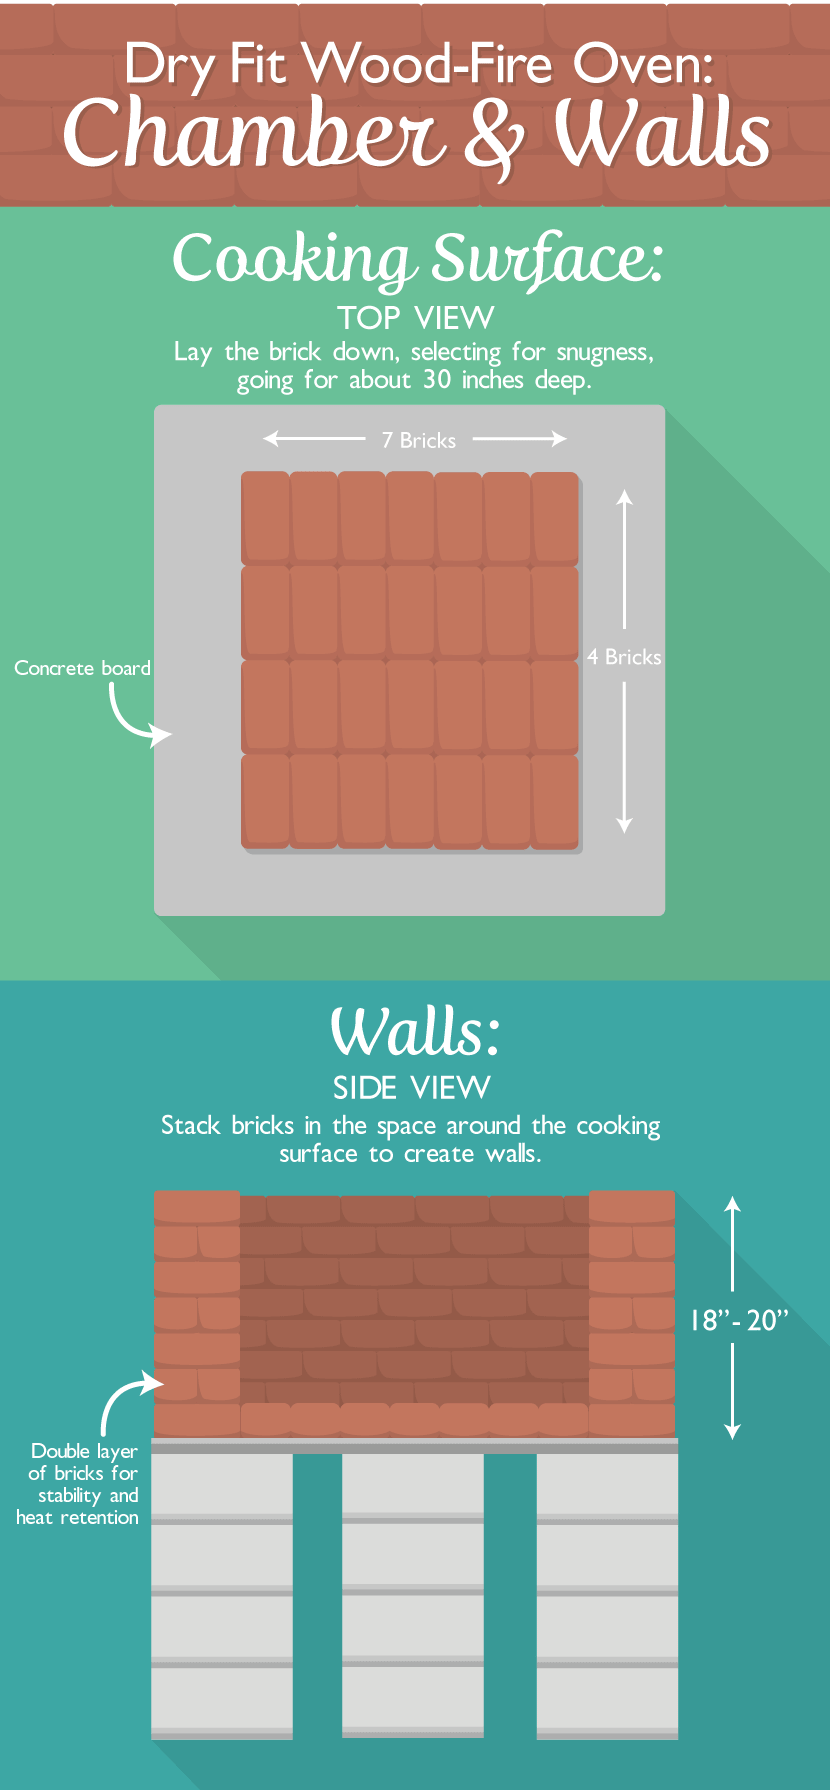
Starting with a platform or base for the oven to sit on, you have a couple of options. I suggest layering concrete block to a desired height. Start with a level area of ground. Set up four corners in a 4 foot by 4 foot dimension. Set up a central block so as to support the middle of the brick oven. The materials being used will create a lot of weight and need to be properly supported when finally assembled. Bring each corner and center to a desired height to support your base platform. The cooking platform should be 38 to 44 inches in height, depending on your ease of comfort working with the peel. Place a double layer of concrete board on your block pillars (avoid using wood materials; ovens can get up to several hundred degrees Fahrenheit). If further support is needed, add some angle iron between the board and concrete blocks to prevent the board from sagging under the weight.
With clay brick, create a base layer. The idea is to create a flat level surface with the brick faces lined up. Lay out the bricks to make a square or rectangle approximately 30 x 30 inches in size. If your surface is terribly uneven, placing a pizza stone down will give you an instant flat surface for cooking.
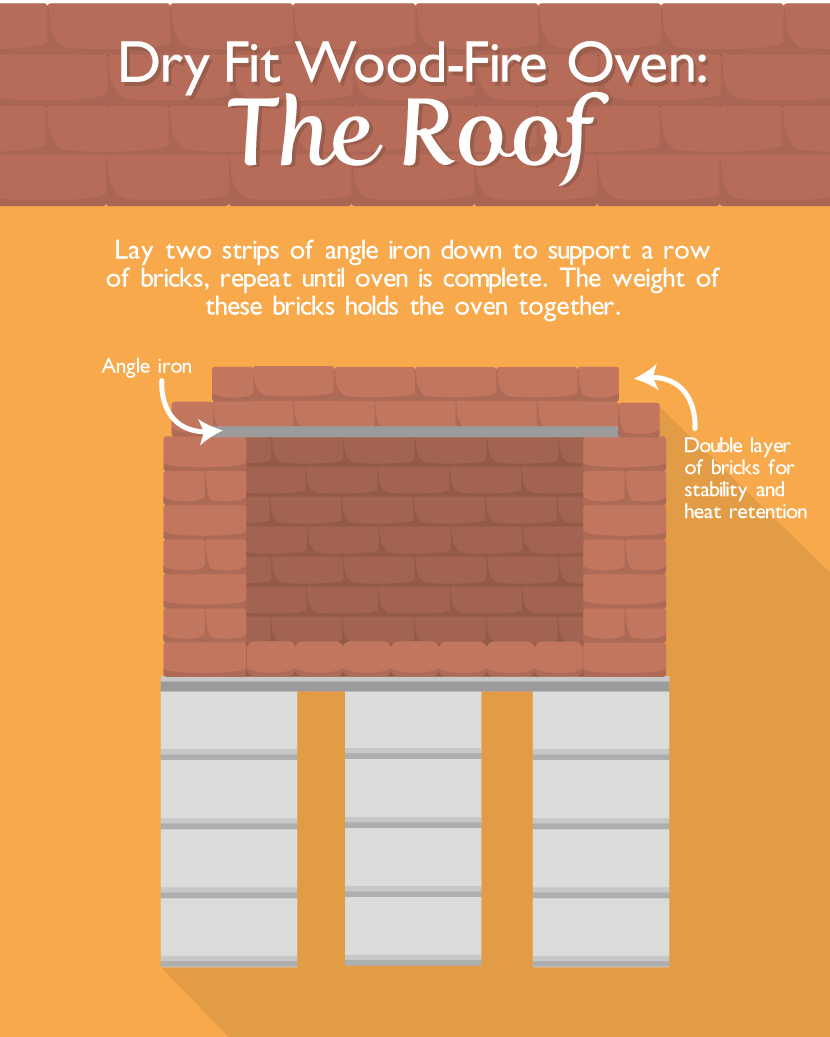
Next begin to layer your wall bricks. For stability and greater heat retention, I would recommend a double layer of brick for the wall construction. Placing the bricks vertically, build the walls up so they are approximately 18 to 20 inches in height from the top of the bricks at the base to the top edge of the walls. Keep in mind that the clay bricks may crack and disintegrate with time, due to the heat, so having replacement bricks on hand is a good idea.
Investing in fireplace bricks is a bit more costly, but their ability to tolerate prolonged heat exposure might be worth that extra expense. If you are willing to purchase fireplace bricks to line the inside of the oven, it will give the oven a bit of extra durability.
The next step in the process is to layer the bricks across the roof. Cut angle iron to the width of the oven. Lay the angle iron down, spanning the open chamber. Begin laying brick between the angle iron, using the bend in the metal as support on each end of the brick. Space the angle iron as tightly as possible so there are minimal gaps for cold air, smoke, and flames to come through the ceiling. For added heat retention and strength, add a second layer of brick on the top.
Start by building your fire in the back of the oven. Using hardwoods such as maple or oak will give you greater heat than softwoods. Avoid chemical starters, as you’ll be eating off the same surface your fire is built on.
If you were wondering why the front of the oven is open, here’s why: as the fire heats up the structure, the smoke and hot gases are forced out the front opening, and will begin to spread the heat to the bricks. A properly built oven will radiate heat from the top, bottom, and sides, cooking food evenly and greatly reducing cooking time due to the high heat. A great flame will dance along the roof of the oven, cooking the top of the pizza beautifully. As you get the nice base layer of glowing red embers, begin to rake them out onto the base brick layer of your oven while maintaining a few pieces of wood burning in the rear of the oven. Determine the size of your pizza or the cooking surface you will need. This will dictate how much area of the base you will need to heat up.
Gauging the oven temperature is the first place to start in the pizza cooking process. An old-school method was to actually hold your hand in the oven space and count to a certain number to determine if the oven was ready. Today, we can use oven thermometers. Pizza dough loves these high temperatures, so 500 degrees Fahrenheit is a good place to start. A thin crust pizza will cook in two minutes or less! This incredible heat will create something you can’t get in your kitchen oven; a better crust, crispier toppings, and that spectacular smoky flavor imparted to the dough and cheese.
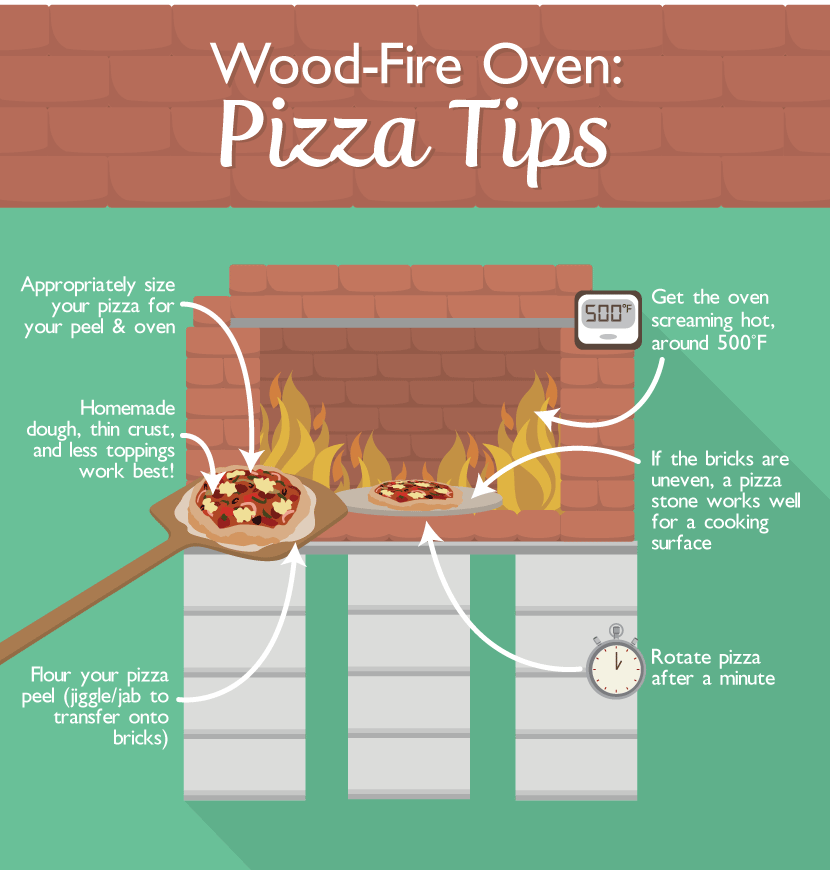
Because fires are a little unpredictable, it may take a few tries to get really good at this. When the fire breaks down into glowing embers, clear the cooking surface for the pizza, pushing the fire to the back of the oven. If you have a thick pizza, you may desire a lower heat to bake the center more evenly without burning the outside. We recommend a thin crust, from home made dough.
The pizza is best placed in the oven with a pizza peel. Sprinkling the surface of the peel with semolina or flour will reduce the friction on the pizza as you give the peel a jiggle and jab while pulling towards you, in order to lay the pizza onto the brick surface. You may also need to spin the pizza partway through, so the fire is not blasting your pizza unevenly.
As you perfect the art of cooking pizza in your oven, you can further elevate your pioneer cooking skills by baking breads, roasting meats in cast iron cookware, and so on. A wood-fired oven is a great way to bring your family and guests into the outdoors, socializing and bonding over a great meal made with a traditional cooking method.
Embed the article on your site

Written by:
Enjoy your salad greens over and over by learning how to become a cut-and-c...
Proper structural elements are key when constructing a wooden gate to last ...
Here are the top 10 secrets for grilling success that will make even the no...
Get your fix of expert articles delivered straight to your inbox!
No Thanks - I don't like cool stuff