

Like what you're reading?
Get your fix of expert articles delivered straight to your inbox!
Oops! Please double check your email address.
No Thanks - I don't like cool stuff


When building a wooden gate, there are several factors to consider. Gates can be merely decorative, as in an arbor framing a walkway into your yard, or more secure, giving entrance through a full fence. The latter can prevent someone from seeing or accessing your private space, thanks to solid wood panel design and strong hardware.
This discussion is about the basic process that goes into constructing a tall gate/doorway for the yard. Following some fundamental structural rules will ensure the gate works properly for years to come.
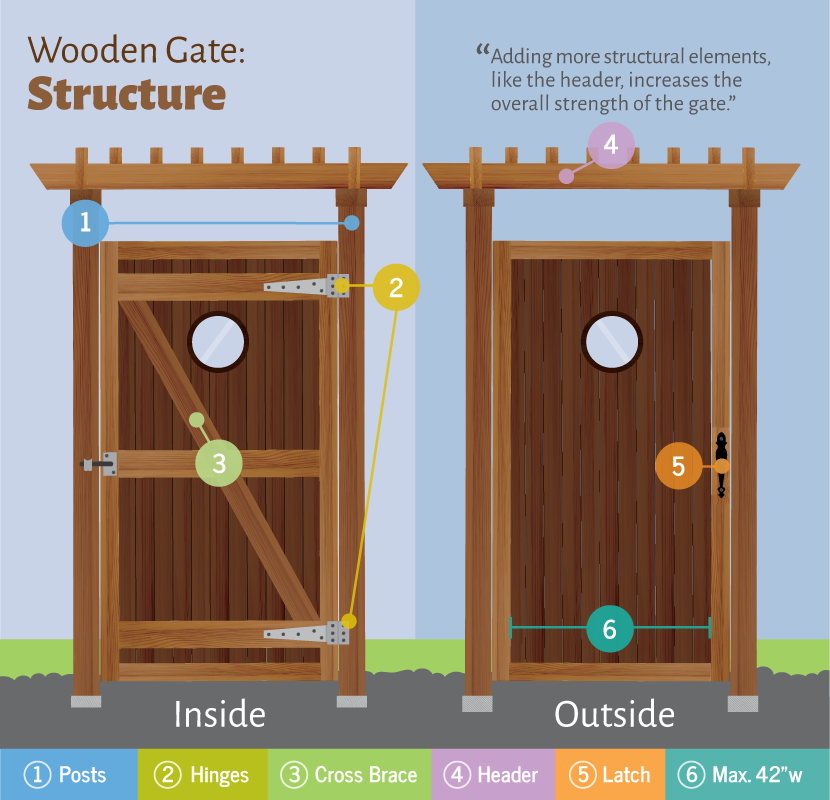
One of the most important things in a gate’s design is a cross-brace in the structure, starting from top corner opposite the hinges (free-swinging side of the gate), pointing downward to the lower hinged side of the gate. It acts like a giant shelf bracket that will hold the gate structure at a 90-degree angle to the post on which it’s mounted.
The cross-brace is usually constructed of 2 x 4 material and acts as a compression load, keeping the gate square. Here’s how: gravity allows the weight of the gate to be transferred inward down the length of the 2 x 4 to the bottom hinge, and then into the post – instead of directly downward, overworking the hinges. It is the simple physics of the triangle shape that makes this work. If you ensure that the cross-brace is angled greater than 45 degrees from the base of the gate, the door will support itself, and last much longer.

It is important to note that an angle less than 45 degrees will render the cross-brace ineffective, because the cross brace cannot take advantage of gravity, and the weight will pull against the hinges more than necessary. This means that the gate will go out of square and no longer close true to the opening it was designed for. This can result in the latch not striking the locking mechanism properly, or the gate hitting the post and never closing properly again. Then you’d have to lift the gate up to shut it – worst!
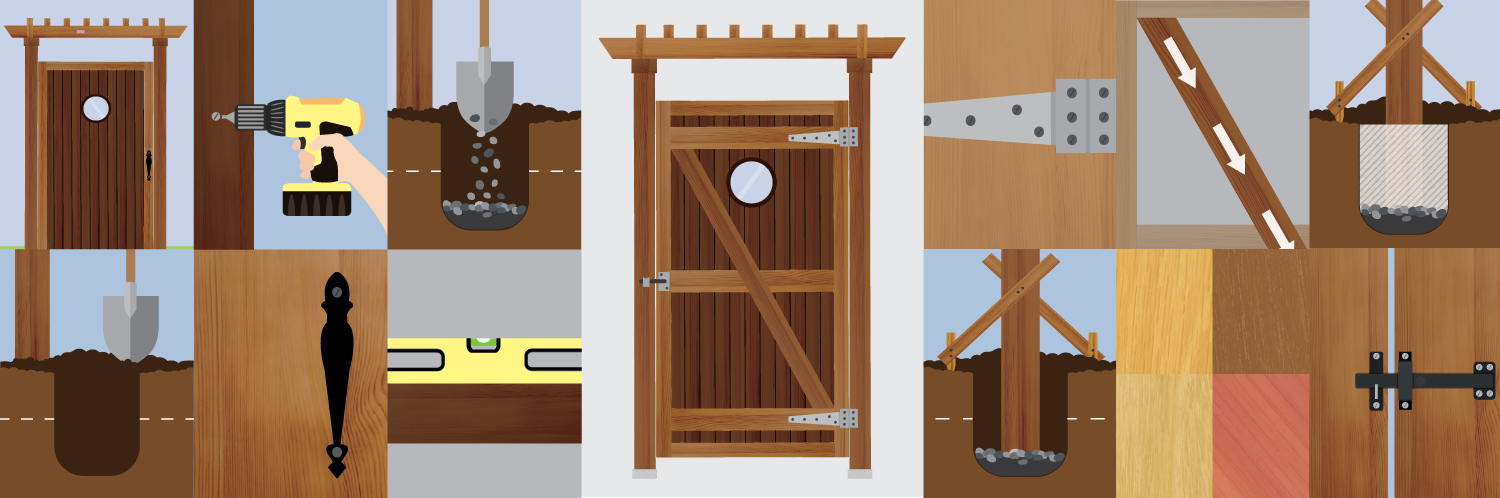
Depending on where you live, the number-one thing to check before installing the posts is your area’s typical depth of frost. You want to ensure that your posts are set into concrete below where the indicated frost level is. This provides a solid anchor into the ground. If frost is not a factor in your region, a depth of 30 inches should be enough to support a gate.
To install the posts, you’ll need to dig a hole between 30 and 36 inches deep. The hole should be about 6 inches wider than the post. For example, if the post is 4 inches wide, the hole should be 10 inches wide. Pour a few inches of gravel in the hole, which will help with drainage. Drop the post into the hole. Fill in around the post with concrete, while keeping the post plumb with a level. This is easier with a second person. Make any final adjustments to the post to ensure it is straight up and down.

It is a bonus if you can make the posts long enough to install a header over the gate opening, with enough clearance to walk under it. This can be in the form of a decorative beam with scrolled ends or a curve cut into the center of it. The header acts as a spacer between the wooden posts. When the gate is mounted to the hinge-post, a header will prevent the structure from leaning inward or warping over time.
Wood is a live material! Even though it was cut from a tree long ago, it still bends, twists, shrinks, and expands constantly, through varying humidity levels. The more support added through structural elements, the longer your gate will stand.
Next consider the width of the gate. A single gate should not be built much wider than 42 inches, or 3.5 feet. A wider gate will lower the angle of the cross-brace and the gate will sag as described above. To ensure a cross-brace angle of greater than 45 degrees, the door height must be greater than the width. If the gate is 3.5 feet wide, for example, the height should be greater than 3.5 feet. If you’d like an opening to be wider, and you feel that a double door gate will not work for you, researching and investing in stronger metal brackets could help hold things square. But, as mentioned, the best way to keep the gate true is to structure it that way.
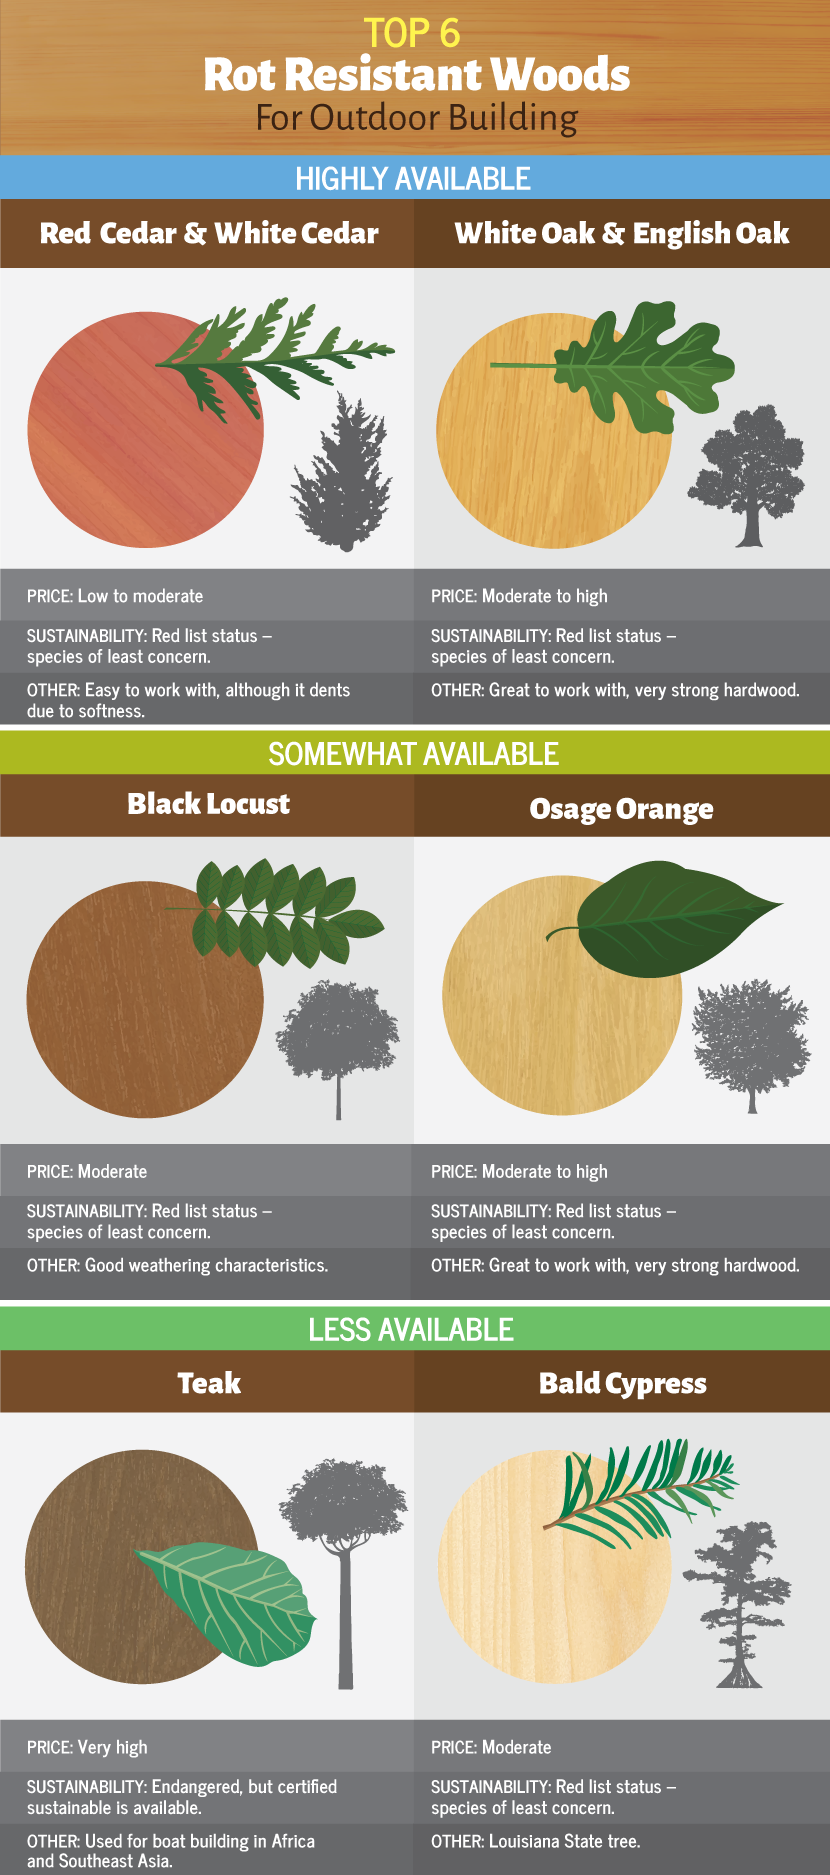
In most regions, there are two basic lumber choices: pressure-treated lumber (PT) and non-pressure treated (NPT). Pressure treating is the process of adding chemical preservatives to the wood, to resist rot and bugs. Both PT and NPT are readily available, although the species available can change, depending on your area.
When choosing a NPT lumber, because there are no added preservatives, you would want to select a wood that has natural anti-rot properties. The chart below shows North American species that have these properties. PT lumber, often spruce, is cheaper than most NPT woods, and has a lower natural resistance to rot or bugs. As mentioned above, it is treated with chemicals to give it those properties.
Recent environmental regulations have changed the chemical compounds used in PT, so ensure you are using approved fasteners with a rating for ACQ (alkaline copper quaternary, a wood preservative), since the wrong type of fasteners can rot when in contact with the compounds in PT lumber. While these compounds are not a critical issue with NPT, ACQ fasteners are still recommended for longer lifespan. Non-ACQ fasteners can turn the wood black as the fasteners oxidize in the wood, which makes for an ugly detail.
When selecting lumber for your gate construction, look for the straightest possible pieces to start off with. It is ideal to find kiln-dried wood, meaning the moisture content of the wood has been lowered; this reduces the chance of warping or twisting.
With PT lumber, the wood is often freshly cut, with high moisture. It has a greater tendency to twist and warp as it dries out. Selecting PT is tricky. Choose lumber that feels somewhat lighter in weight (drier) and looks straight.
Also look for lumber with small knots to further help control the warping issues. These factors help to ensure your gate will not warp after you have built it.
When considering hinges, latches and keyhole locks, determine the approximate weight of the gate you have built. If it has been built in a proper, solid manner, it will most likely take two people to lift and hang in place. At that point the gate may weigh anywhere from 50 to 150 pounds, depending on the size. The hinges should be large enough to support the weight. The screws should be set deep enough to grab into the main 2 x 4 structure of the door.
This gate will be swung back and forth for many years to come, so it has to stand up to some harsh conditions like windy days, occasional bumps and scrapes by wheel barrels and lawnmowers, or kids kicking soccer balls at it! The latch should have more than just two tiny screws holding it in place. Consider using stainless steel hardware if the budget allows for it, since lighter metals won’t hold up to such abuse.
As a gate swings closed, the latch is susceptible to a lot of pressure and can work its way loose or bend. Installing a doorstop on the gate can prevent the bumps that cause damage to the latch. This “stop” can be a small piece of wood extending from the gate, which catches the post when it shuts.
Increasing the strength of a gate happens by proper design. The use of an effective cross brace, framing the posts well, and using quality lumber and parts, will ensure the gate performs well for decades. Having been armed with the basics of gate structure, you are now equipped to build your unique design to match your tastes.
Embed the article on your site

Written by:

Your windows might be beautiful, but when you realize how much heat is esca...

Invest in your home by taking steps to protect it against the cold. Some we...

Obtaining a level measurement is incredibly important for accurately comple...
Get your fix of expert articles delivered straight to your inbox!
No Thanks - I don't like cool stuff