

Like what you're reading?
Get your fix of expert articles delivered straight to your inbox!
Oops! Please double check your email address.
No Thanks - I don't like cool stuff


Nothing beats the comfort, taste and smell of fresh-baked bread. Unfortunately, making bread can be labor intensive and frustrating, especially if the end results don’t meet your expectations. That may be why many people leave bread making to the professionals. If you’ve been disappointed by bread baking in the past or if you’ve been too intimidated to even try baking bread at home, keep reading. Baking mouth-watering loaves is not as difficult as you may think.
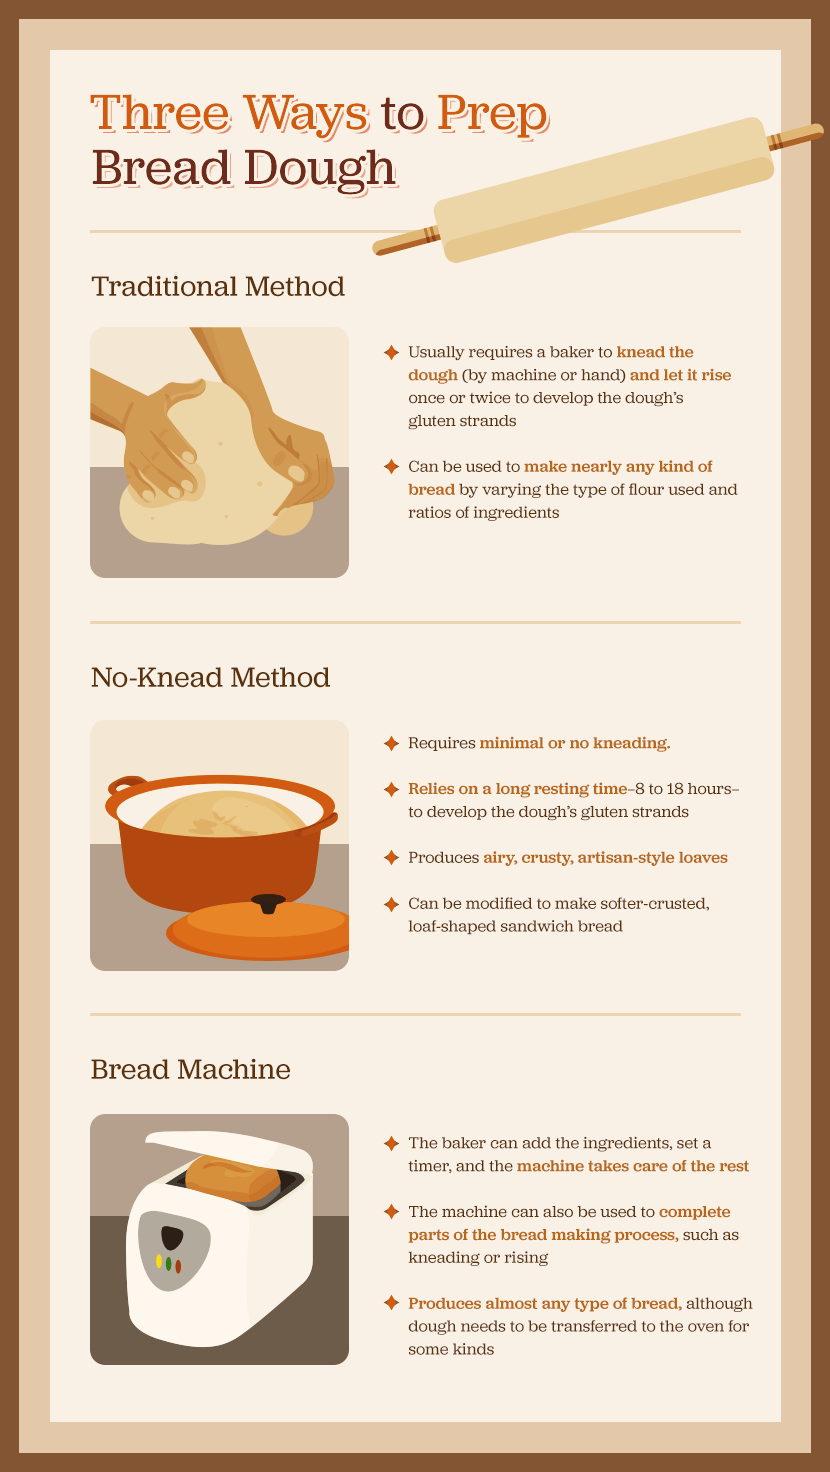
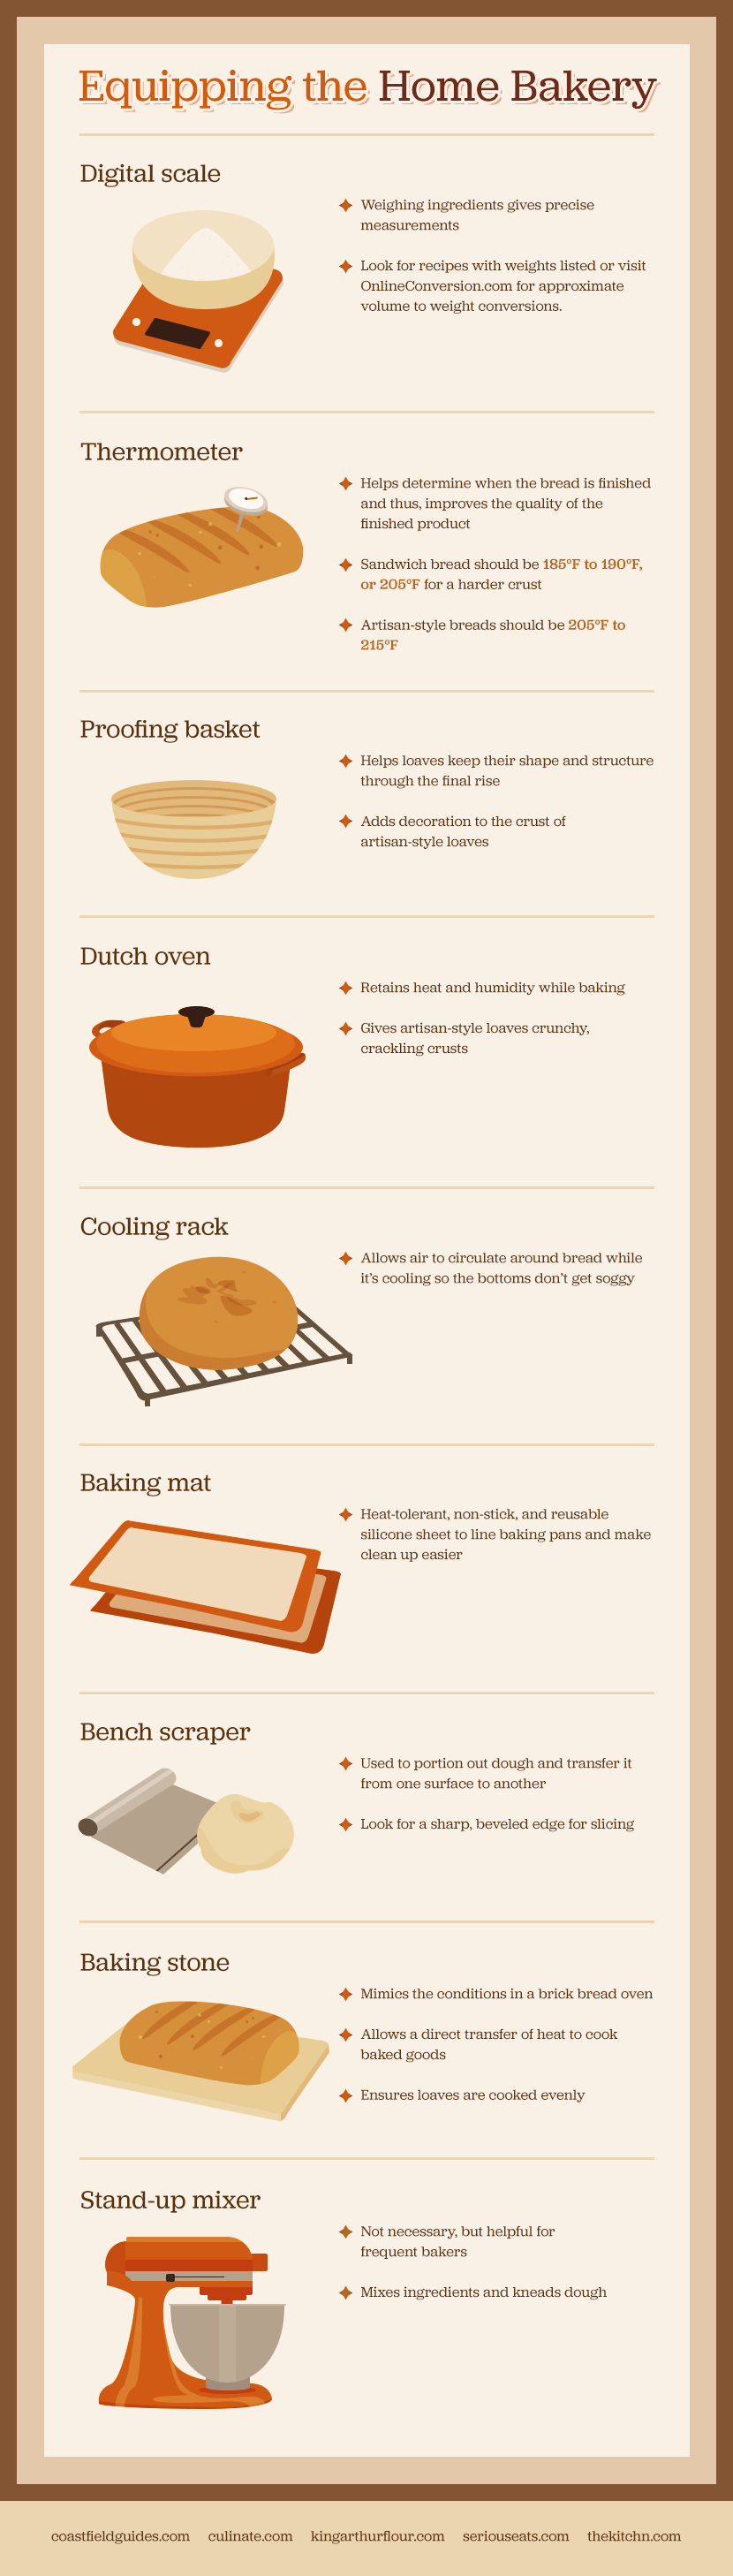
Baking bread at home has undergone a revolution in the past 40 years. Today, you can prepare bread dough as it’s been done for centuries or you can use a bread machine or no-knead method, both of which can make the process nearly effortless. Read on to discover which method best suits your lifestyle, schedule, tastes, and the season. We’ll give you a basic recipe for each method and some tricks and tools to help you bake delicious loaves every time.
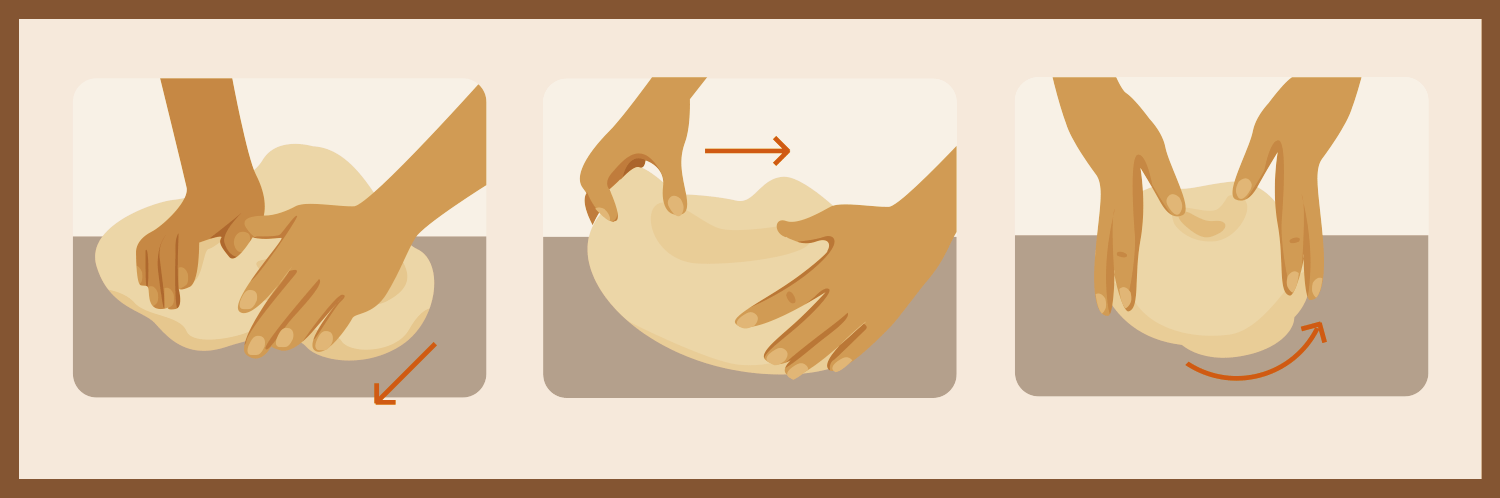
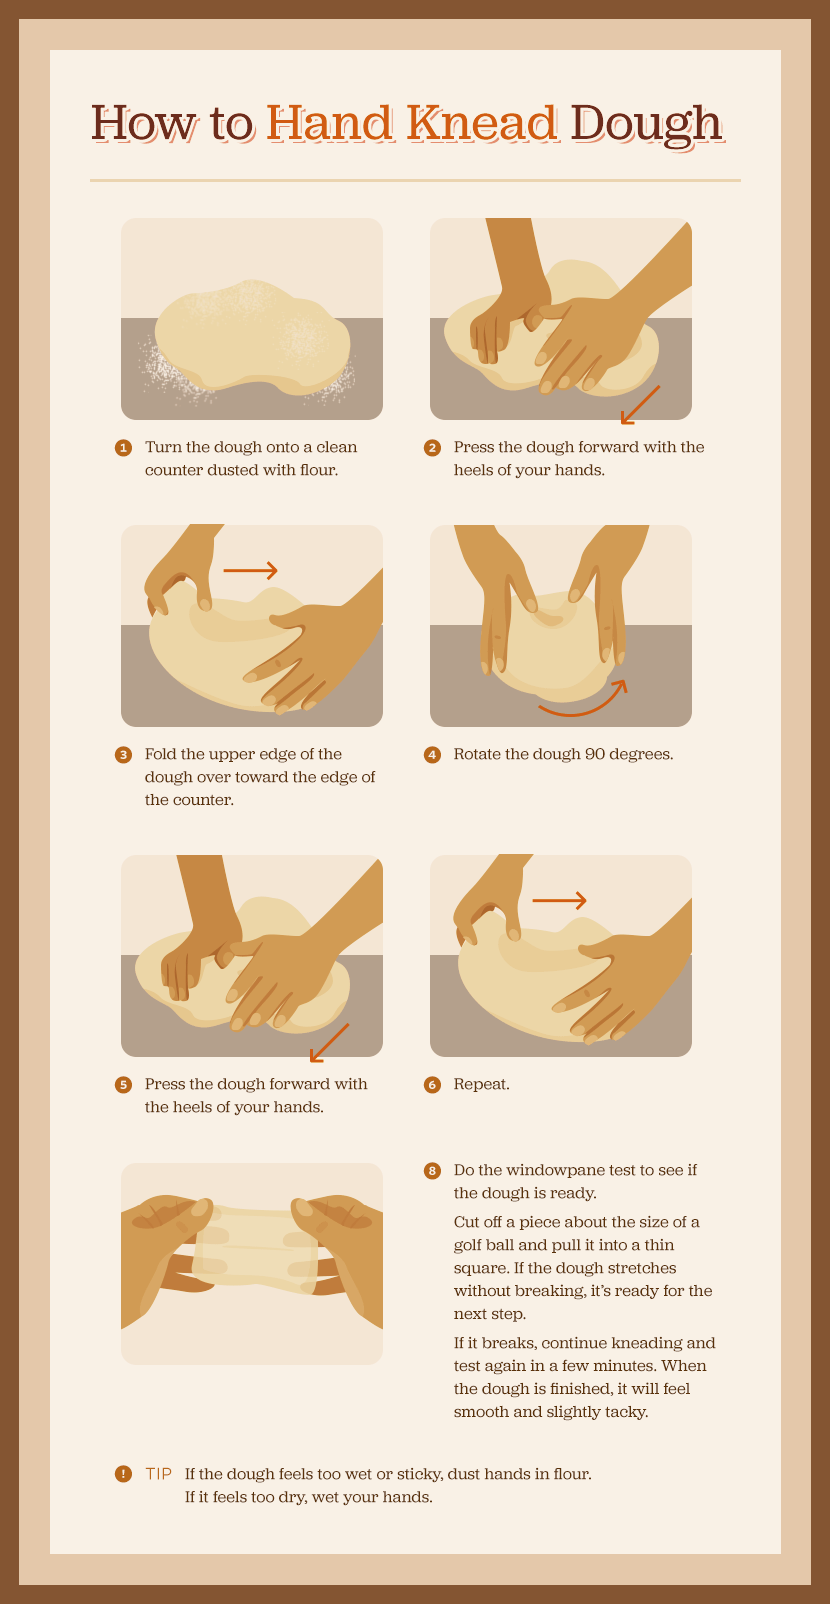
No one would call the traditional steps for transforming flour, water, yeast, and salt into bread simple. Countless books and websites give in-depth information on the subject. However, it’s a satisfying, versatile process to learn. Start with this simple, delicious sandwich bread (adapted from The America’s Test Kitchen Family Cookbook).http://www.amazon.com/Americas-Kitchen-Quick-Family-Cookbook/dp/1933615990 Then, you can move on to more complex recipes that use a starter and whole grains.
Makes one 9-inch loaf
Ingredients:
Directions:

Want to make homemade artisan bread without having to do much of anything? Join the no-knead revolution! Try this amazingly simple recipe adapted from Jim Lahey’s My Bread: The Revolutionary No-Work, No-Knead Method.http://www.amazon.com/My-Bread-Revolutionary-No-Work-No-Knead/dp/0393066304http://www.girlversusdough.com/2015/08/13/no-knead-dutch-oven-bread/
Ingredients:
Directions:
For more fiber and nutrients, use whole-wheat flour instead of bread flour and let it rise longer. Chef Mireya Merritt recommends an initial rising time of 18 to 20 hours for 100 percent whole-wheat no-knead bread. http://www.myhealthyeatinghabits.com/2012/03/21/my-favorite-no-knead-whole-wheat-bread/ Mix whole-wheat and bread flours to suit your tastes and experiment with different rise times.
Substitute 1/4 cup of live sourdough culture in place of yeast to give the bread a richer flavor.http://breadtopia.com/sourdough-no-knead-bread/
If you prefer softer-crusted, loaf-shaped sandwich bread to round, crusty, artisan-style bread, bake the bread in a loaf pan for 30 to 35 minutes at 450 degrees.http://www.thekitchn.com/noknead-bread-hack-how-to-make-105248
The Bread Machine MethodWant to let something else take care of the baking while you sleep? Hello bread machine! Get started with this basic recipe adapted from The Complete Guide to Bread Machine Baking.https://www.amazon.ca/Complete-Guide-Bread-Machine-Baking/dp/0696209675?ie=UTF8&*Version*=1&*entries*=0
Makes a 1 1/2-pound loaf Ingredients:
Directions:
Thinking about buying a bread machine? Here’s what to look for:
Get Rid of the Hole Dislike the large tell-tale hole in the bottom of bread-machine loaves? Before the baking cycle, take the dough out of the machine and remove the kneading paddle. Then return the dough to the machine and bake it.
Let the Bread Machine and Oven Team Up If you like a crispy crust, let the bread machine do the dough prep, then move the dough to the oven for baking.
Keep the Bread Machine Busy Put your bread machine to work even when you’re not baking bread by using it to make cakes, jam, and yogurt.http://thewondermummy.blogspot.com/2014/02/homemade-bread-machine-yogurt-with.htmlhttp://lifehacker.com/5659745/bake-a-cake-in-a-bread-machinehttp://www.ahealthysliceoflife.com/simple-strawberry-jam-in-the-bread-machine/
Whether you hand knead dough or prefer a more modern method for preparation, you’ll be rewarded with the delectable taste and smell of home-baked bread. It’s not just the finished product that satisfies you. The entire process of transforming yeast, flour, salt, and water into bread can be therapeutic, creative, and calming. Once you’ve cut into a fresh-baked loaf, you probably won’t want to go back to the store-bought variety.
Embed the article on your site

Written by:

In the International Year of Pulses, learn how to incorporate lentils into ...
Chickens are a great addition to any backyard garden experience. We cover s...

The three biggest reasons for planting lettuces in your garden are flavor, ...
Get your fix of expert articles delivered straight to your inbox!
No Thanks - I don't like cool stuff