How to Edge, Tune, and Wax Skis and Snowboards
Winter outdoors enthusiasts gearing up for ski and snowboard season know how expensive snow sports can be, and how important it is to take care of skiing equipment.
But if you don’t have $40 to $50 to spend on every professional tuning and waxing session, you can easily do it yourself!
For about the same one-time investment, skiers and snowboarders can tune and wax their own gear all season long.
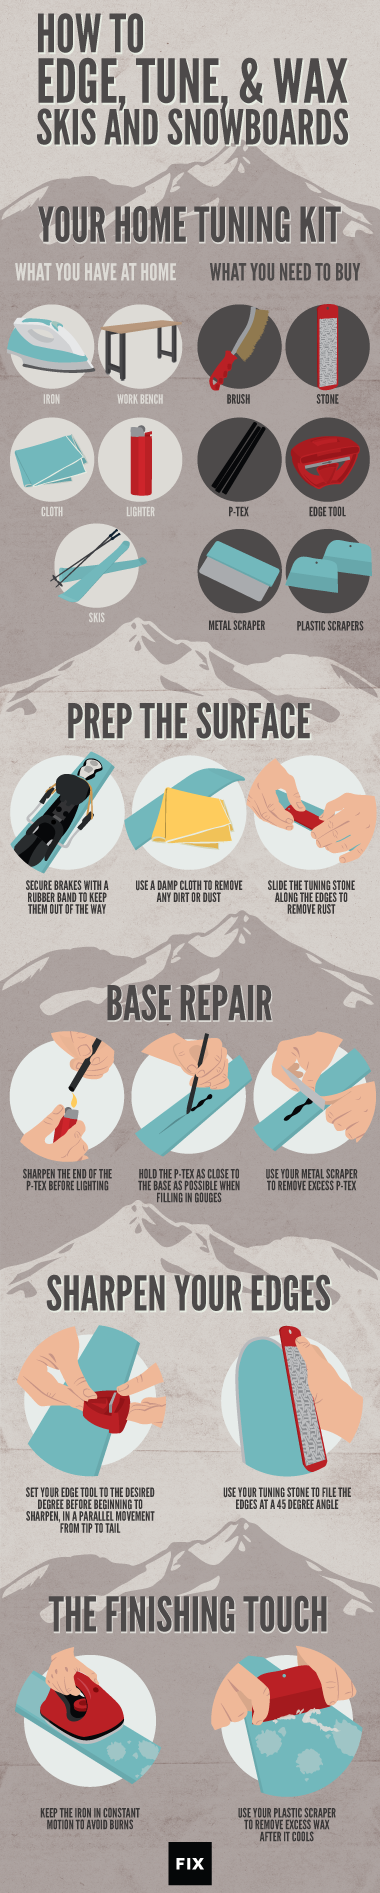
What You’ll Need
The items below can be picked up individually (some you’ll already have on hand at home) or bought in a ski and snowboard tuning kit.
- Wax: pick up a stick of all-purpose (all-weather) wax at your local ski shop or outdoor store.
- Iron: use an old iron at home, or buy a ski-tuning iron.
- Means of securing skis or board: most tuners use a wooden table and vise, but any workbench will do, and a two-person team can hold skis securely without a vise.
- Metal scraper: found in ski shops, a metal scraper is for scraping P-Tex only.
- Plastic scraper: any plastic scraper with an edge will do! Pick one up for just a few dollars at any ski shop.
- File and file guide: a metal file specifically made for edging skis and boards can be found in ski shops or outdoor stores; pair it with a file guide.
- Edge tool (alternative or in addition to the file): included in most ski-tuning kits, edge tools make finding the correct file angle easy.
- Brush and cloth: a soft brush is important for wiping away wax shavings, and a damp cloth will remove dirt and dust from bases.
- Stone: ski stones are useful for removing rust from edges.
- P-Tex: a must for filling deep scrapes or gouges in ski and snowboard bases, found at ski shops and in tuning kits.
- Lighter or matches: for lighting your P-Tex.
Preparation
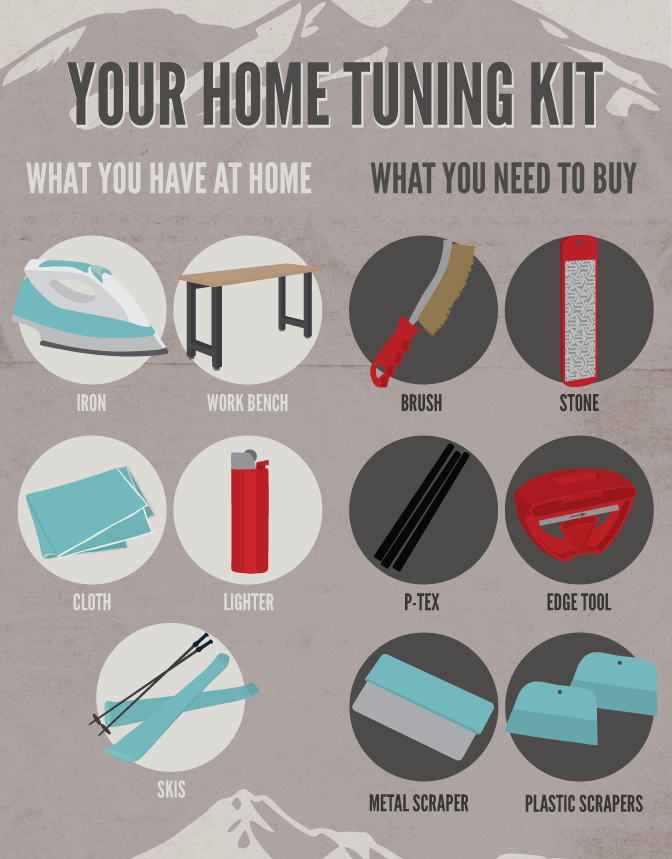
Once you have the necessary tools assembled, it’s time to get started! To prepare your skis or board for tuning and waxing, it’s important to prep the bases. Start by securing your ski brakes, so they’re out of the way.
Simply pull them back with a large rubber band. Next, wipe down the bases with your damp cloth. You’ll want to remove any dirt, dust, or grime that may remain from last season or from “summering” in your garage.
Finally, remove any rust from your edges using your stone. Hold the stone horizontally (like a harmonica) and pass it across the edges at a 90-degree angle, working from tip to tail. Prep both bases before moving on.
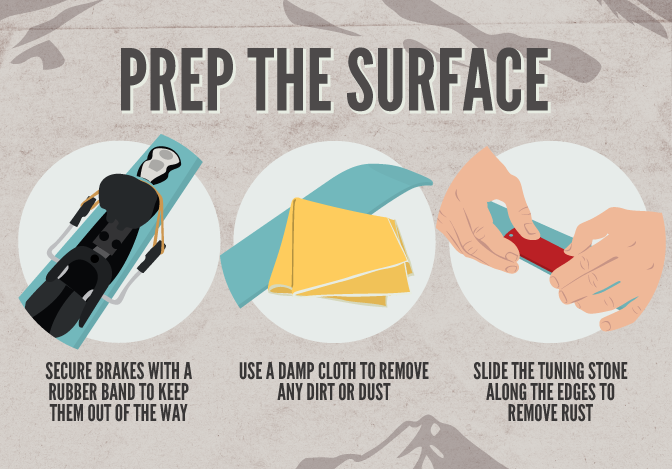
Base Repair
Now that your base is prepped, it’s time to fix any major scrapes or gouges. Light the end of your stick of P-Tex with a match or lighter, then touch the lighted end to the scrape, allowing the melted P-Tex to fill it.
Be careful not to drip the P-Tex in from a height, as this will burn the base. Once the scrape is filled, remove the P-Tex stick and blow it out gently.
Let the base cool for approximately 10 minutes, then scrape away any excess P-Tex with your metal scraper until the base is smooth. You’ll want to hold your scraper horizontally, with your thumbs behind it.
Push the scraper along the gouge until the P-Tex is flat and smooth. Alternatively, you can pull the scraper toward you, “cutting” the P-Tex until smooth. Repeat for both ski bases, as needed.
Sharpening and Edging
After finishing major base repairs, it’s time to tune your edges. A sharp edge ensures the best response from your skis or board when you’re turning on the snow.
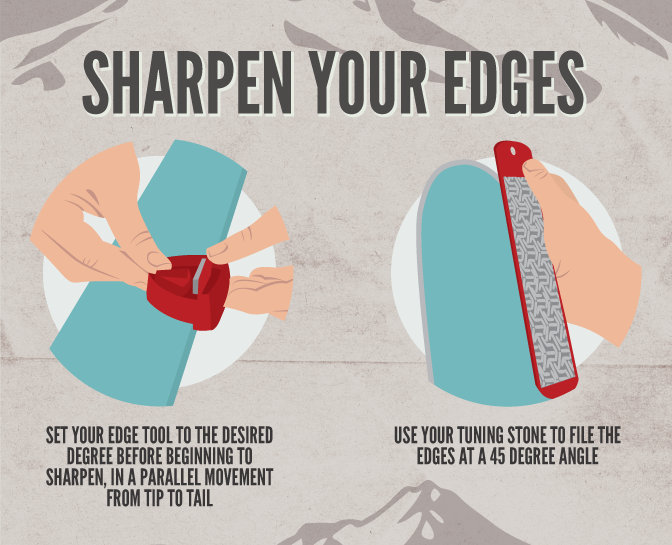
Start with your stone, running it over your edges in a parallel movement (not at an angle) to get rid of any burrs (rough spots). Next, sharpen your edges with either your file and file guide or an edge-sharpening tool.
Either way, you’ll need to decide on the degree of filing you desire, between one and three degrees.
While edge degree can be a personal preference, most skiers and snowboarders start by following their ski or board manufacturer’s recommendations.
If using an edge tool, place the length of the file parallel to the edge at either the 88 or 90 degree setting (based on your degree choice). Draw the file toward you with overlapping strokes, from tip to tail.
Continue until you meet no resistance. If using the file and file guide, place the file guide onto the ski edge itself, then secure the file on the guide with a clamp or firm grip.
The butt of your file goes into the guide (pointing to the lower right), and the tang of your file should point toward your upper left (toward you). Use the same movement you would use with an edge tool. Repeat for all edges.
Lastly, you’ll want to dull down the edges at your tip and tail. While these edges need to be tuned to the same degree as the rest of your edge, they don’t need to be as aggressive.
Take your stone and place at a 45-degree angle to your edge, and dull down contact points.
Waxing
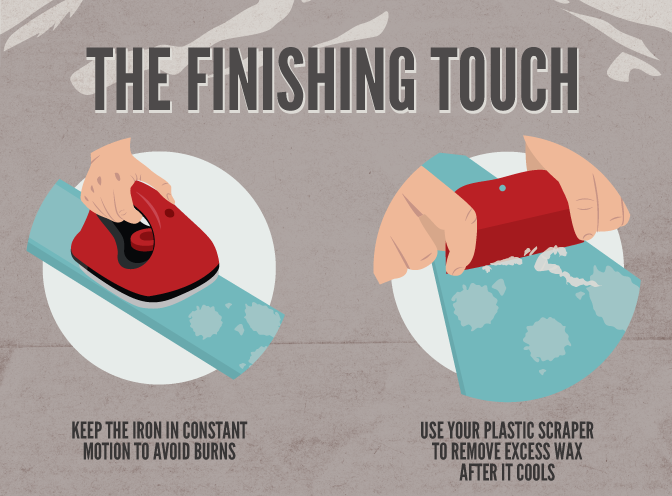
Finally, it’s time to wax your skis or board! Use specialized wax for specific snow and weather conditions, or use an all-purpose wax. Set your iron on its lowest setting, and heat the wax by holding the wax block up to the iron.
Drip wax onto your ski or board base in a figure-of-eight or “S” pattern. Next, iron the wax drippings into the base evenly, taking care to keep the iron moving (to avoid burning your base).
Allow the wax to cool to room temperature (about 20 minutes), then use your plastic scraper to scrape away excess wax.
Do not use your metal scraper for this step, as it will damage your base. Scrape wax from tip to tail, until each pass yields no remaining wax. Use your brush to clean away lingering wax scrapings.
Tune and wax your skis or snowboard now, and enjoy the winter season knowing you’ve learned a new skill and saved your money for the slopes!
Embed the article on your site