


Like what you're reading?
Get your fix of expert articles delivered straight to your inbox!
Oops! Please double check your email address.
No Thanks - I don't like cool stuff


You may know this piece of equipment as a string trimmer, weed whacker, or maybe even a whipper snipper. Whether you use it to keep perfectly edged garden beds, or to slice through weeds, it’s a versatile piece of equipment to have on hand. Keeping it well maintained will ensure it lasts you for many mowing seasons. However, even with the best preventive maintenance, problems can pop up just like those pesky weeds. In this article, we’ll go over those common issues and help you correct them.

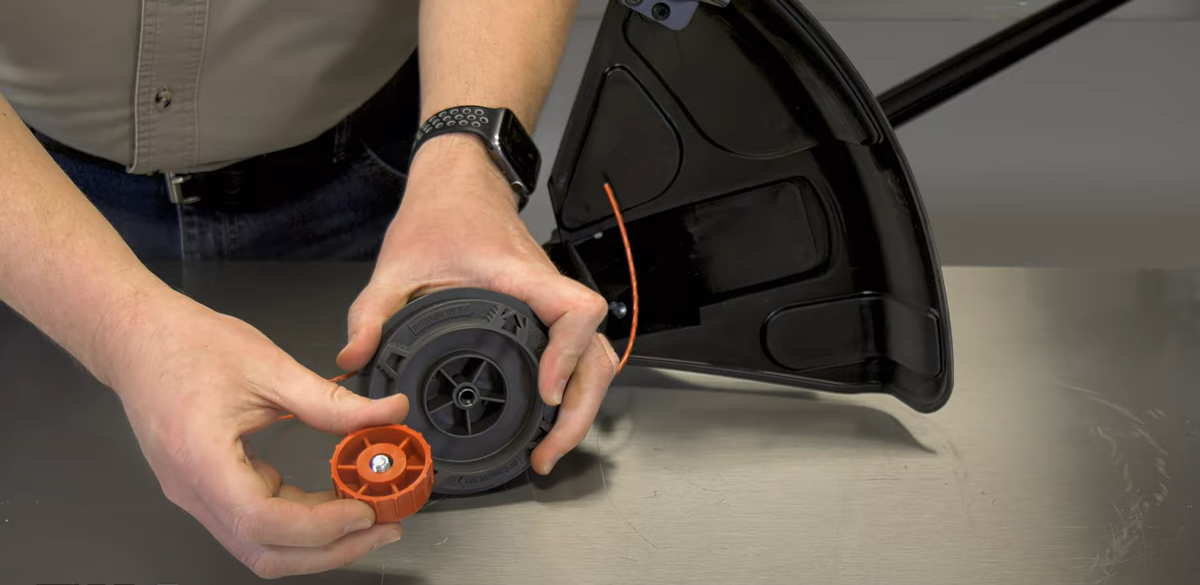
The first item we’re going to look at is the trimmer head. No matter how careful you are with your trimmer, eventually the head will need to be replaced. When you need new line, the head gets bumped against the ground and over time that plastic housing will wear down. When this happens, the trimmer head then needs to be replaced.

There are a few different styles and ways that a trimmer head can be attached, but we’re going to demonstrate the two most common. The first is a style that is threaded directly onto the gear head. To remove it, insert an Allen wrench into the small lock hole found on the side of the gearbox. This locks the head and allows you to unscrew the trimmer head from the shaft. A straight shaft trimmer will have a reverse thread, while a curved shaft will have a regular thread. Replace the washers, and then begin threading the new trimmer head into place. Once again, use the Allen wrench to lock the spindle so that you can fully tighten the head.

The second common style of trimmer head uses a knob to hold the head in place on the shaft. On a straight shaft, this knob will also have a reverse thread. Once the knob is removed, the trimmer head will slide off the spindle. When installing the new trimmer head, you will want to ensure that the hex-shaped recess on the trimmer head lines up with the hex shape on the shaft. When these are lined up, you’ll be able to compress the spring on the trimmer head spool. Then the knob can be reinstalled.
Next up is the trimmer guard. This part helps to protect you from flying debris while the trimmer is operating. The guard also has an attached blade that cuts the line to the proper length. This is an important feature, as extra line length reduces the engine’s RPMs (Revolutions Per Minute). Low RPMs can cause the engine to run cool, which can potentially clog the exhaust with carbon.
Common issues with the guard are that it can crack or have pieces break off, especially along the leading edge. If this happens, the guard will need to be replaced. It is typically attached to the trimmer shaft with a clamp and screw, and we’ll start by removing the screw. With the screw removed, the guard can now be pulled away from the clamp. The old guard can be discarded, and the new one prepped for installation.
A new line cutting blade will need to be attached to the new guard and can be attached with the two screws. Once the blade is installed, the entire guard assembly can be attached to the trimmer shaft. Reversing the earlier steps, the new guard can be attached to the clamp and then secured in place with the screw.

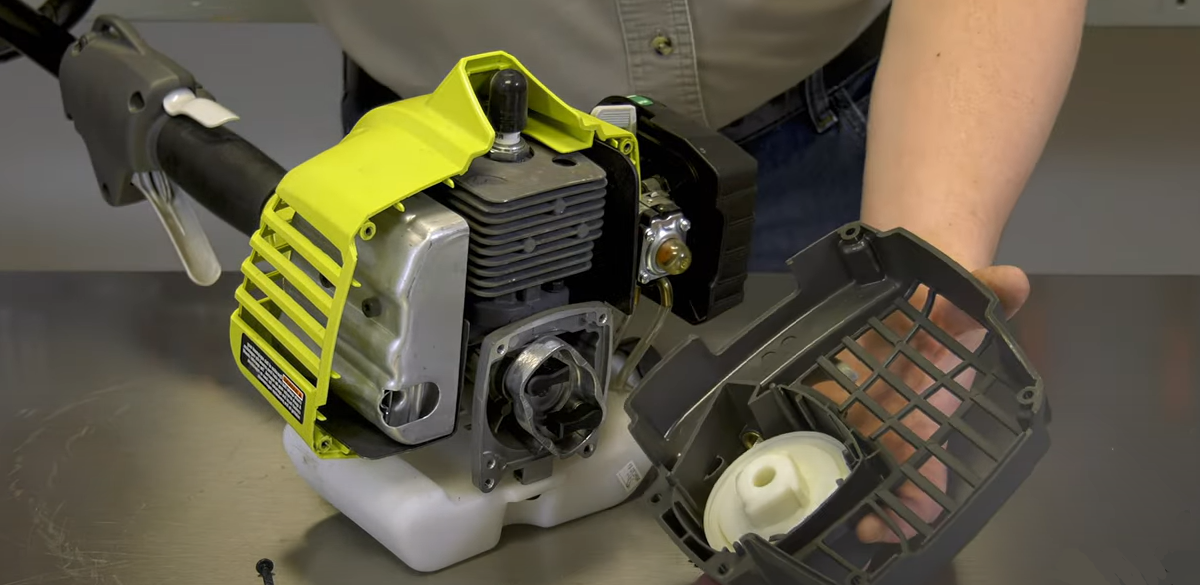
The recoil starter is another part of the trimmer that will wear out with regular use. The rope might fray, or the spring will break, or the pulley will wear down. While it is possible to rebuild a starter, they are such an inexpensive part that it’s often easier to just replace the entire assembly. Once again, we have two different models to demonstrate on. The first uses three screws to hold the starter in place. With these removed, the starter comes free. To install the new starter, you may need to pull the rope to get the poles to align. Once the starter is in position, the three screws can be reinstalled.
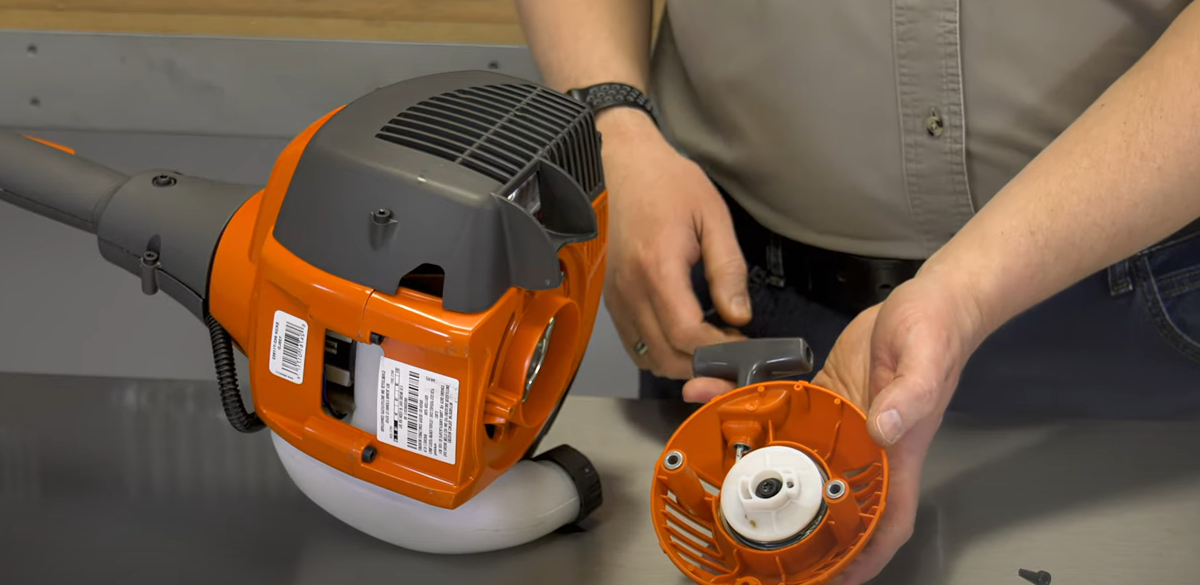
On the second style of trimmer, the starter is built into the rear motor housing. The process to replace this starter is similar to the other style, first remove the housing, and then line up the poles by pulling the starter rope slightly. Once everything is in place, the screws can be reinstalled.
If the trimmer engine is running poorly, or won’t start at all, it could be a problem with the spark plug. The spark plug is installed in the engine’s combustion chamber. It takes the high voltage produced by the ignition module and creates a spark that then ignites the fuel, which powers the engine. If the engine isn’t properly tuned, or if you’re using old fuel, the electrodes on the spark plug will become caked with carbon and tar. If this happens, the engine will not run.

A spark plug is another one of those parts that wears out with regular use and should be replaced at least once per year as part of your regular maintenance. To inspect or change out the spark plug, first remove the boot and then use a wrench to remove the spark plug. Before installing a new spark plug, you’ll first need to set the gap between the electrodes. This is done using a spark plug gapping tool. The tool measures the gap, along with allowing you to adjust it by either prying it open or tapping it closed. The new plug can then be threaded into the cylinder, and then tightened in place with the wrench.

Last on our list is the carburetor. The carburetor mixes fuel into air and sends that mixture into the combustion chamber. If the carburetor becomes clogged, fuel won’t be able to flow properly, and the engine won’t start. Carburetors have very small passages for the fuel to flow through, and they can easily become clogged by dirt or other debris. Regular cleaning or replacing of the air filter can help, but if the trimmer has been left unused for several months, the fuel can break down which then causes corrosion inside the carburetor.

It is possible to clean and rebuild a carburetor, but they are also a relatively inexpensive part so it may be faster and easier just to replace it. To do this, first start by draining any fuel in the trimmer fuel tank. Then remove the air filter cover, the air filter, and the screws that secure the carburetor. Once the screws are removed, the air filter base comes off and the carburetor comes free.
Next is to remove the throttle cable from the carburetor by loosening the nut and then pulling the cable away from the linkage. Note the location of the fuel lines and disconnect them. The new carburetor is now ready to be installed. Reattach the incoming filtered fuel line and the return fuel line to their proper connections. Then the throttle cable can be threaded through the linkage, and the metal tube secured to the bracket. Once the fuel lines and throttle cable are in place, the new carburetor can be secured back on the engine. The air filter base, filter, and cover can be reinstalled, and the tank can be filled with fuel.

If you run into any issues with your trimmer this season, you now know the five most common causes and just how easy it is to fix them yourself! If you need to pick up some replacement parts, we have you covered. Find the exact replacement for your model by searching our site. You can keep up to date with our DIY and how-to videos by subscribing to our YouTube channel.
Written by:
Written by:
Are your tools ready for the gardening season? Check out these simple tips...

Springtime means the start of mowing season! Be sure to inspect these impor...

You've seen them popping up in your backyard, but did you know dandelions a...
Get your fix of expert articles delivered straight to your inbox!
No Thanks - I don't like cool stuff