

Like what you're reading?
Get your fix of expert articles delivered straight to your inbox!
Oops! Please double check your email address.
No Thanks - I don't like cool stuff


Today’s farmhouse style is often called rustic chic because it conveys a comfortable, traditional feeling, yet with a refined nature.
Building a farmhouse table is your first step towards achieving this style. The table is easy to build, requires no special woodworking tools, and best of all, is relatively inexpensive to make.
Similarly designed farmhouse tables cost hundreds of dollars from discount online retailers. Brick and mortar furniture stores often charge as much as $3,000 for the same item. Your farmhouse table will cost between $100 and $200.
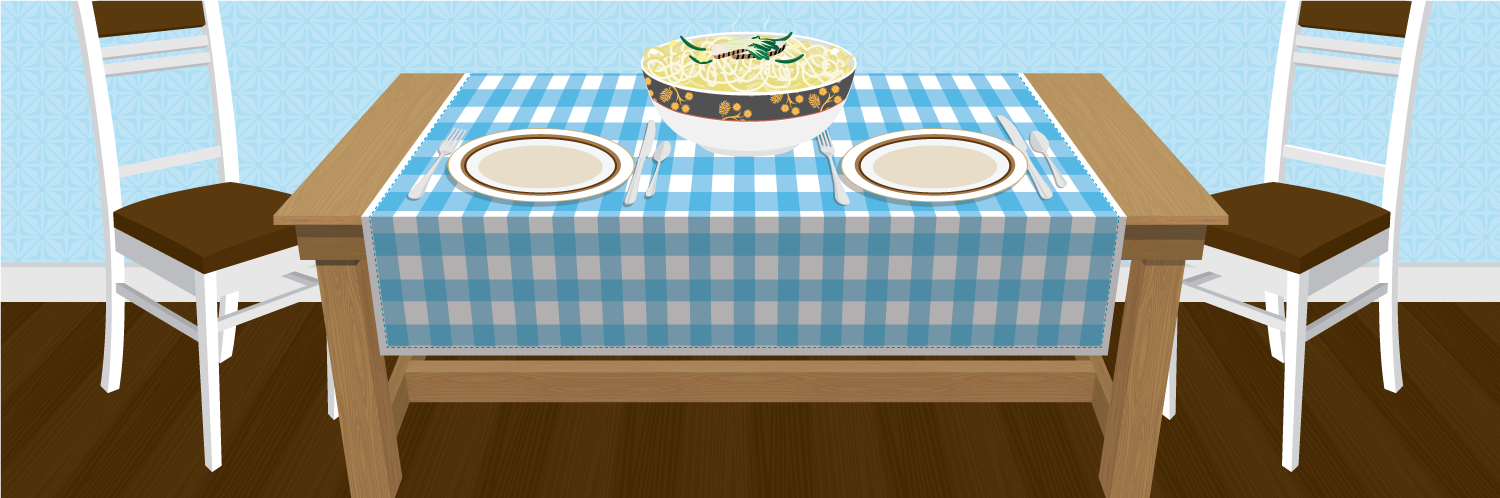
Seating six people, this farmhouse table measures 72” long, 37” wide, and 30” high.
The secret of the table is the truss that runs at foot level along its length. Not only does this infuse the table with a rustic look, it acts as a strengthening device.
Another element you will be adding that provides the table with its unique look: two tabletop end pieces that run perpendicular to the lengthwise pieces that form the majority of the top. These end pieces are a stylistic flourish that distinguish this table from other tables, and adding them requires very little extra work.

| Quantity | Lumber (Nominal Size*) | Length (Ft.) |
|---|---|---|
| 1 | 4x4 | 10 |
| 3 | 1x4 | 10 |
| 2 | 1x10 | 8 |
| 1 | 1x10 | 10 |
| 2 | 2x3 | 8 |
Work in a dry, warm space with a flat floor, such as a garage.
Devote two separate work sessions to the table-building process: first, cutting the lumber and constructing the table; second, finishing the table.
Cut all of the lumber in one session before you begin to build. Your cut list:
| Using This Lumber | Cut This Many Pieces | Each Piece This Long |
|---|---|---|
| 4x4 | 4 | 29 ¼” |
| 1x4 | 2 | 70” |
| 1x4 | 5 | 33 ½” |
| 1x10 | 4 | 53 ½” |
| 1x10 | 2 | 37” |
| 2x3 | 2 | 33 ½” |
| 2x3 | 2 | 26 ½” |
| 2x3 | 1 | 63 ½” |
Some farmhouse table plans employ a device called a Kreg jig that uses special (and expensive) screws to hold the tabletop together.
Instead, this method is far easier as you first make an underlying frame that strengthens the tabletop – eliminating the need for complicated jigging, as well as the need to purchase tools that you will use only once.
Begin with your seven pieces of 1x4 lumber.
Arrange them on the floor so that the two 70” pieces are about three feet away from each other.
Arrange the remaining five 33 ½” pieces between the two longer pieces and running perpendicular to them.
This rough layout gives you a sense of what the underlying frame will look like after it is nailed together.

Following that rough layout, nail together the outer (or perimeter) part of the frame, using your two 70” pieces and two of the 33 ½” pieces.
Before nailing, run a thin bead of wood glue on the end of each piece.
Nail each joint using two finishing nails. While this may initially seem inadequate, you will be adding other fasteners later that will make the table more structurally sound.
You now have three remaining pieces of 33 ½”-long 1x4 lumber.
Run a bead of glue and then nail one of those pieces dead-center onto the perimeter frame.
Nail two more pieces on either side of that center piece, each about 12” away from the center.
As noted earlier, two perpendicular pieces of wood will cap the tabletop and give it a more finished look. These pieces need support below them.
Take out your two pieces of 2x3 lumber that run 33 ½”.
Insert them into the frame, each 6” from the end of the frame.
Each needs to be flush with the top side of the frame.
Lay the frame down flat on the ground.
Take out your two 37” pieces of 1x10 board. Lay one of them on the end of the frame, providing for a 1” overhang. Keep the second 1x10 off to the side; it will be used in a later step.
With your pencil, draw a line down the length of the board on the underlying 2x3. Remove the 1x10.
Set the 1x10 board back down, using the pencil mark as a reference guide. Nail down the board using finishing nails.
Butt the four pieces of 53 ½” board lengthwise against the end piece that you just nailed into place to make a rough check for sizing and placement.
Remove the boards. Run a long bead of wood glue on top of the frame.
Place the four lengthwise boards down again and nail into place with the finishing nails.
Take your remaining piece of 37” 1x10 board. Run glue on the frame. Lay the board on top of the frame, butting it against the lengthwise boards.
Now, take a break and let the wood glue dry for about 2 hours.
Flip the table over.
Take one of your 4x4 pieces and fit it tightly into a corner of the frame. Screw into place, using four of the 2” screws. It is recommended that you drill pilot holes with a drill bit to avoid splitting the wood.
Repeat for the other three legs.
Flip the table over again, with a helper, so that it is now standing upright.
Take your two 26 ½” 2x3’s and your one 63 ½” 2x3.
Build them into an “I” shape, with the long piece running down the middle.
Squirt with glue and screw together with the 2” screws. Drill pilot holes if necessary.
Place the truss between the table legs, using scrap lumber to prop it up.
Height placement is your choice, but keep in mind that the lower the truss is, the stronger it is. However, the truss does need to be at least 2” to 3” off the ground to give the table its proper appearance.
Drill pilot holes, then screw into place with the 5” screws. Use two screws per table leg.https://www.youtube.com/watch?v=zdnJgb_k2gg
Your built farmhouse table is a blank canvas for any type of creative finishing process.
One great thing about this table is that you can dial its refinement up or down, according to how rustic or finished you want it to look.
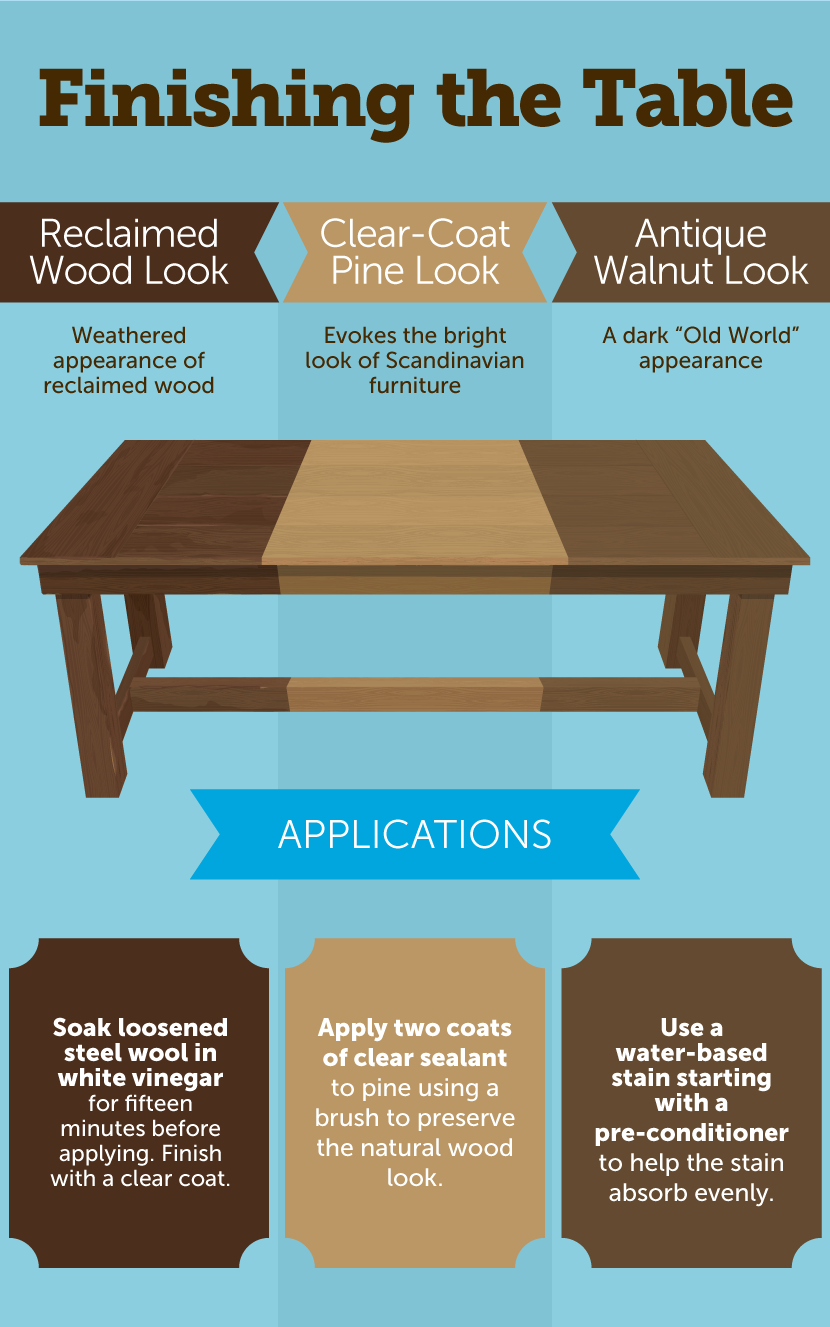
With any style that you choose, you have the option of distressing the wood before staining and sealing.
Distressing means, essentially, to turn new wood into old-looking wood by lightly battering it.
You can use several tools that you may already have on hand. In each case, go light on the pressure at first. You can always distress it more later on. But it is difficult to smooth out wood that has been overly distressed.
Ideas for distressing wood:
Building a farmhouse table is a relatively easy project that will take about one weekend and cost less than $200.
Embed the article on your site

Written by:

This ice shanty will keep you protected from weather all winter long, and f...

For thousands of years humans have used plant volatiles to heal their minds...
Simple accent pieces can transform a room from drab to fab. Fix has budget-...
Get your fix of expert articles delivered straight to your inbox!
No Thanks - I don't like cool stuff