The Secret to Building a Salad Keyhole Garden
A keyhole garden is a remarkably adaptable element that works in a range of garden styles.
Visiting other people’s gardens is a lovely way to peek into their passions and interests.
Some gardeners are completely devoted to one type of plant, while others have a set purpose in mind, such as growing and harvesting herbs and vegetables.
I’ve always been a bit of an equal-opportunity gardener: a few veggies, some blooms, and a few foundation trees for structure.
But this year I’ve decided to focus my gardening efforts on a new type of themed garden: a salad keyhole garden.
What is a Keyhole Garden?
Raised beds are nothing new. The idea is to elevate the garden to maximize drainage, improve the soil, and enhance access.
Keyhole gardens are a riff on that idea, with one addition: a center compost area that works as a self-fertilizing element for the plants.
A salad keyhole garden takes it a step further, by planting specific vegetables and herbs together–to be picked at the same time–to create a delicious dish.
What’s most interesting about keyhole gardens is their bountiful history.
They began as an invention of charitable organizations to help people in poor countries create a self-sustainable, controllable food source.
Considering that the construction of keyhole gardens often utilizes recycled materials – think cast-off tin and upcycled bricks –
schools in some of those countries utilize the gardens as a way to both grow nutritious ingredients for school lunches and as a learning tool, for children to take the idea home to their parents.
The center compost bin serves a dual purpose: it provides nutrients to the plants and offers a spot for recycling kitchen waste.
One of the biggest attractions of a keyhole garden is its ease of construction. Nearly any material that will withstand the stressors of weather–rock, stone, bricks, metal–will work for the walls.
Although there’s no right or wrong height, a keyhole garden typically maxes out at about 6 feet wide, but smaller diameters will work well too.
The access notch makes the garden look like a keyhole, and leads to the composting center. That’s often placed on the least sunny side of the bed (usually north), to allow the plants to better capture sun.
Why Should I Use a Keyhole Garden?
Most landscapes pack in a lot of function, sometimes into a very small area. Some gardeners would love a compost bin, for example, but feel they don’t have room or aren’t even sure how to get started.
Others may want a raised bed devoted to vegetables or a particular flower type, but aren’t positive how to include it in their yard.
A keyhole garden is an easy way to incorporate compost of already used food scraps, while growing new, fresh produce or beautiful flowers.
Many of us (me included) forget to fertilize flowerbeds, or irregularly add an extra layer of compost or mulch to replenish depleted soil.
But plants thrive on rich organic materials (i.e. compost) and a keyhole garden does the work for us very busy gardeners. That easy-to-produce compost is like gardener’s gold.
On one hand, it gives plants a super-juiced supply of nutrients for optimal growth, and on the other hand it conserves every drop of moisture, which is important for drought-challenged parts of the country.
Because they’re raised, keyhole gardens are also much easier to work in, often enabling maintenance without tiresome bending over.
That’s particularly attractive for people with mobility issues or for young children. Keyhole gardens are also incredibly adaptable to a variety of design aesthetics.
Traditionalists can add a pretty climbing trellis, while the cottage gardener may opt for a rambling, flowering vine that flows over the keyhole garden’s side.
How is a Keyhole Garden Constructed?

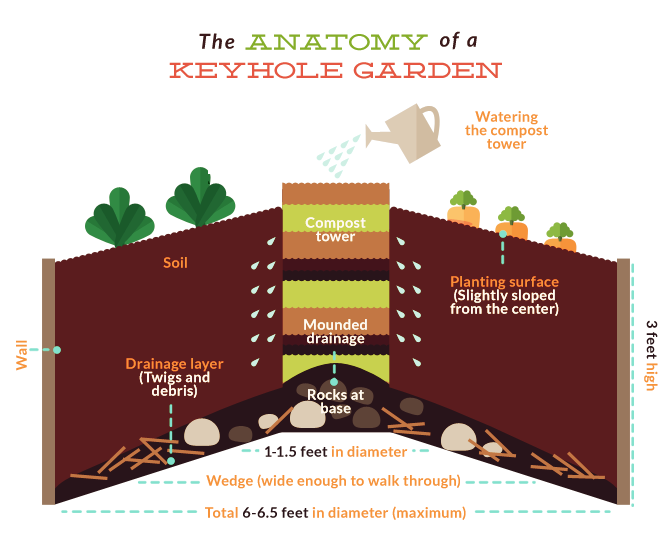
Despite all of its function, the setup of a keyhole garden is fairly simple. Using a garden hose, mark out a circle about six feet wide.
Then, mark a notch out of the circle roughly a foot wide that narrows slightly toward the center (think of a slice of pizza with a flattened end instead of a point).
At the center of the circle, create another smaller circle (about a foot wide): this will be your compost bin.
Next, you’ll need to create the sides of your keyhole garden and give some structure to the center compost bin.
We’ll use bricks as an example: Simply alternate the bricks in a dry stack (meaning no mortar necessary), circling around in layers until you reach about waist height.
At the center of the keyhole garden, add the compost basket. Typically this circle is surrounded by a material such as chicken wire and is about one to one-and-a-half feet wide.
The goal is to hold the compostable materials in place while allowing for drainage out to the surrounding garden. For added stability, countersink the chicken wire into the ground.
The top of the compost basket often extends above the top of the soil in the bed, and some bins use a cap to deflect water into the garden itself.
The first few inches of the compost basket’s bottom are filled with drainage materials such as rocks, the rest holds kitchen and yard waste that decomposes and turns into compost.
Although the compost bin is filled with kitchen waste, the planting space of the keyhole garden should be filled with easily biodegradable materials, such as newspaper, shredded old phone books, and cardboard, for example, as well as garden soil.
The top of the soil in the planting area should gently slope away from the compost basket to encourage drainage and the movement of compost into the keyhole garden’s growing area.

Plants and Planting for a Salad Keyhole Garden
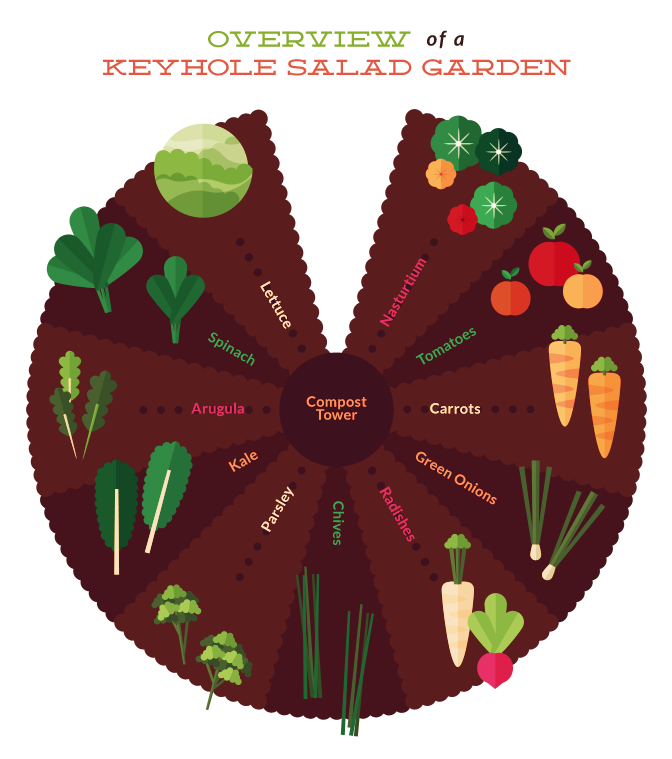
Nearly any plant combination will work in a keyhole garden, but theming the planting is a fun method to try out. For my salad garden, I’m planting a range of crunchy, yummy plants.
Some will be ready for early springtime salads, while others will add flavor later in the season. The key plants I’m planning to include are:
- Lettuce
- Spinach
- Arugula and other specialty greens
- Kale
- Parsley
- Chives
- Radishes
- Green onions
- Carrots (to harvest as baby carrots)
- Cherry tomatoes
- Nasturtiums
There are two ways of grouping plants in a salad keyhole garden.
You can group the individual plants together (all the lettuces, for example) or you can plant taller items at the center of the garden, with lower-growing salad fixings at the front.
You’ll need to water well until the plants are established – then sit back, watch your salad keyhole garden grow, and eat the tasty results of your labor.
Embed the article on your site

