

Like what you're reading?
Get your fix of expert articles delivered straight to your inbox!
Oops! Please double check your email address.
No Thanks - I don't like cool stuff


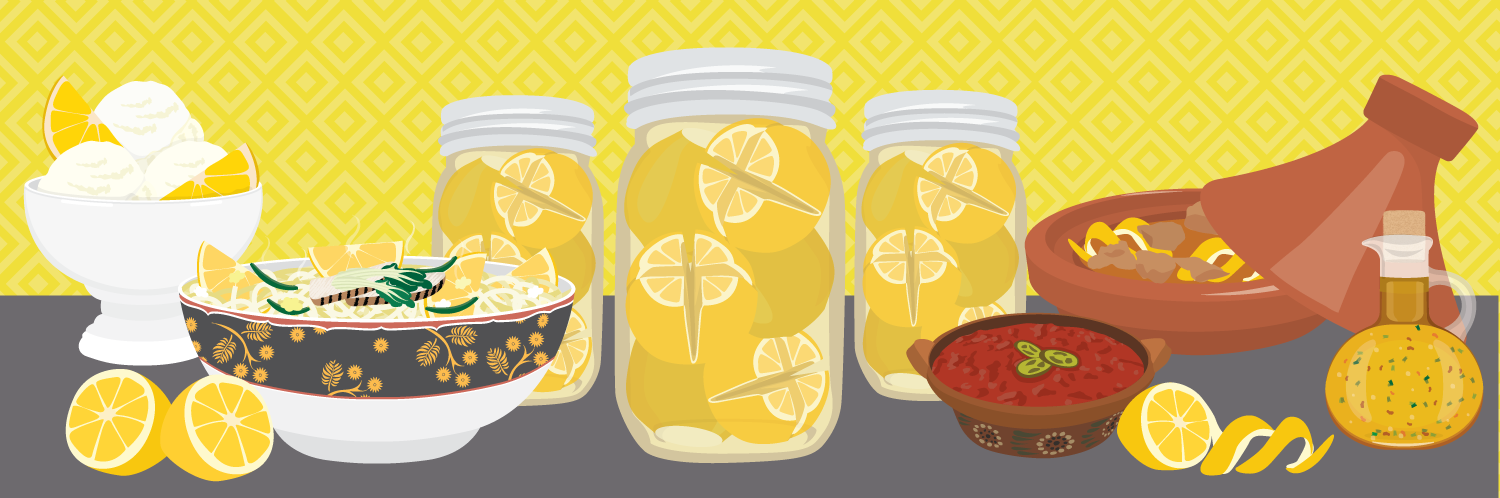
When it comes to pickling, it’s easy to think only about crunchy cucumbers. But did you know that lemons can be pickled, too? Also known as preserved lemons, this zesty food is a specialty in North African, South Asian, and Mediterranean cuisine. They are also a key ingredient in traditional savory Moroccan stews. Clearly, lemons are no stranger to the pickling scene.
Preserved lemons offer flavors that transcend the raw fruit or juice. They are silky, sunny, and equal parts sweet and salty. Unlike with the fresh fruit, the rinds are valuable and edible. They can play double duty as a main ingredient and garnish.

Like many deep-rooted culinary techniques, pickling has been around for thousands of years. Without electricity, it was the only way for people to preserve foods for an extended period. The process could be used for any fruit or vegetable, making it a versatile method of saving food. It entails fermenting the fruit or vegetable in an acidic liquid, called a brine. This promotes the growth of bacteria that transforms the natural sugars of food into lactic acid. Thus, spoiling bacteria – which eat sugar – cannot survivehttp://www.pbs.org/food/the-history-kitchen/history-pickles/. The raw food becomes more resistant to spoilage, resulting in a longer shelf life. It is science at its finest.
In the 1850s, home pickling became easier when the mason jar was invented. The rubber lining provided an airtight seal, creating the perfect setting for pickled goods. These days, mason jars are essential for pickling at home.
Pickling has been applied to lemons for thousands of years. Preserved lemons, which boast a noteworthy role in Moroccan cuisine, are often paired with cinnamon, cumin, ginger, and turmeric. These vibrant spices can also be directly added to the brine during preparation. Most notably, the lemons are used in tagines, a savory stew that is cooked in a clay vessel of the same name. They are used similarly to how lemon juice is utilized in Western meals. Ancient Greeks, the Chinese, Russians, and Indians have also been known to pickle lemons, crafting everything from sweet relishes to side dishes. Clearly, the versatility of preserved lemons knows no boundaries.

If you’re lucky, you can find preserved lemons in Middle Eastern or halal markets. Yet there’s something special about making your own batch. While lemons are available year-round, the unique pickled flavor can amplify your cooking. To make your own, start with a batch of Meyer lemons. As the preferred type of lemon in Morocco, Meyers offer sweeter notes. If you can’t find Meyers, you can use Eureka lemons. Opt for organic, as the rinds will be consumed. Lemons harvested per safe agricultural practices is vital.
Preserving lemons is simple. Gather 5 to 7 fresh lemons, fresh-squeezed lemon juice from three or more lemons, kosher salt, and boiled sterilized water. You will also need a sterile 1-pint jar and a knife. To sterilize a jar, place it in an empty pot. Fill the pot with water until the jar is covered. Bring to a boil over high heat and continue with a rolling boil for 15-20 minutes. Let cool and remove with tongs. Sterilize the lids by placing them in simmering water for 10 minutes. The water should be warm, not hot, which may melt the lid’s rubber seal. Once dry, your sterilized jar will create an uncontaminated atmosphere for lactic acid bacteria.
Trim the nubs off the ends of each lemon. Slice each lemon into quarters, stopping ½ inch from the bottom. You do not want to completely slice through the lemon; the bottom should stay intact. Add a liberal amount of salt to the flesh and repeat with the remaining lemons. Generously add salt to the bottom of the jar and tightly pack the lemons in. Push down so that the juices release. Add more salt, water, and fresh squeezed lemon juice until the lemons are completely covered with liquidhttp://honest-food.net/2010/02/04/preserving-lemons/. Instead of tossing the lemons that you just squeezed for the juice, cut them up and add them to the jar. Let it sit at room temperature in a cool, dark place for 3 to 4 weeks and let the acids work their magic. Occasionally, turn the jar over to evenly distribute the brine.
Don’t feel pressured to make a Moroccan dish daily; the preserved lemons will last a year in the fridge. You can continue to add lemon rinds to the jar as you use them for other meals. It’s an awesome way to get the most out of every lemon. Remember, the longer they sit in the jar, the zestier the flavor. Once you are ready to use a lemon, remove it with a clean wooden utensil. If a white, gooey mold has developed, don’t fret – it is harmless and can be washed offhttp://www.epicurious.com/recipes/food/views/preserved-lemons-231570.

Making a batch of preserved lemons provides an excellent excuse to experiment with Moroccan, Middle Eastern, and South Asian cuisine. In Morocco, they are widely used in aromatic chicken, lamb, and vegetable tagines. The flesh is removed and discarded, while the peel is sliced and added early in the cooking process. The clay or ceramic vessels that hold the tagines typically double as decor. While a modern-day slow cooker can be used to cook tagine, the finished meal won’t be as authentic.

Preserved lemons hold great potential aside from tagines. They will work where ever fresh lemons do while offering a smoother flavor. Use the pulp to enhance stews, sauces, or soups. Chop the rind and add to salads, dressings, or hummus. Mix it with rice or pasta for a fragrant meal. Seafood also boasts an established reputation as the perfect partner for lemons. Sweeten things up by sprinkling preserved lemons onto yogurt or ice cream for a zesty burst of flavor.
Now that you know the lowdown on preserved lemons, it’s time to start experimenting. A mere 15 minutes of prep can yield a homemade specialty that can elevate your cooking. How’s that for kitchen cred?
Embed the article on your site

Written by:
You'll be pleasantly surprised with all the creative ways to make a meatbal...
Learn how to infuse regular blocks of cheese with delicious smoky flavors. ...

Everybody knows too much of any alcoholic beverage is unhealthy, but can be...
Get your fix of expert articles delivered straight to your inbox!
No Thanks - I don't like cool stuff