

Like what you're reading?
Get your fix of expert articles delivered straight to your inbox!
Oops! Please double check your email address.
No Thanks - I don't like cool stuff


Between making your monthly rent or mortgage payments, paying for your utilities, and buying furniture, moving into a new home can be quite taxing on your wallet. For many of us, there seems to be little left over in the budget when it comes to extra money for decorating. But with a little creativity and imagination, you can make your own beautiful artwork and home accents that won’t break the bank.
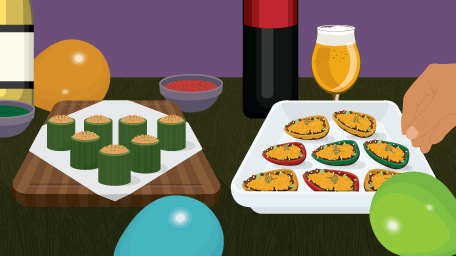
Thrift stores are filled with hidden treasures. The key to finding them is to look past the color and focus on the shape. Always remember that you can change the color. Don’t pass up those ceramic figurines that seem outdated; instead, picture them in all white, rose gold, or even black. In addition to figurines, you can paint frames, candlesticks, lamps, vases, baskets, and more. With a little bit of paint, you can transform those once-kitschy pieces into modern home décor resembling what you’d find at expensive department stores today.
You can easily update thrift store knick-knacks to fit your style in just a few easy steps. The basic materials you need to paint your thrift-store finds are spray paint, sandpaper, and primer. When selecting spray paint, choose interior multipurpose paint. Using an all-in-one paint and primer will save time and money. You can select different finishes, from matte, satin, and gloss to sea glass, metallic, or even textured stone. You may need to sand some pieces first to allow the paint to adhere nicely. For small home décor accents, light sanding by hand is sufficient. The heavier the material on the piece you’re sanding, the coarser the grit you’ll need to use. Start with a fine grit. For example, 120 is used as a starter grit for delicate surfaces, like ceramics. Work your way to a higher grit if needed. For metal pieces, you’d need a coarse grit, like 60 or 80.

Once you’ve sanded your piece, spray paint it in a well-ventilated area. Lay down a tarp to protect your work area from excess spray. It is best to spray several light coats instead of one heavy coat. Allow your project to dry for at least 20 minutes between coats. A good trick is to put small home décor pieces on top of a cardboard box and spray them there so you can easily rotate the box and spray all four sides and the top with ease. You can take your pieces inside to dry about thirty minutes after spraying your last coat. Allow them to dry overnight.
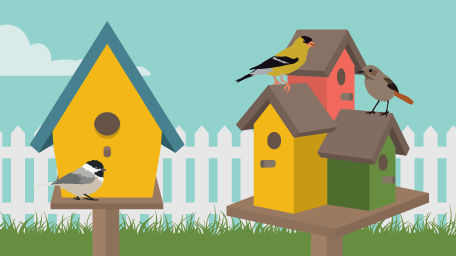
Gallery walls look great in hallways and entryways or above your living room sofa. You don’t need to spend a lot of money on individual pieces of artwork. Instead, create your own by stenciling recycled shoebox lids. This upcycling idea is even less expensive than buying paint canvases from the craft store, and it will have the same look. You can even mix and match them with the thrift store frames you just painted.
You will need shoebox lids in various sizes. Save box lids from shoes, boots, and kids’ shoes to get a variety of sizes. You will also need acrylic craft paint, paint brushes, stencils, and stencil brushes. Use about five to seven pieces to create a good gallery wall. Choose your color pallet and lay out the shoebox lids in your desired arrangement. Next, paint each box lid a different base color. Don’t forget to paint the edges of the lids. Two coats should do the trick. Using your stencils and stencil brushes, add a design in a contrasting color by carefully saturating the tip of the brush, removing some of the excess paint, and stamping the paint down onto the stencil in an up-and-down motion to help prevent bleeding. Allow each box to dry between painting the stencils, and be sure to wash your stencils after each use. Once they are dry, hang each lid with a thumbtack. Add rubber putty to the tip of each thumbtack to prevent the lid from slipping off.

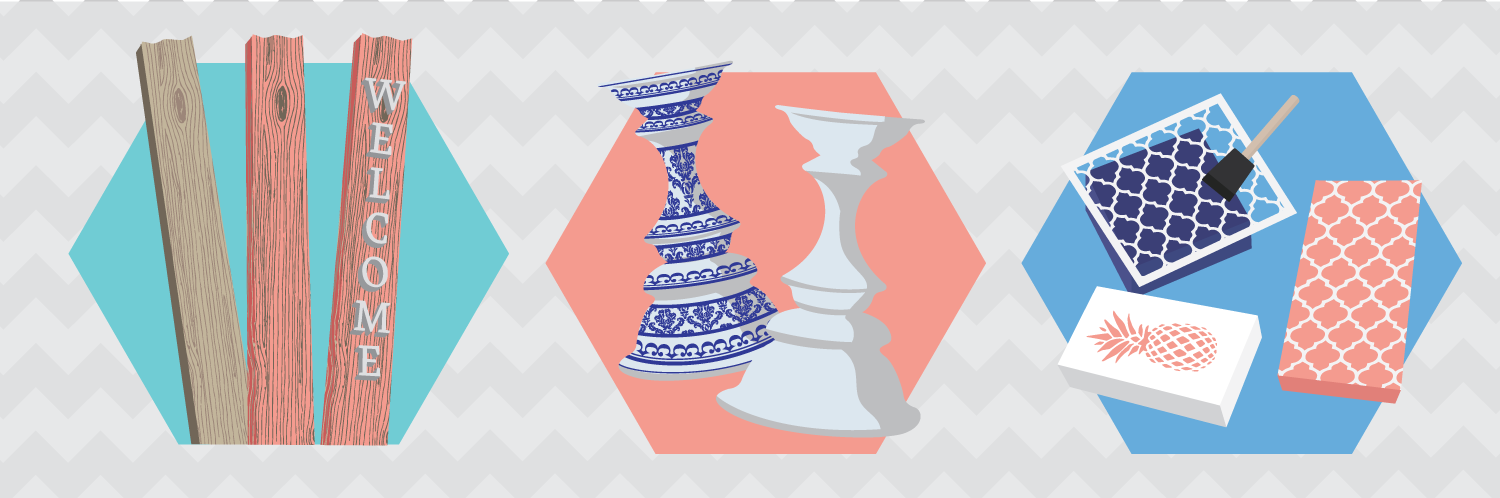
Another option for inexpensive artwork and home décor is to repurpose salvaged materials such as old shelves, cabinet doors, and extra floor planks. If you don’t have these items laying around, you can find them for a few dollars at salvage shops, such as Habitat for Humanity’s ReStore shops. A cabinet door can cost as little as two dollars, and a box of 20 or more flooring planks can run ten dollars or even less. Check garage sales or free curb alerts too. Salvaged materials like these are perfect blank canvases for welcome signs, holiday artwork, serving trays, and more.
Some DIY projects take just a little time and a few quick steps. To make a serving tray, add cabinet pulls to the sides of a cabinet door. Using industrial-strength glue, attach metal clips to an old shelf to create an instant photo display piece. Cut 4” x 4” pieces from a flooring plank to make a set of coasters. If you invest in a good letter stencil set, you can stencil your own signs for every holiday. Projects like these are unique, and they look like trendy store-bought items.
Standard flooring planks are the perfect size to make a welcome sign for your front door. To make one, you will need 5”-tall letters, sandpaper, craft paint, a paint brush, and industrial-strength glue. You can find unfinished wood letters at your local craft store. Sand down the splintered edges. Next, paint each letter in the color of your choice. One coat will suffice. Once the letters are dry, lay them down on the flooring plank to position them properly. Make sure they are centered. Once you are satisfied with the placement, use strong glue like E6000 to glue them down.

Decorating your new home isn’t as costly as it seems if you get a little creative. Turning someone else’s trash into treasure is simple even for a beginning do-it-yourselfer. With a good eye and a little elbow grease, you can create beautiful, one-of-a-kind pieces for your home on any budget, even a tight one.
Embed the article on your site

Written by:
Hosting a gathering, whether large or small, doesn't have to break the bank...

Research suggests that families who eat five meals a week together are happ...
Take care of the feathered friends in your garden this spring by learning h...
Get your fix of expert articles delivered straight to your inbox!
No Thanks - I don't like cool stuff