
Like what you're reading?
Get your fix of expert articles delivered straight to your inbox!
Oops! Please double check your email address.
No Thanks - I don't like cool stuff


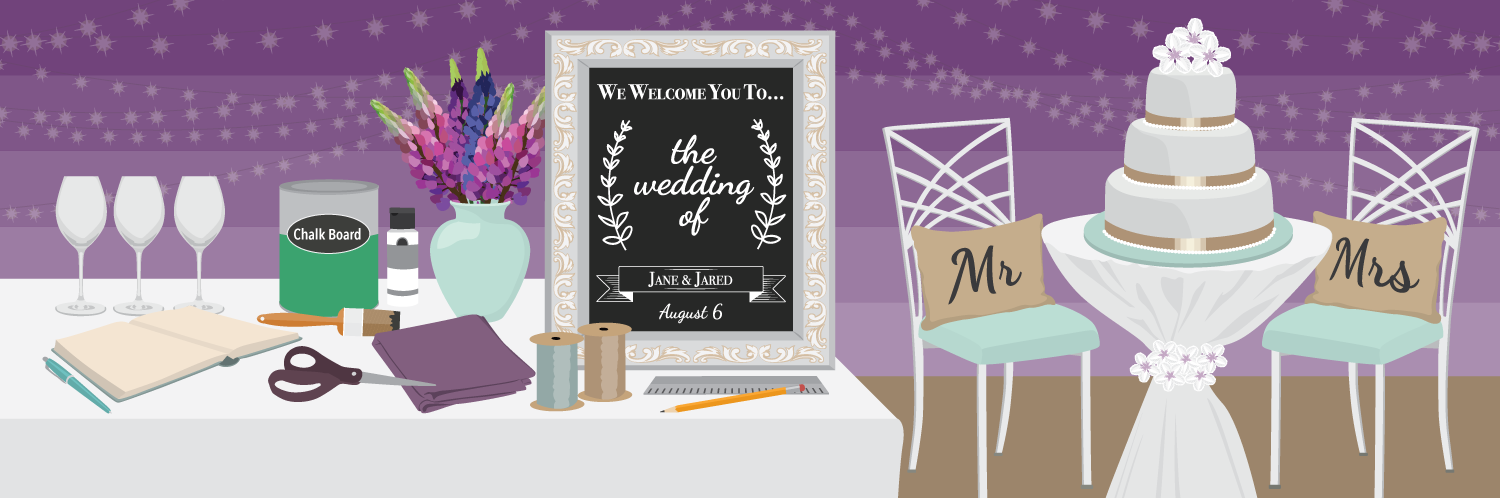
Weddings are a big deal. After all, your wedding is often referred to as “the big day.” Some people spend months, years, or even their whole lives planning the biggest celebration of their lives. With the average cost of a wedding in the U.S. running upwards of $25,000, many of us plan on a budget, and luckily we have the DIY craze on our side. But now that we have spent so much money on a fabulous celebration, why not take it a step further and bring our wedding décor home with us to help spruce up our humble abodes? In honor of the budget-friendly bride to be, I have come up with three wedding DIY pieces that will not only look beautiful on your wedding day, but can come home with you and be re-purposed into memorable home décor.
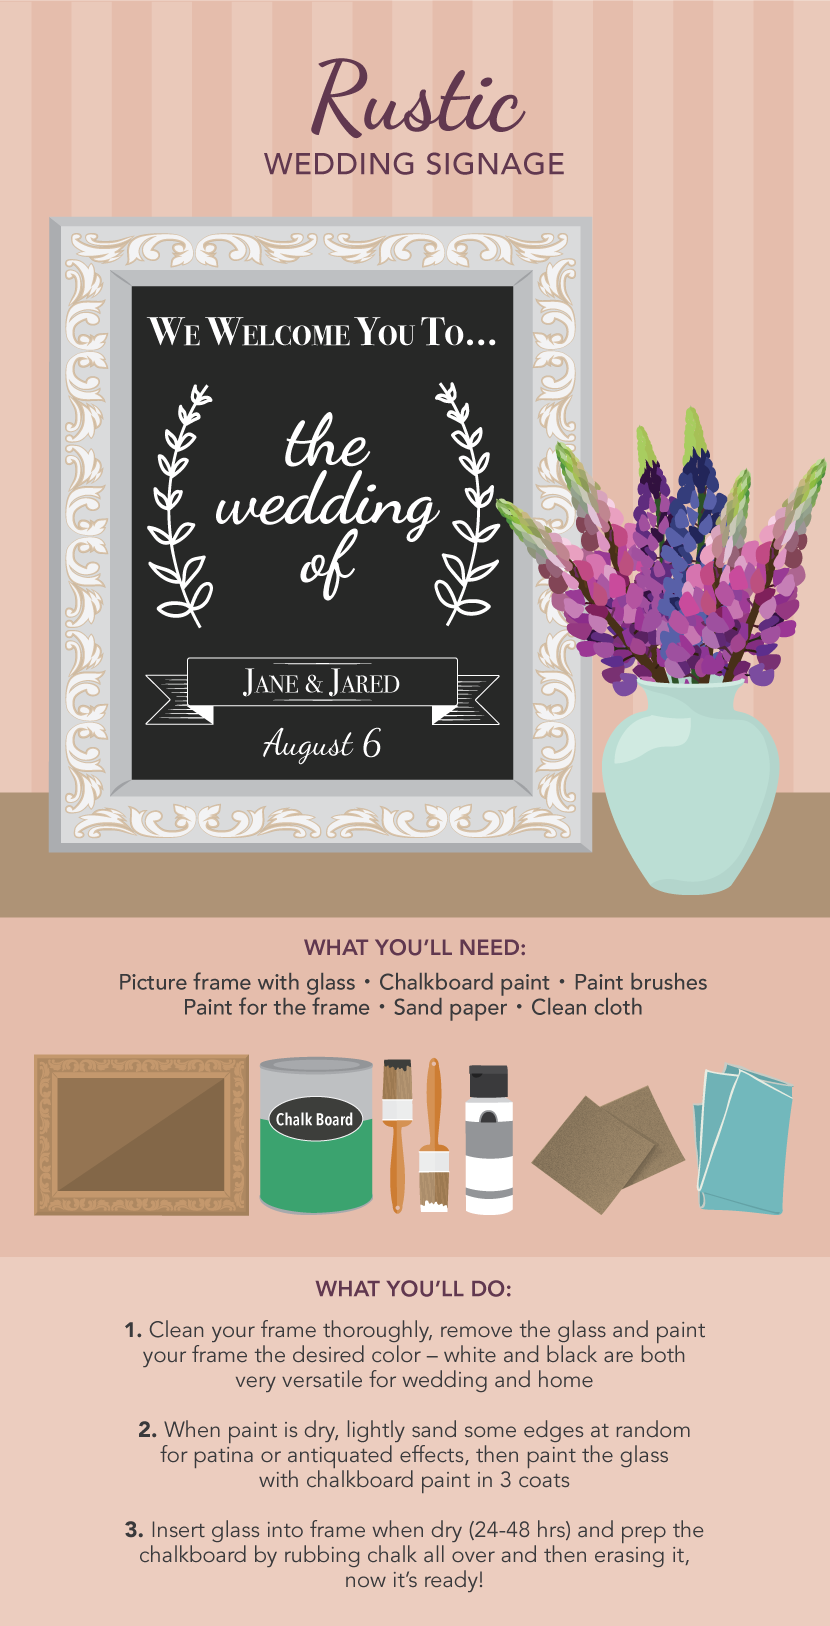
A chalkboard sign has many uses at a wedding. Use it as a welcome sign to your guests or list the wedding party at the ceremony entrance. At the reception, use it to show the menu for the evening, mark the gift table, or direct your guests to their seats. With the help of a wedding planner, you can use one board for both the ceremony and reception. With an eraser in hand, pretty handwriting, and a quick change, this chalkboard can prove very useful.
At home, a chalkboard has many uses. After the wedding, take it home to use in the kitchen to announce the menu each night to your family, make a to-do list or chore chart, or keep track of schedules, sports, and other engagements. You can also use it as a home office memo board and calendar. You can even hang it in your living room or bedroom and write inspirational quotes and messages on it, which doubles as a piece of artwork.
To make a framed chalkboard on the cheap, you can opt to make one from scratch or transform a thrifted frame with a few simple steps. First, visit your local thrift store and peruse the framed artwork section. The more ornate the frame is, the better, and a good standard frame size is about 20” x 24”. Be sure to buy a frame with glass. Once you find the perfect frame, clean the glass and frame thoroughly. Gather your materials, including chalkboard paint, paint brushes, paint for the frame, and sandpaper. Begin by removing the glass and painting the frame the desired color. White and black are very versatile for both a wedding and your home decor. Once the paint is dry, lightly sand random edges for a patina or antiquated effect. Next, paint the glass with chalkboard paint in three coats. Allow the paint to dry for 24-48 hours. Last, insert the glass into the frame and prep the chalkboard by rubbing chalk all over the glass and then erasing it. The chalkboard is now ready for the big day.

Burlap adds a rustic flare to any wedding. DIY stenciled “Mr. & Mrs.” chair back signs are a great option to accent the bride and grooms’ seats at their reception table to set their chairs apart from the rest of the party. Once the reception is over, turn the signs into throw pillows for the bedroom, living room, or even an outdoor living space.
To make the chair back signs, cut burlap fabric to the desired size. Use liquid seam sealant at the ends of the burlap to prevent fraying. Stencil “Mr.” and “Mrs.” in the center of the burlap using acrylic craft paint and a foam stencil brush. White or black paint shows up nicely on burlap. You can opt to embellish the edges with lace trim.
To turn the chair back signs into throw pillows, you will need additional burlap and pillow filler like polyester fiber fill. Cut a matching pillow back for each pillow with the additional burlap. Pin the two pieces of burlap at the edges with straight pins, with the outside facing in. Sew the edges together as you remove the pins, leaving a small opening. If you used trim for the chair back signs, it must be removed before sewing. Turn the pillow case inside out and stuff the inside with filling. Hand sew the small opening closed. If desired, sew the trim back on to the edges of the pillow.

Creating your own DIY photo backdrop is a great way to save money on renting a photo booth while also adding rustic whimsy to your wedding décor. You can make a simple and beautiful backdrop with draped ribbon. After the reception, re-purpose the ribbon into a whimsical baby mobile for a nursery.
Gather a large branch from your backyard. The branch will serve as a rod to hang the ribbon. You can also use PVC pipe or a curtain rod. Use fabric shears to cut the ribbon into 16-foot pieces. Drape and tie them over the rod so that the ribbons are about 8 feet long. Consider mixing the ribbon with fabric and lace ribbon to add texture and pattern to your backdrop. Depending on your venue, you can hang the branch or rod with fishing line.
To make a ribbon baby mobile, upcycle the ribbon from your photo backdrop and tie and drape them on a large embroidery hoop. The ribbon can vary in lengths from 20”-26” long. Fold them in half and tie each ribbon onto the hoop. Use three additional pieces of ribbon to create a hanger at the top of the mobile.
Flower centerpieces or candleholders are not the only items you can bring home from your wedding and reuse. As you can see, there are several ways to upcycle and re-purpose other wedding décor into home décor. With a little DIY creativity, you can create unique custom pieces like these. Not only will you have saved money on double-duty decor but seeing these one-of-a-kind pieces in your home with your new spouse will be a great reminder of your beautiful big day.
Embed the article on your site

Written by:

With so many stores and online options available to create wedding registri...
Add colorful and fresh centerpieces to every room! Lean how to perfectly ar...
Beautiful antique furniture doesn’t have to break the bank. Learn the art o...
Get your fix of expert articles delivered straight to your inbox!
No Thanks - I don't like cool stuff