During fall and winter, few things are more universally loved than a warm, crackling wood fire.
But this could come at a steep price should a dirty chimney cause a chimney fire. Difficult to contain, chimney fires can quickly spread to the rest of the house.
Even if a dirty chimney does not lead to an accidental fire, it can still mean a slow-drawing chimney that builds up smoke within the house.
Find out how to accurately determine whether your chimney needs cleaning, and learn do-it-yourself methods for cleaning your chimney by yourself.
Why It Is (Deadly) Important to Clean Your Chimney
Roaring inferno. Rumbling like a train. Black, oily material raining down. Cracking, snapping. Gunshots.
Those are phrases that homeowners have used to describe their terrifying experiences with chimney fires.
Once this fire starts, the only solution is to call the fire department, as the fire can spread quickly to the rest of the house.http://www.csia.org/homeowner-resources/the_facts_about_chimney_fires.aspx
What causes this is the accumulation of creosote, soot, and organic matter such as bird’s nests and pine cones in the chimney flue.
The flue is the masonry or metal duct that extends from the fireplace up to the top of the chimney.https://www.highschimney.com/articles/chimney-terminology-chimney-flue-chimney-vent/
Creosote and soot are caused by wood fires. Gas-burning fireplaces will not have this problem.
Eight Stages of a Chimney Fire
The groundwork for a chimney fire is laid well in advance of the devastating event itself – often years prior.https://www.highschimney.com/articles/creosote-chimneys-part-1-creosote-education/
- Poor Burning Conditions: Burning green or unseasoned wood can produce creosote, even in the short term. Even burning seasoned wood over time without cleaning the chimney causes creosote and soot to form.
- Condensation: Unburned gases condense on the walls of the flue.
- Stage 1 Creosote: Condensation hardens in the form of creosote, a thin powdery layer. At this point, this is still normal and should not cause an accidental fire. Creosote at this stage is easy to brush away.
- Stage 2 Creosote: As time goes on, large, flaky, and shiny creosote builds up. This is the earliest point at which accidental fires can develop.
- Stage 3 Creosote: Flakes accumulate and become thick and fluffy, the most dangerous condition of all. Stage 3 creosote is best left in the hands of a chimney sweeping company, which will use a rotary head with chains to break down this extra-hard formation.
- Fire Started: Homeowner starts intended fire in the fireplace.
- Ignition: As heat rises through the flue, creosote superheats. The accidental fire begins.
- Chimney Fire: Flames blast out of both chimney top and down into house. Do not attempt to stop a chimney fire. Call the fire department immediately.
Collateral Damage
Even if the chimney fire does not consume the structure, your home will suffer substantial and costly peripheral damage.
- Masonry flue may crack at a mid-point, where it is hidden behind walls and inaccessible. A cracked flue renders the chimney inoperable until fixed.
- Water from fire department is directed downward, flooding the home.
- Thermal shock causes exterior brick masonry to crack.
- Roofing materials and flashing near chimney warp and distend.
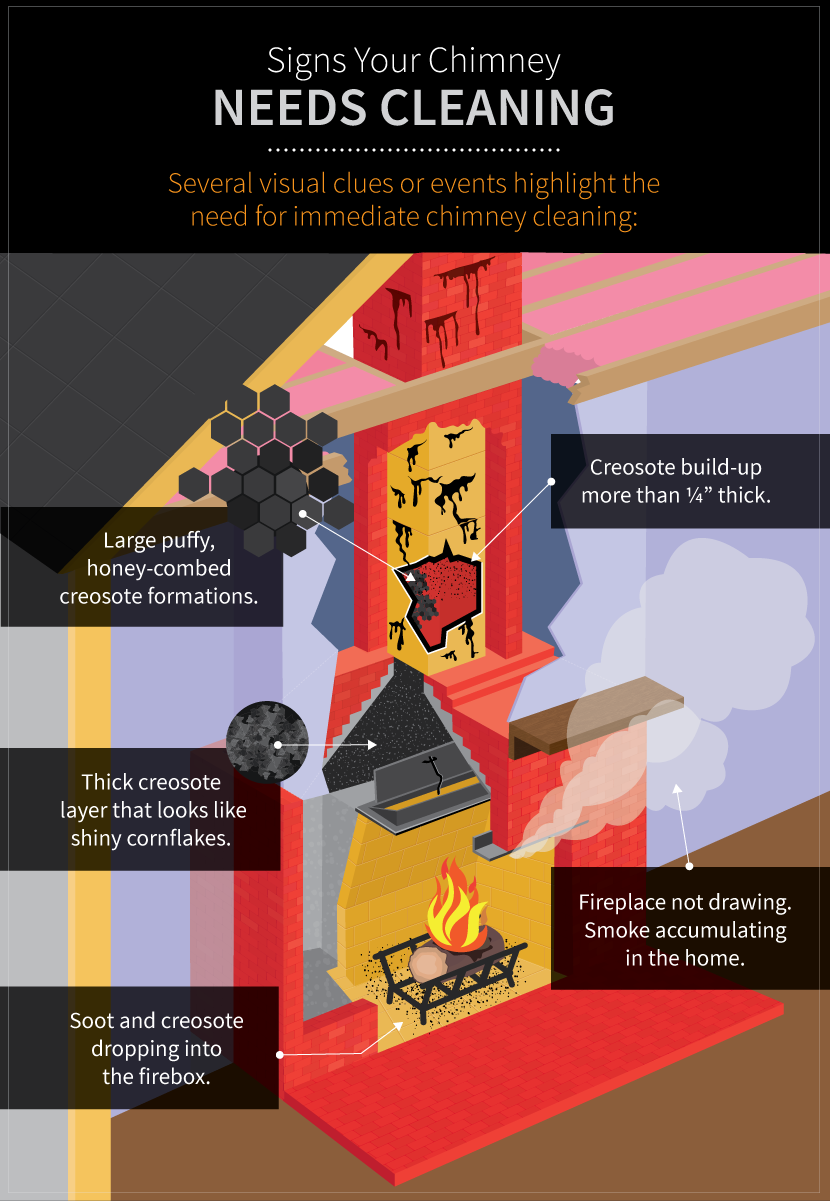
Signs That Your Chimney Needs Cleaning

Chimney sweeping companies typically recommend that you clean your chimney annually in the late summer or early fall, before you have started any fires for the year.
In addition, here are other indications that it may be time to clean your chimney:
- You often burn unseasoned or inadequately seasoned wood or wood that otherwise had a difficult time burning completely. Wood usually needs six months or more of seasoning to expel enough moisture for proper burning.
- Soot and creosote sometimes fall into fireplace.
- Thick and puffy or honeycombed creosote is present inside the flue.
- Thinner, flaky creosote more than ¼-inch thick is present in the flue.
- Smoke accumulates in the house when you have a fire.
- You frequently burn artificial logs.
- You tend to keep the damper semi-open to slow the fire and keep it burning longer.https://www.ctsweep.com/blog/top-sweep-stories/minimize-creosote-buildup/
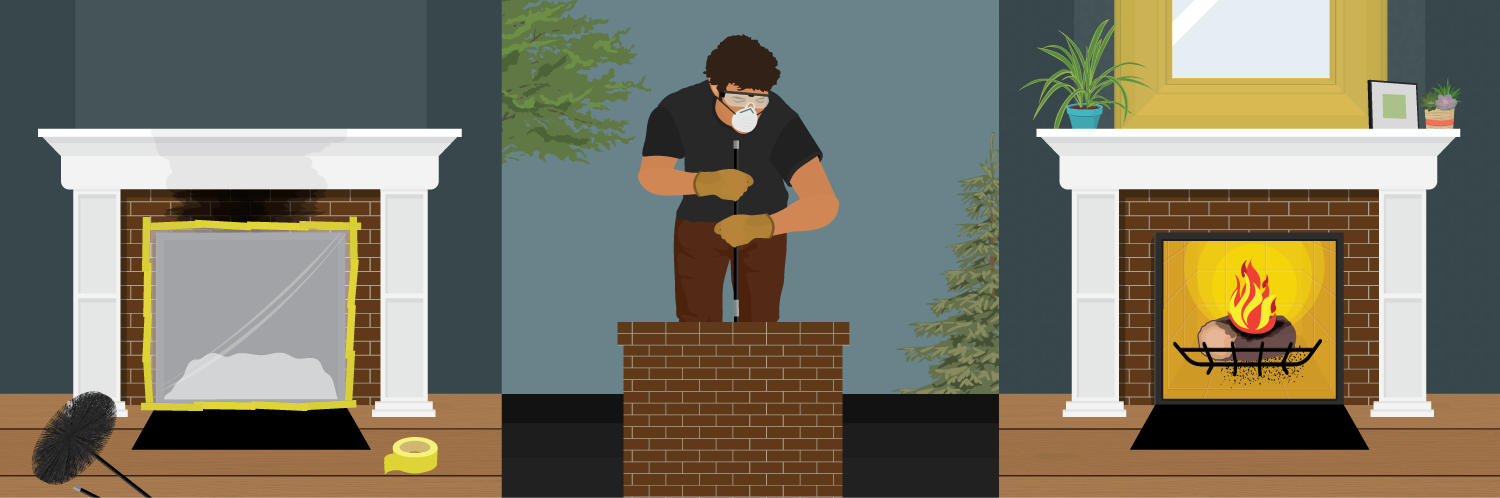
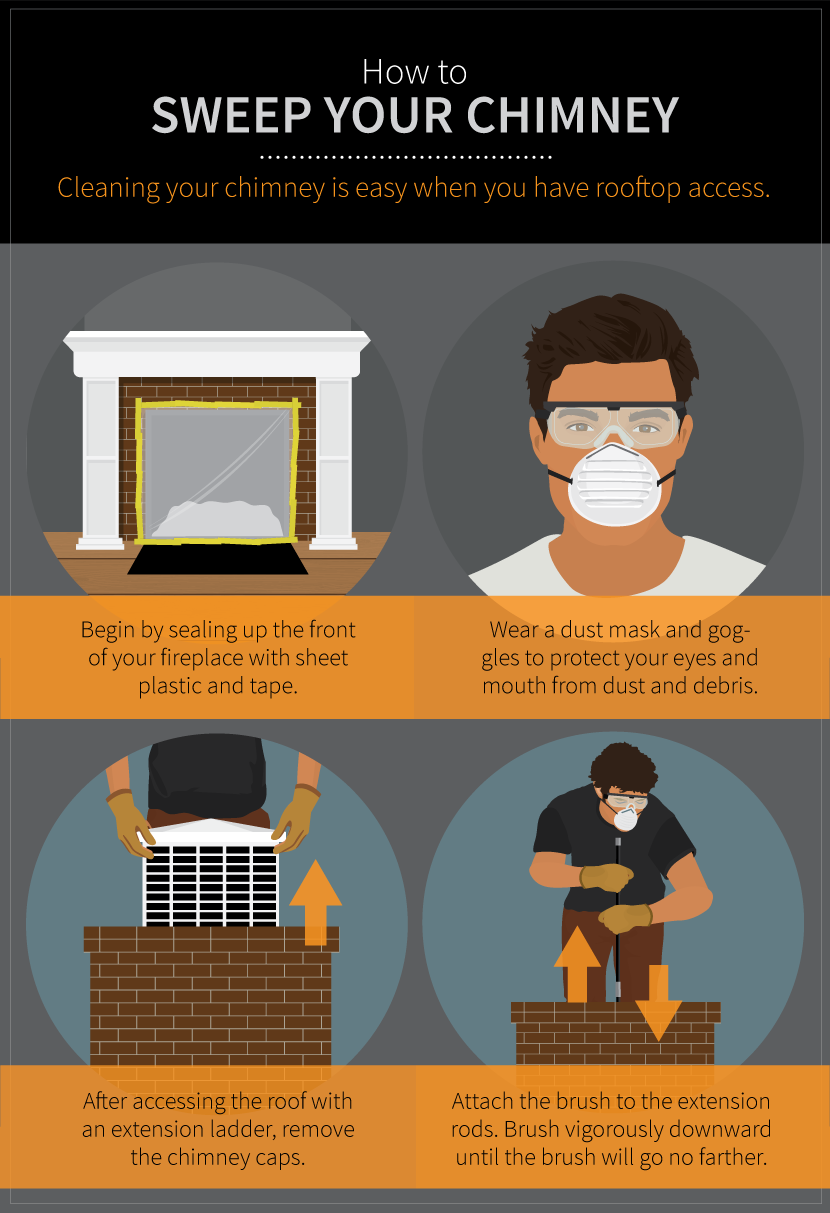
How to Sweep Your Own Chimney
As long as you are willing to invest in a few tools and materials, you can sweep your own chimney.
This investment will quickly pay you back by reducing the frequency of visits from a chimney sweeping company.
In fact, it is prudent to have a sweeper or technician certified by the Chimney Safety Institute of America (CSIA) perform the intial cleaning.http://www.csia.org/search
Self-sweeping augments, rather than replaces, regular cleaning performed by a certified technician.
Top-Down vs. Bottom-Up Sweeping
As long as you can access the roof of your home, sweeping from the top down will be more efficient and cleaner than will the alternate method, sweeping from the bottom up.
Sweeping top down means you can fully seal the front of your fireplace. Soot and creosote will not fall on you as you sweep.
It also means that you will be better able to move the brush through the flue, avoiding the “dog-leg” smoke shelf portion at the bottom.
- Downstairs Interior: At the fireplace, open the damper, lay out the dust cloth in front of fireplace, and tape sheet plastic against face of fireplace.
- Tools and Materials: Assemble your cleaning supplies in a duffel bag: cleaning brush, extension poles, cordless drill, and dust mask.
- Access Roof: Place extension ladder against eaves of house. Carry the duffel bag to the top of the ladder and place the bag on the roof before getting on the roof yourself.
- Remove Chimney Caps: You need to remove the protective chimney caps from the top of the chimney before cleaning.
Do this by turning out the screws with your cordless drill and placing the screws in your pocket for safekeeping. Carefully place removed chimney caps on the roof so they do not slide off.
- Attach Brush: Screw the chimney sweep brush onto the first extension rod.
- Insert Brush: With only one rod connected at this point, push the brush into the flue and scrub vigorously up and down. Continue scrubbing while gradually pushing the brush farther down the flue.
- Add Rods: When you reach the end of that rod, thread on another rod. Repeat the previous step, successively adding rods until you reach the smoke shelf and can go no farther.
- Remove: Instead of pulling upward in one continuous motion, bring up the rod/brush assembly slowly, scrubbing along the way while progressively unscrewing extension rods.
- Replace Caps: Replace the chimney caps and screw them back into place.
- Leave Roof: Bring tools with you as you exit the roof area.
- Downstairs Interior: Wait about five minutes for dust to settle before taking down the sheet plastic in front of fireplace. Sweep the firebox with the smaller wire brush.
- Clean Up: Clean fallen debris with the shop vacuum. Remove and discard plastic covering floor.
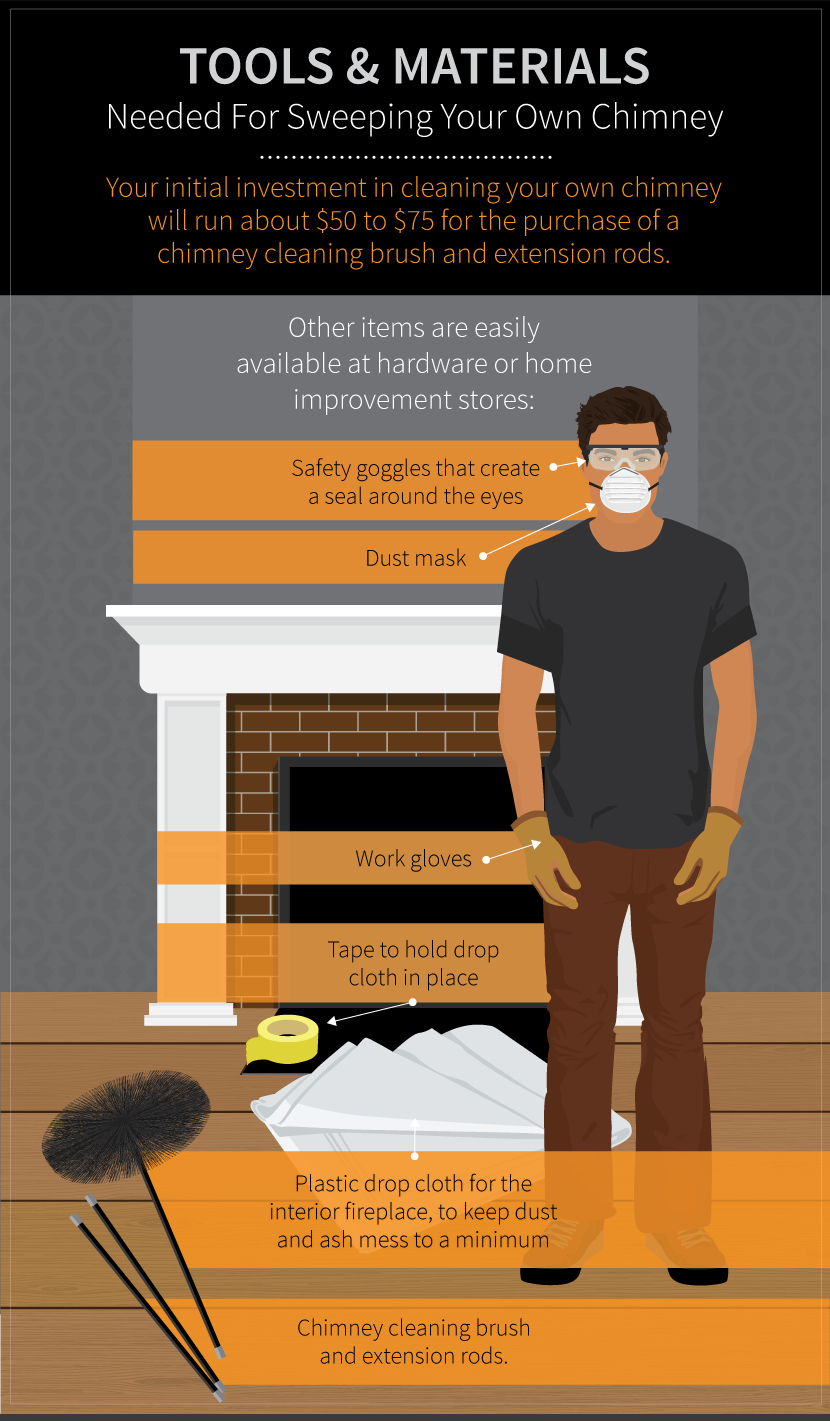
Tools for Sweeping Your Own Chimney
Chimney Sweep Tools
Tools that are specific to chimney sweeping that you must purchase:
- Chimney Brush: While on the roof, take note of the shape of your flue (square, rectangular, or round) and measure its length and width. These measurements determine the brush you will purchase.
- Fiberglass Extension Rods: 48-inch-long rods connect end to end and carry the chimney brush down the flue. While on the roof, also run the tape measure down the length of the flue to determine how many rods to buy.
General Tools and Materials
- Sheet plastic
- Duct tape
- Extension ladder
- Shop vacuum
- Old clothes, including long-sleeve shirt
- Dust mask
- Safety glasses
- Cordless drill
- Duffel bag
- Tape measure
- Small wire brush of the type used to clean barbecues
Chimney Sweeping Safety
Chimney sweeping is a safe project as long as you take a few precautions. Protecting yourself and your property against soot, creosote, and other debris is one precaution.
You can stay clean by wearing a dust mask, gloves, hat, and long-sleeve clothing. Because the chimney brush has sharp metal bristles, be sure to wear safety glasses, too.
The second and most important safeguard is to properly access and stand on your roof.
- Use an extension ladder, not a step ladder.
- Raise the ladder so that it rests against the eaves and extends at least two feet above the eaves.
- Make sure that the base of the ladder is resting on a hard surface, such as concrete or asphalt. If the ground is dirt, use a plywood sheet as a base on which to rest the ladder.
- Mount the ladder slowly, making sure to keep both hands on the ladder at the same time.
- Once on the roof, go to the chimney area and place the duffel bag on the roof ridge so that it does not roll off.
- Do not go near any edge of the roof except when climbing the ladder.http://www.popularmechanics.com/home/how-to/a9631/dont-be-an-idiiot-how-to-use-any-kind-of-ladder-safely-16123359/
Cleaning your woodburning fireplace’s chimney by yourself is an economical way to keep your family safe from accidental fires.
It also ensures that your fireplace will work efficiently by drawing smoke up and out at a maximum rate.
Embed the article on your site