


Like what you're reading?
Get your fix of expert articles delivered straight to your inbox!
Oops! Please double check your email address.
No Thanks - I don't like cool stuff


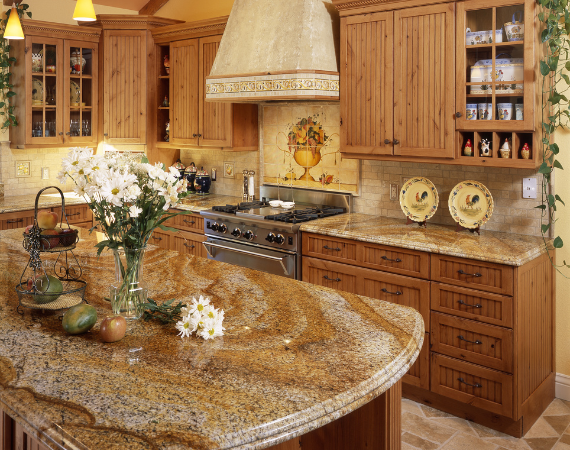
Do you ever find yourself flipping through glossy home decor magazines, captivated by those stunning granite countertops, only to be jolted back to reality by their cost? Today is the day we roll up our sleeves and craft our own granite countertops. Because let’s face it, nothing says 'luxury kitchen' quite like granite—and nothing says 'smart homeowner' more than by DIYing it.
Before we begin, let's talk safety. You’re dealing with heavy material and powerful tools, so there’s no skimping on the safety gear. Safety goggles, protective gloves, and a dust mask are non-negotiable. If you are sensitive to loud noises, think about popping in some ear plugs.
You can get granite in different grades. High-grade granite is more uniform but comes with a steeper price tag. On the flip side, lower-grade options provide a more organic look but may be more porous. Choose something that complements your overall room decor. While neutral tones are safe bets, contrasting colors can make bold statements. Can't decide? Many retailers offer sample pieces you can take home. Test these against your current room setup to make sure you're not setting yourself up for buyer's remorse.
It's no news that granite is heavy. Choose a workspace that’s solid and can withstand granite's weight. This isn't a paper-mache project, so you need something sturdy. Clear the area, sweep the floor, and make sure you've got easy access to electrical outlets for your power tools.
Pros move granite slabs vertically because they may cave in or crack if carried horizontally. If transporting it horizontally is your only option, make sure to recruit two extra sets of hands—one for carrying the end opposite you and another for stabilizing the center of the rock. Move it carefully to your workspace. Clean the slab up with a mixture of mild soap and water before patting it dry.
Get your measurements accurate down to the last millimeter. Factor in allowances for sink installations, and don’t forget the edges. Mistakes in measuring can set you back both time and money.
Using a straightedge and a water-soluble marker, measure and mark the cut line. To minimize chip-out, cover the cut line with painter’s tape. Remeasure and mark the tape. It's not a bad idea to double-check and triple-check.

You’ll want a wet-cutting circular saw that is equipped with a diamond-tipped blade. If you’re new to this, getting a feel for the saw is invaluable. A run-through can help you get a feel for the saw. Move it along the cut lines without actually turning it on.
An unsteady granite slab is just asking for trouble, especially when you've got a live saw blade in your hands. Secure the slab to your workspace with C-clamps spaced every few feet along the sides.

Before touching that power button, make sure you're decked out in your safety gear. Set up your water source—your garden hose—in a position that guarantees a constant water flow to the saw blade.
Then, kick off the sawing process with a 'back-cut' or 'kerf'—a small, two-inch cut starting from the end of your marked line. You don't want to skip the back-cut because it helps avoid chipping or breaking the granite, especially since it becomes brittle right as the blade is about to finish the cut.

Guide your saw carefully along the marked lines, ensuring a consistent pace and steady hand. Your patience here is key. If you feel the saw is struggling, make the cut in two rounds. After you've completed the initial cut, release the C-clamps and examine the granite for unevenness and rough edges.
Don't forget to turn off and unplug the saw when you're done. Once that's taken care of, peel off any tape and give yourself a pat on the back. Clean up any remaining slurry with a damp cloth. And if some of it has found its way onto your driveway or walkway, a quick rinse with your garden hose will sort it out.
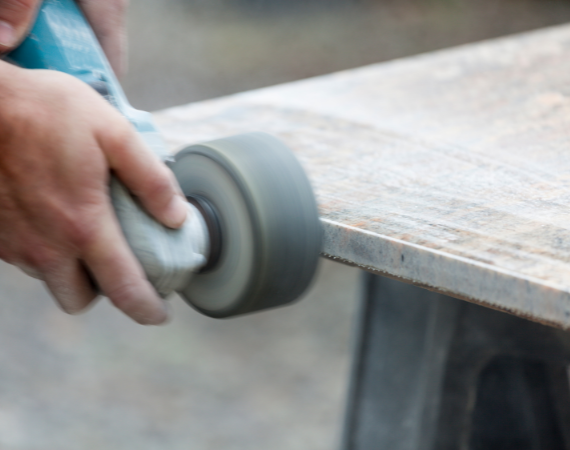
Polishing will bring a showroom shine to your freshly cut granite. For this task, diamond polishing pads are your best bet, specifically designed for stone surfaces. These pads come in various grit levels, typically ranging from 50 to 3000. The lower the grit number, the coarser the pad.
Start by attaching a lower-grit pad—usually 50 or 100—to your polisher or grinder. This initial step will help to smooth out uneven areas or minor chipping on the granite's surface. Apply consistent, yet moderate pressure, and move the pad in circular motions across the surface. When working on the edges of the tile, hold the grinder at a 45-degree angle and slide it evenly along the length, first moving away from you and then back toward you.
Throughout the process, it's important to keep the surface moist. A squirt bottle with water is useful for this. Finally, wipe down the granite with a damp cloth to remove any residual grit or polishing dust.
You've crafted a granite countertop worthy of a five-star chef's kitchen, and you're practically bursting with pride. But there's one more step: installation. It's time to bring your hard work home—literally.
First things first, we need a clean canvas. That means your old countertop has got to go. If it's sealed with caulk, as most countertops are, you'll need some caulk remover to free it. Start by shutting off the water supply and disconnecting any sinks, faucets, and other fixtures that are part of your existing countertop.
Generously apply caulk remover along the caulk lines where the countertop meets the wall, and where it meets the base cabinets. Caulk remover breaks down the caulk, making it easier to remove. Follow the manufacturer's instructions for how long to let the remover sit.
Once the caulk remover has worked its magic, use a scraper or putty knife to gently remove the softened caulk. Be careful not to damage the wall or cabinets in the process. If some caulk proves stubborn, a second application of remover may be needed.
Next, carefully lift the old countertop off the base cabinets using a pry bar. Remember to go slow. Clean off any remaining caulk or adhesive from the top of the base cabinets using a scraper and some more of that caulk remover.
Use a level to check that the base cabinets are, well, level. If they’re not, now's your chance to adjust them. A level surface is crucial for the successful installation of your new countertop.
Before securing anything, do a dry run by placing the granite slab onto the base cabinets. This step will help you ensure that everything lines up well. If something seems off, it's a lot easier to fix it now rather than when the countertop is glued down.
Now, apply a high-quality construction adhesive to the top edges of the base cabinets where the granite will rest. Use enough to hold, but not so much that it oozes out. Carefully lift the granite slab and align it with the base cabinets. You may want some assistance for this part. Once it's aligned, gently lower the slab into place and press firmly to adhere. If your countertop comes in multiple pieces, you'll need to seal the joints. Use a clear or colored epoxy that matches your granite. Apply the epoxy and then wipe off any excess before it dries.
Once everything’s in place, apply a final coat of sealer. This will keep your new granite countertop looking new for years to come. Let it dry, and you're all set!

For everyday cleaning, a simple soap and water solution is ideal. Refrain from using acidic or abrasive cleaners as they can etch the surface and wear down the sealer.
At least once a year, inspect your granite for any signs of wear and tear. Conduct a water droplet test to determine if resealing is necessary. To do this, sprinkle a few drops of water onto the granite and observe what happens. If the water beads up, the sealer is still effective. If the water is absorbed and darkens the area where it was dropped, it's time to reseal your granite.
Take a step back and admire what you've accomplished. You’ve turned a raw piece of stone into a functional, beautiful kitchen centerpiece. Now go on, show off that spanking new granite countertop to your friends and family. And the next time someone compliments your kitchen, you can proudly reply, “Thanks, I did it myself!”
Written by:
Written by:
Looking to create exciting, chef-inspired meals at home? These kitchen gadg...
It's time to give your kitchen a facelift! Rather than waiting for mortar t...
Planning your kitchen layout is all about functional design. An efficient k...
Get your fix of expert articles delivered straight to your inbox!
No Thanks - I don't like cool stuff