End of Winter Prep
How to Get a Jump on the Gardening Season
The days are short, the ground is cold, and most vegetable gardens are dormant. But that’s no reason to neglect them. A little prep now can give gardeners a head start on a productive spring. And the best part is, some of the planning can take place while you’re cuddled up with a cup of tea next to the fire.
Design the Landscape
Most yards look bleak this time of year, but their barren state is useful. It offers a perfect blank slate for dreaming and planning for the future. Without the greenery, it’s easier to assess the perfect place for a pond, bench, greenhouse, path, arbor, or other desired garden elements. Winter afternoons are perfect for flipping through gardening books and magazines and creating a project dream list with long- and short-term gardening goals. And as an added bonus, research suggests envisioning greenery may help combat winter blues.
Tips for productive planning sessions:
• If you’re in a new location, it’s best to spend a year watching the landscape before planning changes. Notice the movements of sun, shade, wind, and moisture.
• Think about what will fit your lifestyle best. Is the lawn too labor intensive? Should the veggies and compost be close to the kitchen?
• Create a big vision. Ask a landscape designer or permaculture expert for help, if necessary.
• Consider building the garden around a focal point. A bench, tree, sculpture, pond, or other dynamic feature can jumpstart a design.
• Break projects into small, doable tasks. Big changes often paralyze.
Make a Blueprint
Making planting decisions is usually the most difficult part of gardening for newbies, and can flummox even experienced gardeners. It’s best to get started on garden planning well before the growing season.
A garden journal is an invaluable gardening tool, and the winter months are a great time to start one. By keeping track of the types of vegetation, when they’re planted, how they’re fertilized, the weather, and successes and failures, gardeners become their own best teachers. It’s also worth investing in a comprehensive region-specific gardening book.
With the help of the reference book and notes on what worked well in the past, decide what to grow this spring. Make a list of plant varieties and when they need to be planted. If the seeds should be started inside, note that date too. Sketch the shape of the garden, and assess the best place to plant each crop based on sun exposure, plant height, timing, and past experience. Make notes about recommended fertilization and care instructions for each plant. Finally, pencil in planting dates on a calendar or appointment book. This detailed blueprint will be priceless once the earth is ready for digging.
Assess the Seed Stock
Once landscape and garden plans are in place, it’s time to assess seed stock, discard any old seeds, and make a list of seeds that need to be reordered. If seeds are stashed in the bottom of a junk drawer or the storage method is otherwise unruly, it’s also a good time to devise an organization system. Narrow-lidded file boxes or mason jars make good seed storage containers. Be sure to add a desiccant to absorb moisture. (Make one by filling a small cloth bag with rice or powdered milk.)
Gardeners differ on the best way to organize seeds. Some organize alphabetically by crop type, others by season and sowing dates. The key is to experiment and see what works best for you.
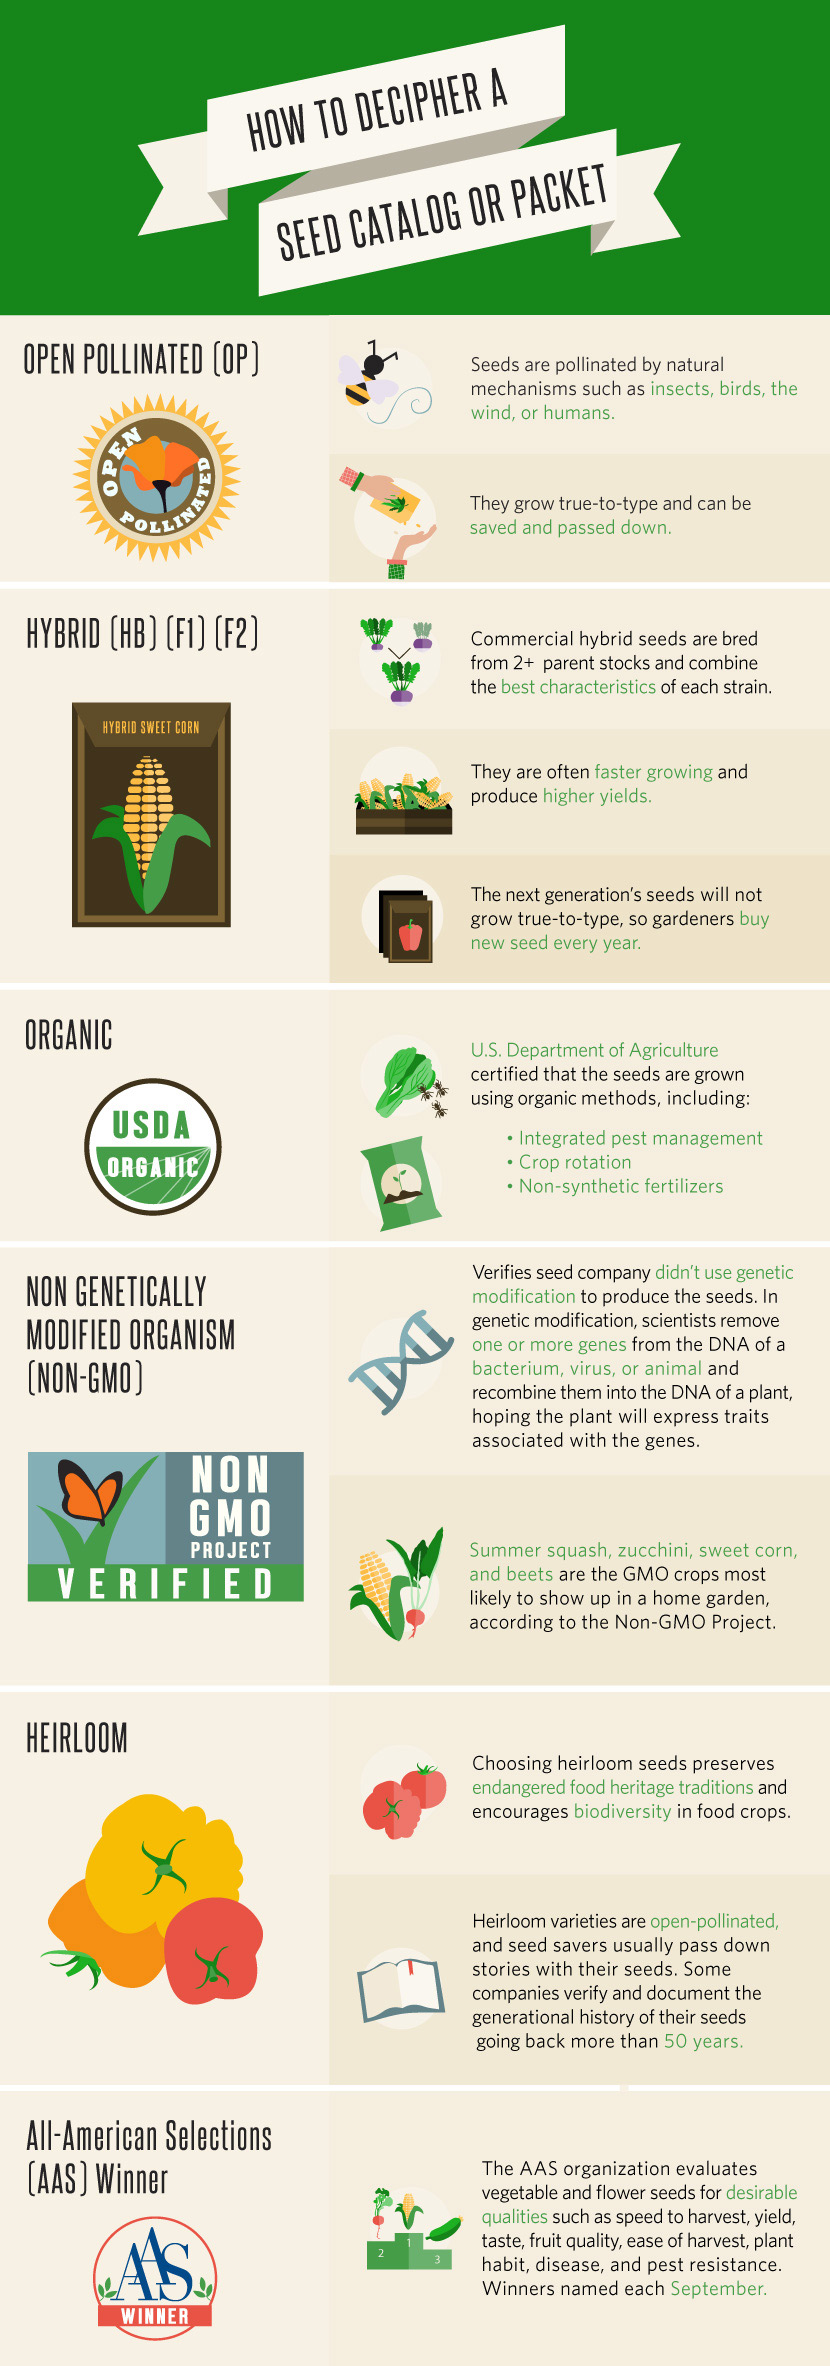
Order Seeds
Horticulturist Joseph Tychonievich warns of a winter malady known to strike gardeners this time of year called S.A.D.: Seed Acquisition Disorder. For gardeners who didn’t save last season’s seeds, it’s never too early to browse seed catalogs or websites. Check out local companies first. Plants grown and acclimated to a specific region grow best there. If no local options are available, many mail-order companies sell seeds. Just make sure desired plant varieties are bred to thrive in the garden’s USDA’s Hardiness Zone.

Maintain Tools
It’s easy to neglect shovels, hoes, spades, and shears during the busy growing season. Now is a great time to get them in shape for spring. It’s important to wear gloves and safety glasses.
How to clean and maintain garden tools:
1. Wash off dirt, dry with a towel, and leave overnight to dry thoroughly.
2. Remove any rust with sandpaper, steel wool, or a wire brush.
3. Sand splintery handles and wash them down with a wet rag.
4. Use a mill file or sharpening stone to sharpen shovel edges and shears.
5. Rub oil into the tools’ metal and wood parts to prevent rust and splintering. Cooking oil spray works well; petroleum-based oils can pollute the soil.
6. Lubricate moving parts and replace any missing screws or parts.
If the gardening shed or garage is messy, it’s a good time to clear work tables and get organized. Hanging shovels, rakes, and hoes on wall nails can save space and prevent dulling of edges. Drill small holes in handles to hang.
Keep the Compost Cooking
One of the best ways to prepare for spring is to spend the winter turning kitchen scraps and leaves into a nutrient-dense superfood for the garden. Cold, wet weather slows the decomposition process, but a few tips can help keep compost cooking during the cold months.
• Alternate layers of carbon- and nitrogen-rich materials. Kitchen scraps, coffee grounds, and manure are rich in nitrogen. Straw, leaves, and shredded newspaper are rich in carbon.
• Shred all waste into small pieces to help support the decomposition process.
• Protect the pile from wind, rain, and animals by covering open piles with a tarp. In very cold climates, pack bales of straw around the compost or bury it in a trench to protect it from freezing.
• Keep a covered pile damp by watering it regularly.
• Resist turning the pile until spring.
Prune
Many flowering and fruiting shrubs and trees benefit from an annual cutting back in late winter. Pruning helps them produce more fruit and flowers, resist pests and disease, and devote more root structure and energy to spring growth. (Plant care varies widely by climate. Contact a local university extension office for specific advice.)http://www.extension.umn.edu/garden/yard-garden/trees-shrubs/pruning-trees-shrubs/
The following plants often benefit from winter pruning:
• Fruit trees
• Grape vines
• Roses
• Summer flowering trees
The following usually should not be pruned during the winter:
• Conifers
• Bleeder trees, which produce copious amounts of winter sap, such as maples, birches, dogwoods, walnuts, and elms
• Shrubs and trees that flower in early spring, such as lilacs and rhododendrons
How to prune a shrub or tree:
1. Invest in the right tools, including pruning shears, lopping shears, and a handsaw.http://www.extension.umn.edu/garden/yard-garden/trees-shrubs/pruning-trees-shrubs/
2. Keep all tools sharp, and have a tub of soapy water, alcohol wipes, or an alcohol spray on hand to clean tools between use. Disinfection prevents the spread of disease.
3. Remove diseased, damaged, or pest-infested branches.
4. If two branches cross each other, remove the smaller or less healthy one.
5. Remove branch stubs, which can attract insects.
6. Encourage outward, open growth by cutting inward-pointing branches. Trim outside branches above a healthy, outward-facing bud.
7. After pruning, fertilize to support lush spring growth.
Make Repairs
Before spring, inspect the garden and repair any sagging raised beds or broken trellises and fences. Clear drainage ditches of debris to ensure proper spring runoff. Cover the garden with fabric, a tarp, or sheets of newspaper to discourage weed growth prior to planting.
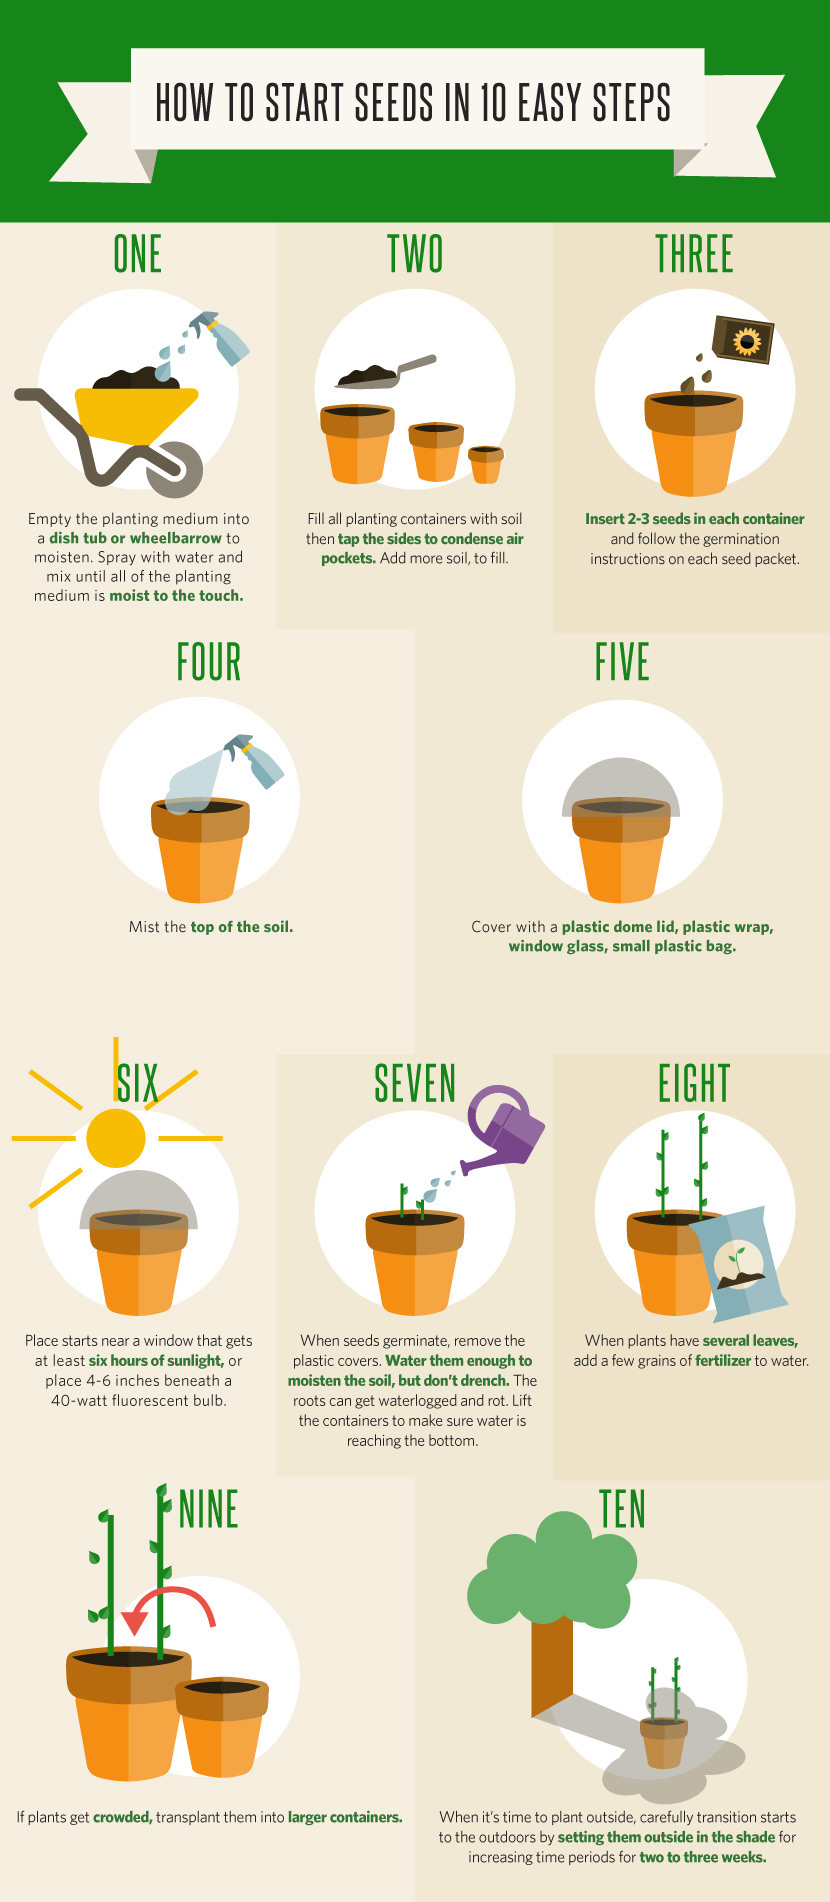
Start Early Spring Crops
Four to ten weeks before the projected final frost date, start seeds. In milder climates, early spring crops such as onions and greens can be started in mid-winter.http://sapport.scribble.com/Mainpages/Guardian/SeedingGuide/springseedingcalendar.htm
Garden stores sell special soil seed-starting mixes especially for seed starting that discourage common pathogens and retain water. It’s also possible to buy the ingredients and mix a homemade version. All sorts of containers are appropriate for starting seeds, including paper cups, plastic nursery flats, and fiber pots. Punch holes in the bottom for drainage. (If re-using plastic containers, wash with soapy water and rinse with diluted vinegar to avoid spreading disease to new seedlings.)
Once the garden is planned, the compost is cooking, the tools and garden shed organized, the seeds ordered and organized, and the early crops started, a gardener is set for a productive spring. All that’s left to do is plant the garden and enjoy the harvest.
Embed the article on your site