Your Guide to Easy Outdoor House Fixes
Warm, favorable weather means it’s time for barbecues, waterskiing, boating, swimming, picnics, and travel. Do you know why toasty weather is the perfect time for chores around the house, particularly outdoors?
Because you can tackle jobs that were physically impossible to do when snow, rain, and cold weather swirled around your house.
Even if you could paint the house in November, would you really find much joy in the task when your hands are frozen to the paintbrush?
The real answer, though, is that summer and warm weather have the amazing, transformative effect of turning miserable jobs into a lark. Break times call for lemonade in your lounge chair or naps on the hammock.
And the work itself even feels – dare I say – positively fun when sun kisses your shoulders as you fix the chimney or power-wash the drive.
So seize this glorious moment and knock off some of those chores now!
Roof and Chimney Fixes
A house’s weather-tight nature is often referred to as the “house envelope.” When mailing a letter, you never just tuck in the flap; you lick the adhesive, firmly sealing it. You want your house envelope to be the same way: tightly sealed.
Roof and chimney fixes are best completed in warm, dry weather, and they ensure a tight envelope in the months to come.http://www.familyhandyman.com/roof/repair/roof-repair-how-to-find-and-fix-roof-leaks/view-all#step1
The only time it’s safe to be on a roof is when the weather is bone-dry. Any moisture on the shingles can result in slips and falls, leading to serious injury or death. With your extension ladder properly positioned, do the following:
- Identify the Problem: First, check your attic for signs of water leakage, such as black mold, rotted wood, or damaged insulation. Next, access the roof with the extension ladder.
- Vent Boots: The rubber boots surrounding vents crack over time. Repairing the rubber is not advisable. Instead, purchase a new boot and replace the old one entirely.
- Step Flashing: Flashing prevents water from seeping between the roof and the chimney. One quick solution is to insert new flashing under the old flashing. The permanent solution is to pull the old flashing out and install new flashing; however, this complicated job is best left in the hands of the pros.
- Nail Holes: The roof is probably the only place in your house where caulk is not good enough. The solution is to cut a patch out of metal flashing and adhere it with roofing cement, such as Henry Rubberized Wet Patch, and roofing nails.
Easy Ladder-Positioning Trick: The Firefighter Method
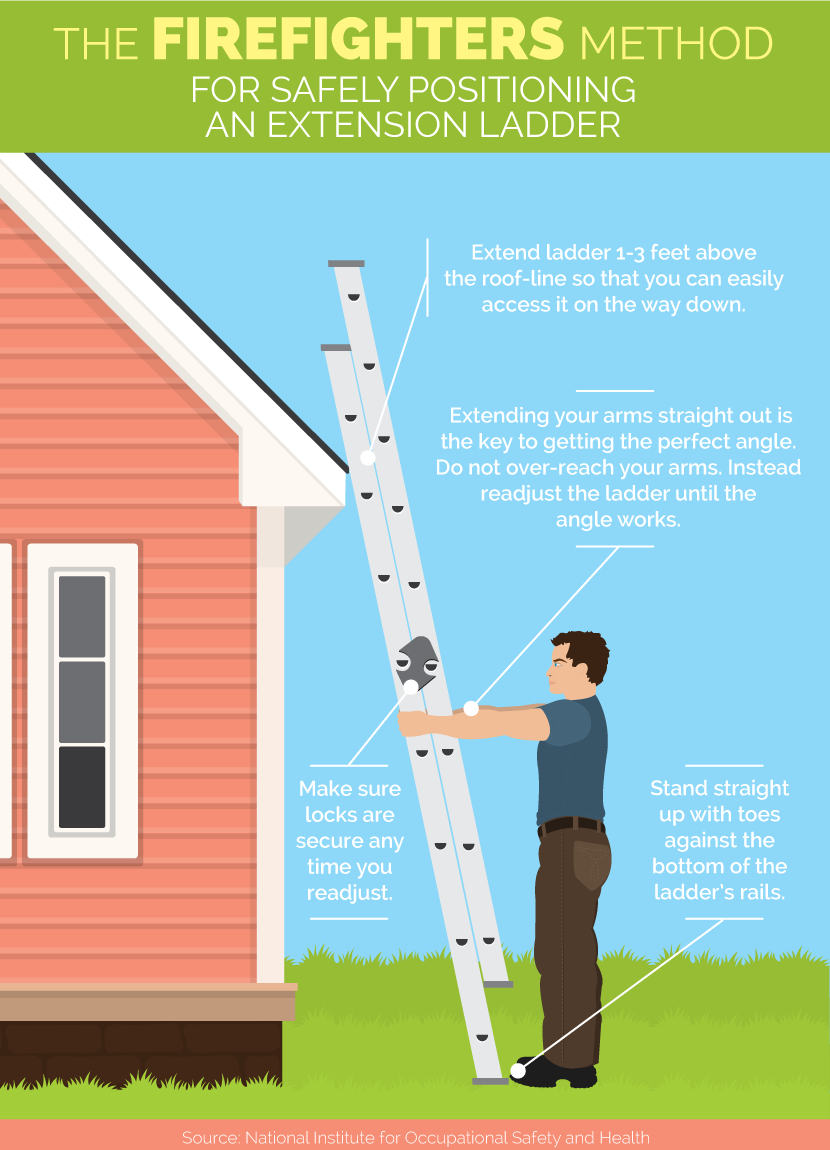
Extension ladders require you to maintain a 75-degree angle between the ladder and the ground. Because most people do not carry around giant protractors,
one simple trick to achieve this angle is what the National Institute for Occupational Safety and Health (NIOSH) calls “The Firefighter Method”:
- 1. Place the ladder against the wall and your toes against the bottom vertical rails of the ladder.
- 2. Stand straight up – no leaning forward allowed!
- 3. With your hands extended at 90 degrees from your body, grab the rails of the ladder from behind. Rails are the vertical pieces; rungs are the horizontal steps.
- 4. If you cannot do this, adjust the ladder until you can.http://hfs.sagepub.com/content/54/3/334.full.pdf+html
Inspect and Replace Siding and Trim
With your extension ladder in place, look for rotting or cracked house siding and trim.
Fix wood siding either by replacing the old siding with new boards or by caulking. Fill wide, deep cracks in with wood putty. Replace old, damaged vinyl siding completely.
Remove cracked or rotting trim, and replace it completely. One great trick is to use PVC board instead of wood. PVC, a type of plastic, will never rot. You can nail and paint it just like real wood, too.
Exterior Paint Touchups
After the last time you painted the house, you did save some paint, right? That smart move means you can touch up areas where paint is cracking and peeling away.
Because paint is your home’s last line of defense against the elements, these areas must be touched up.
5 Exterior Touch-Up Tips and Hacks:
- Paint only when the surface is shaded and cool. Painting on a hot surface causes the paint to cure too quickly.
- Foam paint brushes – terrible products for painting large areas – are actually perfect for dabbing little touch-ups. When finished painting, discard them.
- Shaken, not stirred: paint that is more than six months old will not adequately mix with a stirrer stick or even a drill-based mixer. Take the cans back to the store where you purchased them and have them mechanically shaken. All paint stores do this free of charge for their own paints.
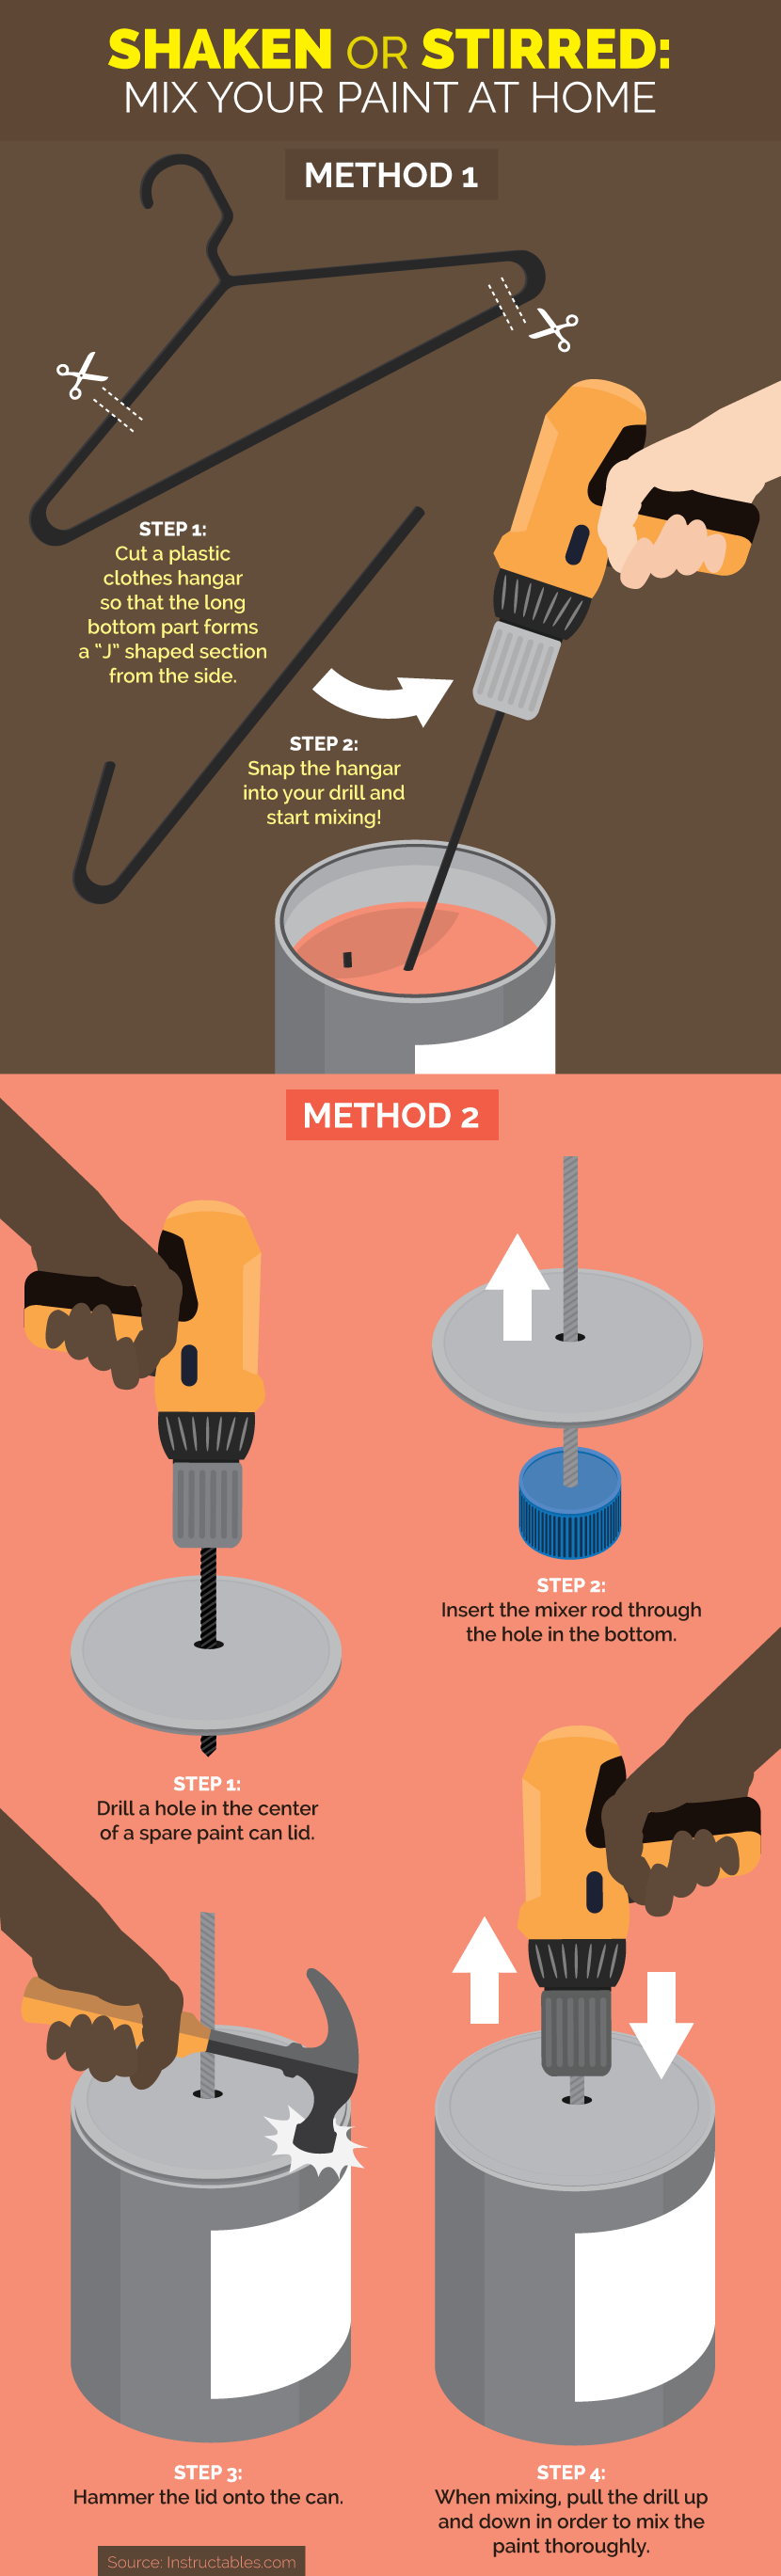
- If you opt to use a paint mixer and drill, one cool trick to minimize the mess is to knock a hole in the center of the paint can lid, insert the mixer rod through the hole in the bottom, and hammer the lid onto the can. Then you can run the mixer with no mess, no slop.http://www.todayshomeowner.com/video/tip-for-mixing-paint-with-a-drill-attachment/
- One great hack for making your own drill-driven paint stirrer is to cut a plastic clothes hanger so you have the long bottom section (where the clothes hang from) and a J-shaped section on the side. Chuck the hanger into your drill and run it as you would a store-bought mixer.http://www.instructables.com/id/How-to-make-an-easy-paint-stirrer/
Deep-Down Gutter and Downspout Cleaning
Last fall and winter, you cleared your gutters of leaves and debris. Good for you, but you have more to do.
Even though the larger debris is gone, you must clean the gutters until they are spick and span. Particles of composite shingles gather in the bottom of gutters. After a few seasons, these layers build up, becoming difficult to scrape out.
- Gutters: Access your gutters with your extension ladder. Start at the highest end of the gutter (the end farthest from the downspout). With a sprayer-equipped hose, spray the particles and debris toward the downspout. Keep moving your ladder until you reach the downspout. Remove as much as you can by hand before forcing the rest downward with the hose.
- Down Spout: Remove the downspouts from the house with your cordless drill or manual screwdriver. Lay the downspouts on your lawn and clean them out by spraying inside with your hose. When they are dry, put them back on the house.
Deep-Cleaning Your Windows
Think your windows are clean? Just wait until the morning sun hits them, and you will see that your spray and paper towels have only moved the dirt around.
Here is a seven-step process for deep-cleaning your windows.http://www.thisoldhouse.com/toh/how-to/intro/0,,20364019,00.html
- 1. Use a narrow nozzle on your shop vacuum to clean debris from the window tracks.
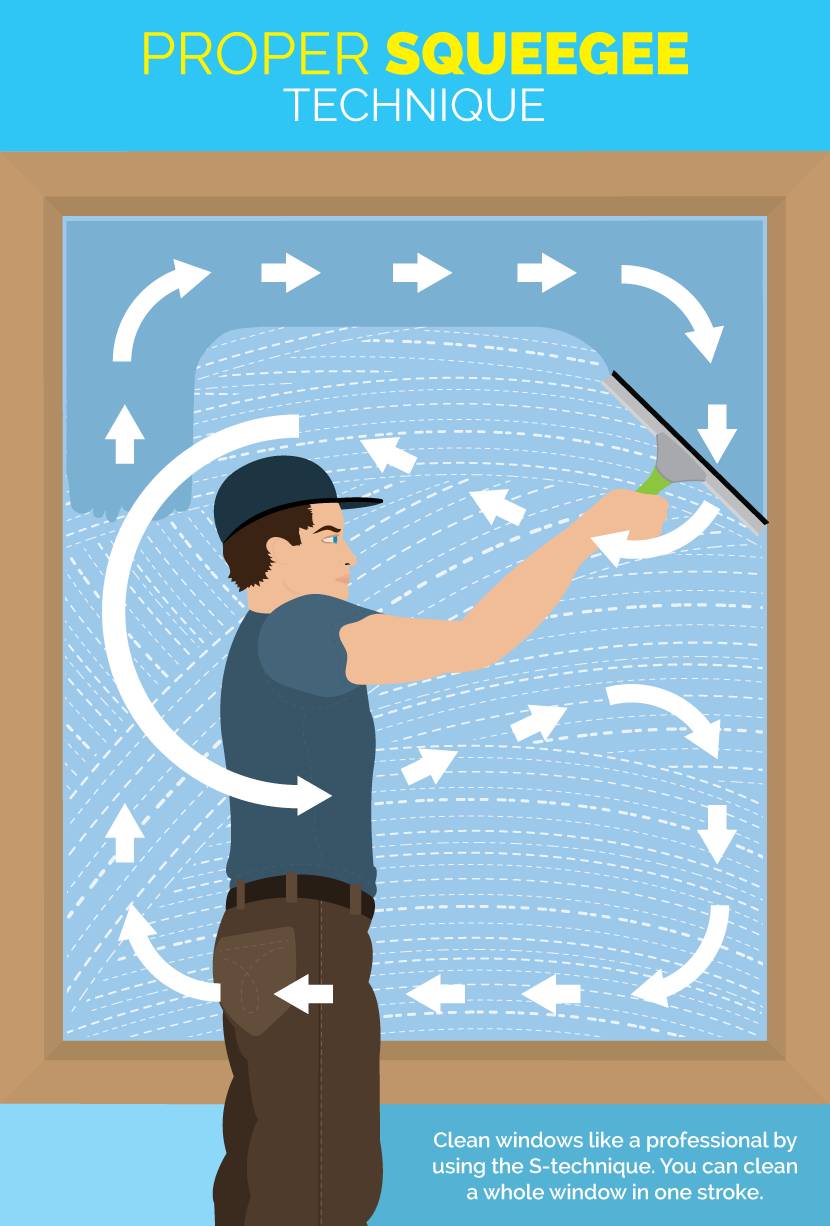
- 2. Purchase a squeegee with a cloth-strip washing head on one side.
- 3. Fill bucket with warm water, and add a squirt of dishwashing soap.
- 4. Lightly soap up the window with the cloth washing side.
- 5. Using the squeegee side, wipe off the soap in reverse “S” strokes.
- 6. After every stroke, wipe off squeegee with a clean cloth (not a paper towel).
- 7. When finished, clean up stray drips with the same cloth.
Total Moss Removal
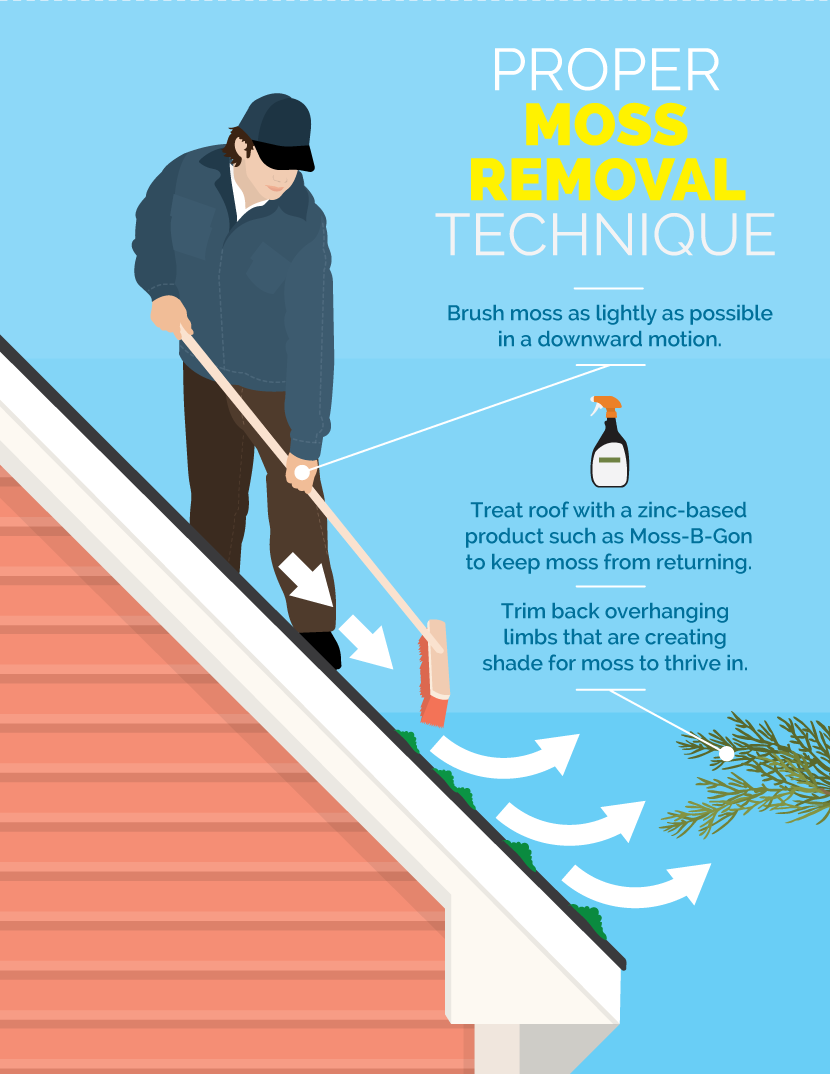
When moss first began appearing on your roof and other shady areas in the fall, you hopefully began killing it with a zinc-based product, such as Moss-B-Gon.
But that is only the first step: you are still left with clumps of dead moss firmly attached to your shingles.
You can remove this with a standard-bristle push broom. Stand above the moss and push downward on the shingles – from roof peak toward the house perimeter – as lightly as possible to break up the clumps (pushing upward will force the dead moss under your shingles).http://www.askthebuilder.com/removing-moss-and-algae-from-roofs/
Take time out from your busy schedule of having fun with warm-weather activities to tackle a few of those chores around the house that have been dogging you. Use this list to prioritize your schedule and make sure you get those projects done as efficiently and quickly as possible.
Embed the article on your site