Ratings submitted by customers like you who bought this part.
?
$72.90
In Stock
Fix Number:
FIX11728995
Manufacturer #:
5220FR2075L
Manufactured by:
LG
Product Description
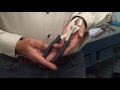
If your washing machine is leaking, slow to fill, will not stop filling with water, or is not filling at all, the cold-water inlet valve may be defective. The purpose of the valve is to open to allow water into the washer, and is used for cold water, liquid bleach, and prewash cycles in your washing machine. This is a genuine OEM replacement part that measures approximately 4 inches long and 3 inches wide. It has a standard hose fitting inlet along with two outlets facing 45 degrees to the right and one outlet facing 45 degrees to the left. When replacing this part, you will want to disconnect the power and water to your washer and remove the fill hoses. You will need to pull the machine out far enough so that you are able to access the back panel where the valves are located.
If your washing machine is leaking, slow to fill, will not stop filling with water, or is not filling at all, the cold-water inlet valve may be defective. The purpose of the valve is to open to allow water into the washer, and is used for cold water, liquid bleach, and prewash cycles in your washing machine. This is a genuine OEM replacement part that measures approximately 4 inches long and 3 inches wide. It has a standard hose fitting inlet along with two outlets facing 45 degrees to the right and one outlet facing 45 degrees to the left. When replacing this part, you will want to disconnect the power and water to your washer and remove the fill hoses. You will need to pull the machine out far enough so that you are able to access the back panel where the valves are located.
Works with the following brands:
LG, Kenmore
Works with the following products:
Washer, Washer Dryer Combo
Fixes the following symptoms:
Leaking, Water Filling Issues
Part# 5220FR2075L replaces these:
AP5986564, 5221ER1003A, AGM73269503
Videos For installing this part.
Replacing your Water Inlet Valve - Cold
Questions and Answers
We're sorry, but our Q&A experts are temporarily unavailable.
Please check back later if you still haven't found the answer you need.
2 questions answered by our experts.
< Prev
1
Next >
Sort by:
Search filter:
Clear Filter
Your search term must have 3 or more characters.
Keep searches simple. Use keywords, e.g. "leaking", "pump", "broken" or "fit".
Sorry, we couldn't find any existing answers that matched. Try using some different or simpler keywords, or submit your new question by using the "Ask a Question" button above!
Javier
February 11, 2022
I replaced this cold water inlet valve and I am afraid I might have mixed up the pre wash and main wash hoses. I know 100% that the hose marked 'bleach' goes in the right most port, but what are the order of the other 2? Is main wash suppose to be the center port on the inlet valve?
Hi Javier,
Thank you for your question. We have included a link to one of our YouTube videos that you may reference on how to install the water inlet valve. The washer in the video may appear different from yours, but it will give you a general idea on how to install the valve and the hoses. If you have any questions, please let us know. We are open 7 days a week. We look forward to hearing from you!
5 people found this helpful.
Was this helpful?
Thank you for voting!
Jack
September 27, 2021
My LG washer 3 years old left fabric dispenser filled with water. Technician said we needed this part. We bought part and error codes fa and ie came on along with the area being flooded overnight.
He tells me it was a defective part and not him that allowed the water to continuously run. Your thoughts would be appreciated.
For model number WM3670HWA
Hello Jack, Thank you for the question. If the water continues to fill even when the appliance is not in use, normally indicates the Valve is defective. The Valve can be tested as well. Set your multitester to the R X 1 ohms setting to test for continuity. Place each of the multitester's leads on a terminal. Your multitester should display a reading between 200 and 500 ohms. Closely examine your water inlet valve. The exact ohm resistance rating you should test for may be marked on the valve. We hope this helps!
The hot water valve is found at the back of your washer and controls the flow of hot water into the machine. If the valve is defective, the washer may leak, overfill, fill slowly, or not fill with water at all. If this h...
Installation Instructions Provided by Fix customers like you.
Average Repair Rating: 4.8 / 5.0, 4 reviews.
< Prev
1
Next >
Sort by:
Search filter:
Clear Filter
Your search term must have 3 or more characters.
Keep searches simple. Use keywords, e.g. "leaking", "pump", "broken" or "fit".
Sorry, we couldn't find any existing installation instruction that matched.
I actually looked on you tube for the type of washer and the issue. I checked all the areas the various videos showed me. The last one I checked was the inlet valves. All that is needed is a Phillips head and a wrench. Took the top off. Unplugged the washer. Unplugged the hoses. Unscrewed the valves and removed the hoses and the circuit p
... Read moreieces. Replaced one at a time. Everything worked perfect. Hooked hoses back up. No more leaks. Attached the top back and pushed back into place. No more leaking.
The cold water inlet valve cracked and I kept getting water on the floor unless I shut off the water valve completely.
Unplug the washer. Shut off the water and disconnect the cold water hose that goes in the back of the washer. Remove the top cover of the washer. Then I used pliers to disconnect the 3 black hoses from the old water valve that was cracked and to connect them back to the new water valve. It took less than 15 minutes. Very easy.
Unplug electric cord from washer. Removed 2 screws in the back of washer and slide top back 1 inch and lifted top off washer. Turned off cold water and disconnected the cold water line. Removed the 3 hoses connected to the valve assembly inlet and removed to 2 screws holding the valve assembly in place. Reassembled, total time was about 1
... Read more5 minutes. (very easy)
Shut off the water to the machine and unplug it. Remove cold water line from the back of the machine. Remove the two screws holding the water valve in place. Using plyers, slide the clamps holding the three water lines in place out of the way so you can remove the lines. I installed the lines on the new valve as I removed them to avoid r
... Read moreeinstalling them in the wrong place. Slide the water line clamps back in place, fasten the valve to the machine with the two screws you removed and reattach the cold water line.
Read less
0 of 1 peoplefound this instruction helpful.
Was this instruction helpful to you?
Thank you for voting!
< Prev
1
Next >
Model Compatibility
This part works with the following models:
Fix Number: FIX11728995
Manufacturer Part Number: 5220FR2075L
Some of the parts we sell are eligible for mail-in rebates since we can recycle them. We will display any applicable rebates in your shopping cart. To redeem your rebate, contact Customer Service after you have received your part.