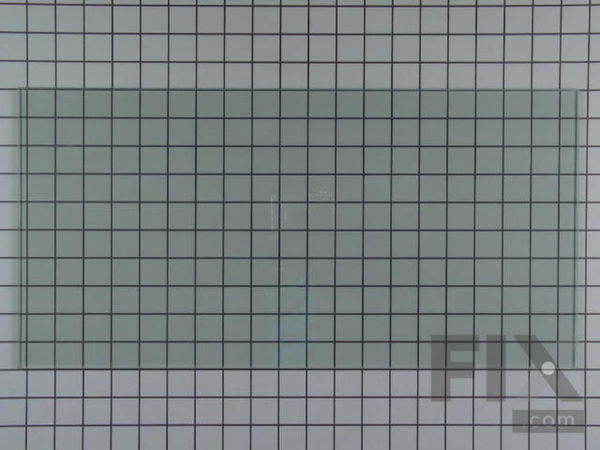
Part Location Diagram of WP4449259 Whirlpool Inner Door Glass
See part 3 in the diagram
( Grid squares measure 1x1 inch )

Inner Door Glass WP4449259

★★★★★
★★★★★
3 Reviews

Rated by 11 customers 

?

Easy 

30 - 60 mins 

Ratings submitted by customers like you who bought this part.

?
$112.15
In Stock
Fix Number:
FIX11742543
Manufacturer #:
WP4449259
Manufactured by:
Whirlpool

Product Description

The glass panel on the door of your range allows you to see your food as it is being cooked in the oven. If it has become damaged, broken, or so grimy that it is beyond cleaning, it should be replaced. This is a genuine OEM heat resistant panel that measures approximately 10 inches by 20 inches. It is the innermost glass panel on the door and is sold individually. When replacing this panel, please be sure to wear proper protection such as gloves in case any glass breaks. Always be sure to disconnect the power supply to your range and ensure that it is cool to the touch before starting the repair.

Questions and Answers

Ask our experts a question about this part and we'll get back to you as soon as possible!

2 questions answered by our experts.
  • 1
Sort by:
Sorry, we couldn't find any existing answers that matched.
Try using some different or simpler keywords, or submit your new question by using the "Ask a Question" button above!
Tim
February 1, 2022
I need to replace inner cracked glass on our KitchenAid I c that there are four screws on the inner door to get to the glass is it fairly easy to replace the inner glass
For model number KEBS207DWH8
Fix.com logo
Hi Tim, Thank you for your question. This repair is not difficult to do. We have included a link to one of our YouTube videos that you may reference on how to install the inner door glass. The range in the video may appear different from yours, but it will give you a general idea on how to install the part. We hope this helps! Good luck with the repair!

1 person found this helpful.

Was this helpful?
Thank you for voting!
Marilyn
November 19, 2021
Does the inner glass come wit a frame?
For model number W2759B
Fix.com logo
Hello Marilyn, Thank you for the question. This is just the one piece of glass as seen in the picture. If you need help placing an order, customer service is open 7 days a week. Please feel free to give us a call. We look forward to hearing from you!

Was this helpful?
Thank you for voting!
Affresh Washing Machine Cleaner - 3 pack
$12.58
In Stock
Produce Preserver Filter
$21.50
In Stock
Affresh Dishwasher Cleaner Tablets - 6
$19.09
In Stock
Cooktop Cleaning Cream
$15.57
In Stock
Cooktop Cleaner
$17.74
In Stock
Affresh Cleaner
$19.09
In Stock

Installation Instructions Provided by Fix customers like you.

Average Repair Rating: 3.5 / 5.0, 11 reviews.
  • 1
  • 2
Sort by:
Sorry, we couldn't find any existing installation instruction that matched.
Customer:
Andrea from Folsom, CA
Parts Used:
WP4449259
Difficulty Level:
Really Easy
Total Repair Time:
30 - 60 mins
Tools:
Screw drivers
Broken glass
I googled it, perfect!
7 of 7 people found this instruction helpful.
Was this instruction helpful to you?
Thank you for voting!
Customer:
William from Huntington, IN
Parts Used:
WP4449259
Difficulty Level:
Easy
Total Repair Time:
15 - 30 mins
Tools:
Screw drivers
Replacing a broken inner glass pane on the oven door
Remove screws from top of outer door, depress clamp for the screws and slide out the outer door panel; remove each of the inner panes by removing screws from their brackets (lay aside in order); remove final inside broken pane from it's brackets. Clean and replace each pane in reverse order. There is no need to get into the hinge assemb ly, or completely remove the door from the oven.
2 of 2 people found this instruction helpful.
Was this instruction helpful to you?
Thank you for voting!
Customer:
Sandra from Seaside, CA
Parts Used:
WP4449259
Difficulty Level:
Easy
Total Repair Time:
15 - 30 mins
Tools:
Screw drivers
The inner glass window was cracked and needed to be replaced.
There were several on line tutorials on how to remove the door, replace the glass, and reinstall the door. The steps were all relatively simple to follow and the entire process took about 20 minutes.
2 of 2 people found this instruction helpful.
Was this instruction helpful to you?
Thank you for voting!
Customer:
Donnamarie from Pinckney, MI
Parts Used:
WPW10207397, WP4449259
Difficulty Level:
Really Easy
Total Repair Time:
1- 2 hours
Tools:
Screw drivers
Broken inner window on door and broken heating element
I watched a Youtube video to see how to fix my oven. So happy to see the site had my pieces. I am NOT a handyperson but decided to try it. My son-in-law located the hinge locks and easily pulled those forward. The door lifted out quite easily. I unscrewed all the screws in the door and carefully lifted each part as it came loose. After so many years, the parts were very greasy and dirty. I lifted out the broken glass and disposed of it and, one by one, I just scrubbed all the parts clean. I carefully reassembled the pieces and replaced all the screws. The heating element was a very easy fix. I turned off the power, removed 2 screws that held it to the back wall of oven, pulled the connector wires apart carefully, disposed of old unit, connected new unit like the other one was, replaced screws and "voila!" done.
1 person found this instruction helpful.
Was this instruction helpful to you?
Thank you for voting!
Customer:
Ernesto from Rancho Mirage, CA
Parts Used:
WP4451722, WP4449259
Difficulty Level:
Very Easy
Total Repair Time:
Less than 15 mins
Tools:
Screw drivers
After self cleaning, oven stop heating up
I did find this very helpfully video
1 of 2 people found this instruction helpful.
Was this instruction helpful to you?
Thank you for voting!
Customer:
Marla from LA MESA, CA
Parts Used:
WP4455525, WP4449259
Difficulty Level:
Easy
Total Repair Time:
30 - 60 mins
Tools:
Screw drivers
Oven door wouldn't close, cracked interior glass while cleaning.
Replacing the oven door hinges was easy. Insert pins into the holes where the oven door meets the oven and lift off. place oven door on table with outside part facing up. unscrew the screws but keep track of which screws were used on the sides. There are 2 screws that are a different color and go on the brackets on the bottom. Lift off the face, swap out the hinges and reassemble and put the door back on. Take out the pins (they will already be on the new hinges) Done. The glass required me to flip the door over and unscrew the interior screws, I simply took off each layer and place it in the exact order to put back on, I slipped out the broken glass, and put the layers back on. secured the outside door and I was done.
0 of 1 people found this instruction helpful.
Was this instruction helpful to you?
Thank you for voting!
Customer:
Joseph from Madera, CA
Parts Used:
WP4449259
Difficulty Level:
Easy
Total Repair Time:
30 - 60 mins
Tools:
Screw drivers
Inner glass cracked by slamming door on baking dish
The instructions from previous submissions were great (thank you for the door removal hints). Good thing I kept the door removal pins after 15 years (an allen or larger nail will do if you threw them away). Keep the door on a large flat surface with a towel under it so it doesn't scratch and keeps the work area clean. The door handle does not need to be removed and can be off the surface to keep it flat.
0 of 1 people found this instruction helpful.
Was this instruction helpful to you?
Thank you for voting!
Customer:
Larry from Spokane, WA
Parts Used:
WP4449259
Difficulty Level:
Easy
Total Repair Time:
1- 2 hours
Tools:
Screw drivers
I broke the inner glass by washing it while it was really hot - Not a smart move - I should have been smarter than that!
The repair went quite well, as I disassembled the door and laid out the parts in order to facilitate the reassembly. I cleaned all the inner glass panels before reassembly using a product called 'Bar Keepers Friend'. It cleans wonderfully and does NOT scratch the glass. I also want to thank the person I talked to at this site who really knew what I needed and got the item shipped that day. The part arrived when expected and undamaged.
0 of 1 people found this instruction helpful.
Was this instruction helpful to you?
Thank you for voting!
Customer:
Cathleen from Indianapolis, IN
Parts Used:
WP4449259
Difficulty Level:
Easy
Total Repair Time:
30 - 60 mins
Tools:
Screw drivers
Inner Glass Oven Door Repair
After watching your video of the inner glass oven door repair, I a 55 year old woman repaired it all by myself. Taking it apart was easier than putting it back together though. Still, the repair took me less than an hour and saved me several hundred dollars had I called a repair man. Thank you.
0 of 1 people found this instruction helpful.
Was this instruction helpful to you?
Thank you for voting!
Customer:
Michael from Schoharie, NY
Parts Used:
WP4449259
Difficulty Level:
A Bit Difficult
Total Repair Time:
15 - 30 mins
Tools:
Screw drivers
Replace inside door oven glass
3 days of internet searching to find that the door hinges are out of date. There is a small hole under the hinge arm. You need to place a nail into the hole on each side, close the door allowing the tension to come off the hinge. Then lift and pull the door up and away to remove. Remove the screws from the top and sides keeping the or der of removal. The hard part was cleaning up the broken glass and then cleaning the remaining glass. Center the new piece of glass, replace the screws into the door in reverse order. Don't over-tighten. Place the door back onto the hinges. Lower the door, remove the nails and you are back in business. Make sure the door is seated all the way so the door closes properly.
0 of 1 people found this instruction helpful.
Was this instruction helpful to you?
Thank you for voting!
  • 1
  • 2
Customer Reviews
Average Rating: (3 Reviews)
5.0
★★★★★
★★★★★
Filter By Rating:
  • 5
    3
  • 4
    0
  • 3
    0
  • 2
    0
  • 1
    0
  • 1
Sort by:
Sorry, we couldn't find any existing reviews that matched. Try using some different or simpler keywords.

Model Compatibility

This part works with the following models:
Fix Number: FIX11742543
Manufacturer Part Number: WP4449259
Brand
Model Number
Description
Whirlpool
GBD307NKB0
Range - Whirlpool Range/Stove/Oven Model GBD307NKB0 Parts
Whirlpool
GBD307NKQ0
Range - Whirlpool Range/Stove/Oven Model GBD307NKQ0 Parts
Whirlpool
GBD307PDB0
Wall Oven - Built-in, Wall, Electric 30"
Whirlpool
GBD307PDB09
Wall Oven - Built-in, Electric
Whirlpool
GBD307PDB1
Wall Oven - Built-in, Electric
Whirlpool
GBD307PDB10
Wall Oven - Built-in, Electric, Double
Whirlpool
GBD307PDB2
Wall Oven - Built-in, Electric
Whirlpool
GBD307PDB3
Wall Oven - Built-in, Electric, Wall
Whirlpool
GBD307PDB4
Wall Oven - Built-in, Electric
Whirlpool
GBD307PDB5
Wall Oven - Built-in, Electric
Whirlpool
GBD307PDB6
Wall Oven - Built-in, Electric
Whirlpool
GBD307PDB7
Wall Oven - Built-in, Electric
Whirlpool
GBD307PDQ0
Wall Oven - Built-in, Wall, Electric 30"
Whirlpool
GBD307PDQ09
Wall Oven - Built-in, Electric
Whirlpool
GBD307PDQ1
Wall Oven - Built-in, Electric
Whirlpool
GBD307PDQ10
Wall Oven - Built-in, Electric, Double
Whirlpool
GBD307PDQ2
Wall Oven - Built-in, Electric
Whirlpool
GBD307PDQ3
Wall Oven - Built-in, Electric, Wall
Whirlpool
GBD307PDQ4
Wall Oven - Built-in, Electric
Whirlpool
GBD307PDQ5
Wall Oven - Built-in, Electric
Whirlpool
GBD307PDQ6
Wall Oven - Built-in, Electric
Whirlpool
GBD307PDQ7
Wall Oven - Built-in, Electric
Whirlpool
GBD307PDS09
Wall Oven - Built-in, Electric
Whirlpool
GBD307PDS1
Wall Oven - Built-in, Electric
Whirlpool
GBD307PDS10
Wall Oven - Built-in, Electric, Double
Whirlpool
GBD307PDS2
Wall Oven - Built-in, Electric
Whirlpool
GBD307PDS3
Wall Oven - Built-in, Electric, Wall
Whirlpool
GBD307PDS4
Wall Oven - Built-in, Electric
Whirlpool
GBD307PDS5
Wall Oven - Built-in, Electric
Whirlpool
GBD307PDS6
Wall Oven - Built-in, Electric