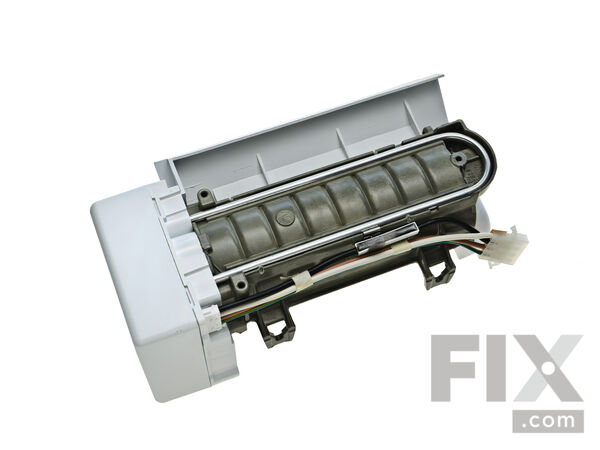
Part Location Diagram of 2198597 Whirlpool Ice Maker Assembly -  8 Cube
See part 100 in the diagram
Replacing your Whirlpool Refrigerator Ice Maker Assembly -  8 Cube
( Grid squares measure 1x1 inch )

Ice Maker Assembly - 8 Cube

★★★★★
★★★★★
1 Review

Rated by 40 customers 

?

Really Easy 

15 - 30 mins 

Ratings submitted by customers like you who bought this part.

?
$145.08
In Stock
Fix Number:
FIX869316
Manufacturer #:
2198597
Manufactured by:
Whirlpool

Product Description

If your fridge has stopped making or dispensing ice, you may need to replace the ice maker assembly. Regular wear and tear can cause this part to fail over time, especially if used frequently. To replace this genuine OEM part, you will need a quarter inch nut driver and a small flat blade screwdriver. Disconnecting the water supply and power to the refrigerator should not be necessary, but you will want to turn off the ice maker before beginning this repair. Be careful when removing the old ice maker, as you will need to reuse the base assembly, or casing, on the new ice maker.

Videos For installing this part.

Replacing your Ice Maker Assembly - 8 Cube

Replacing your Ice Maker Assembly -  8 Cube

Questions and Answers

We're sorry, but our Q&A experts are temporarily unavailable.
Please check back later if you still haven't found the answer you need.

1 question answered by our experts.
  • 1
Sort by:
Sorry, we couldn't find any existing answers that matched.
Try using some different or simpler keywords, or submit your new question by using the "Ask a Question" button above!
Lee
June 27, 2022
Does this model require a metal rod to start and stop to dispense ice?
For model number WRS321SDHZ08
Fix.com logo
Hello Lee, Thank you for your inquiry. We have researched the model number that you have provided and show the compatible ice maker as FIX16555339. The control arm to shut off the ice maker when the bin is full is part# FIX16730924 and appears to be part of the ice bin. We hope this helps and if you need help placing an order, customer service is open 7 days a week. Please feel free to give us a call. We look forward to hearing from you!

Was this helpful?
Thank you for voting!
Related Parts:

Installation Instructions Provided by Fix customers like you.

Average Repair Rating: 4.2 / 5.0, 40 reviews.
  • 1
  • 2
  • 3
Sort by:
Sorry, we couldn't find any existing installation instruction that matched.
Customer:
Edward from Saint Leonard, MD
Parts Used:
W10408179, 2198597
Difficulty Level:
Very Easy
Total Repair Time:
15 - 30 mins
Tools:
Nutdriver, Screw drivers
Water was running out of the ice maker slot.
After immediately closing the water supply valve, I looked over the system and decided to look online and found Part Select. After reading what others have found; then watching the excellent "How To" videos, and using the easy to follow parts diagrams, I had ordered a new ice maker and water inlet valve. Considering how old the fridge wa s, how much we use the ice maker and water dispenser, and the price of the parts, I didn't want to play around and bought both parts. I simply followed the exact video instructions and was done in 30 minutes tops. I'm an aircraft mechanic so this job was super simple for me, but, I believe that with the excellent "how to" videos supplies, anyone could accomplish many of these simple part replacements and save themselves a lot of money. I will differently use this site again.
5 of 6 people found this instruction helpful.
Was this instruction helpful to you?
Thank you for voting!
Customer:
Thomas from Lincolnton, NC
Parts Used:
2198597
Difficulty Level:
Very Easy
Total Repair Time:
30 - 60 mins
Tools:
Nutdriver, Screw drivers
Would not make ice.
Removed door on ice maker by moving the catch to the side on each hinge. Used a 1/4" nut driver to unscrew one screw on the cover for the electrical connection. Used a screwdriver to push in the latches on each side of the ice maker and slid it out. Pulled the latch on one side of the electrical connection and unplugged it. On the table, removed the three screws holding the bottom plate on the ice maker they pushed in the latch on one side of the electrical connector and pulled it through the housing at an angle. Pushed the electrical connector of the new ice maker through the bottom housing at an angle them pushed the other side in until it snapped into place. Replaced the three screws in the bottom of the lower plate. plugged the electrical connection from the refrigerator into the connector on the ice maker until it locked into place. Slid the ice maker into position until it locked into place. Replaced the cover for the electrical connection and the screw that holds it in place. Replaced the door. View the video on line at PartSelect and you should have no trouble replacing your ice maker. It is very easy to do this repair. Took me about :30 minutes to complete the replacement, start to finish. The new ice maker works great.
4 of 5 people found this instruction helpful.
Was this instruction helpful to you?
Thank you for voting!
Customer:
Mary B from Millington, TN
Parts Used:
EDR3RXD1, 2198597
Difficulty Level:
Easy
Total Repair Time:
15 - 30 mins
Tools:
Nutdriver, Screw drivers
Ice maker not working (replaced ice maker and filter)
We followed the instruction video included on the order page. It took about 20 minutes for us. One exception to the video instruction is keeping the "infrared door closed". We had to pull hard on the ice maker unit to remove and we broke the infrared door. I would suggest using tape to keep the infrared door secure while removing and i nstalling the unit. Filter replacement: we watched the video, however, we had to put alot of pressure on the filter to get it to engage. When the filter is successfully in place, it make a loud swish sound as the water enters the filter and it will lock in place.
1 person found this instruction helpful.
Was this instruction helpful to you?
Thank you for voting!
Customer:
Tigger from Placerville, CA
Parts Used:
2198597
Difficulty Level:
Really Easy
Total Repair Time:
Less than 15 mins
Tools:
Nutdriver
Ice maker stopped making ice.
Step 1 : removed the damage ice-maker from the freezer Step 2: Removed the bottom tray from the damage ice-maker And mounted it on the new ice-maker. Step 3: installed the new ice-maker.
1 person found this instruction helpful.
Was this instruction helpful to you?
Thank you for voting!
Customer:
GW from WELLSTON, OK
Parts Used:
2198597
Difficulty Level:
Very Easy
Total Repair Time:
15 - 30 mins
Tools:
Nutdriver
Ice maker quit working.
I followed your video instructions which worked perfectly well. Thank you!
1 person found this instruction helpful.
Was this instruction helpful to you?
Thank you for voting!
Customer:
Carmen from Medford, NJ
Parts Used:
2198597
Difficulty Level:
Really Easy
Total Repair Time:
30 - 60 mins
Tools:
Nutdriver, Screw drivers
Unit would not make ice cubes
Google instructions to trouble shoot,then removed whole unit. Only difficult screws to take out were lift up door needed very short nut driver.very easy to install as per instructions downloaded from whirlpool site
1 person found this instruction helpful.
Was this instruction helpful to you?
Thank you for voting!
Customer:
gerald from southlake, TX
Parts Used:
2198597
Difficulty Level:
Really Easy
Total Repair Time:
15 - 30 mins
Tools:
Nutdriver, Screw drivers
no problems
Remove lid, compress switch and slide old unit out, tilting water spout out of cup. Disconnect electric plug and slide all the way out. Unscrew old cover and attach to new unit and reverse above.
1 person found this instruction helpful.
Was this instruction helpful to you?
Thank you for voting!
Customer:
Charles from Madisonville, LA
Parts Used:
2198597
Difficulty Level:
Easy
Total Repair Time:
30 - 60 mins
Tools:
Nutdriver, Screw drivers
Ice maker not making iceused
used instructions on pc and had no problems at all.
0 of 1 people found this instruction helpful.
Was this instruction helpful to you?
Thank you for voting!
Customer:
Bruce from Rhome, TX
Parts Used:
2198597
Difficulty Level:
Really Easy
Total Repair Time:
15 - 30 mins
Tools:
Nutdriver, Screw drivers
Ice maker wouldn't make ice.
Pulled the refridgerator out and unplugged it. Placed a piece of tape on the acuator door (flapper door on side). Removed the 2 screws on the ice maker door using a 1/4 in. nutdriver. Using a #2 phillips screwdriver, I removed the plastic cover over the wire harness. Pressed the plastic clips in using a flat tip screwdriver and slid the i ce maker unit forward and out of the retainer. Disconnected the wiring harness and removed the ice maker. Once removed, turned the unit upside down and removed the 4 screws holding the bottom cover using a 1/4 in. nutdriver and installed the cover on the new unit. Reattched the wiring harness and slid the new icemaker back in place. Reinstalled the wiring harness cover and the icemaker cover. Removed tape from flapper door, plugged the refridgerator in and slid it back in place. Approx. 20 minutes and works like a champ.
0 of 1 people found this instruction helpful.
Was this instruction helpful to you?
Thank you for voting!
Customer:
William from Raymore, MO
Parts Used:
2198597
Difficulty Level:
Really Easy
Total Repair Time:
15 - 30 mins
Tools:
Screw drivers, Socket set
Ice maker drive motor quit
I removed the front protective shield (2 screws), then located the two push up tabs on the bottom edges of the unit, depressed them and pulled the unit forward and down where I unplugged the wiring harness and removed the unit. I then removed the bottom plate ( 3 hex head 1/4" tap screws) and reinstalled it on the new unit . Then reversing the process I installed the new unit and front shield. This was an extremely easy repair that saved a service call and repair bill.
0 of 1 people found this instruction helpful.
Was this instruction helpful to you?
Thank you for voting!
  • 1
  • 2
  • 3
Customer Reviews
Average Rating: (1 Review)
5.0
★★★★★
★★★★★
Filter By Rating:
  • 5
    1
  • 4
    0
  • 3
    0
  • 2
    0
  • 1
    0
  • 1
Sort by:
Sorry, we couldn't find any existing reviews that matched. Try using some different or simpler keywords.

Model Compatibility

This part works with the following models:
Fix Number: FIX869316
Manufacturer Part Number: 2198597
Brand
Model Number
Description
Kenmore
10641522500
Refrigerator
Kenmore
10641523500
Refrigerator
Kenmore
10641524500
Refrigerator
Kenmore
10641529500
Refrigerator
Kenmore
10644022600
Refrigerator
Kenmore
10644022601
Refrigerator
Kenmore
10644022602
Refrigerator
Kenmore
10644022603
Refrigerator
Kenmore
10644023600
Refrigerator
Kenmore
10644023601
Refrigerator
Kenmore
10644023602
Refrigerator
Kenmore
10644023603
Refrigerator
Kenmore
10644024600
Refrigerator
Kenmore
10644029600
Refrigerator
Kenmore
10644029601
Refrigerator
Kenmore
10644029602
Refrigerator
Kenmore
10644029603
Refrigerator
Kenmore
10644032600
Refrigerator
Kenmore
10644032601
Refrigerator
Kenmore
10644032602
Refrigerator
Kenmore
10644032603
Refrigerator
Kenmore
10644033600
Refrigerator
Kenmore
10644033601
Refrigerator
Kenmore
10644033602
Refrigerator
Kenmore
10644033603
Refrigerator
Kenmore
10644034600
Refrigerator
Kenmore
10644039600
Refrigerator
Kenmore
10644039601
Refrigerator
Kenmore
10644039602
Refrigerator
Kenmore
10644039603
Refrigerator