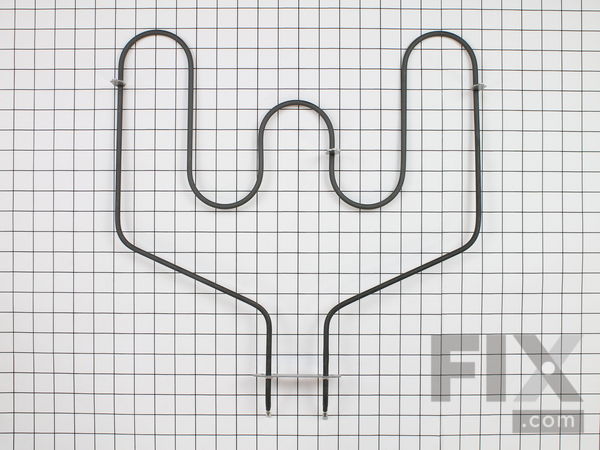
Part Location Diagram of WB44T10011 GE Bake Element - Push On Terminals - 240V
See part 251 in the diagram
( Grid squares measure 1x1 inch )

Bake Element - Push On Terminals - 240V

★★★★★
★★★★★
4 Reviews

Rated by 15 customers 

?

Easy 

15 - 30 mins 

Ratings submitted by customers like you who bought this part.

?
$88.10
In Stock
Fix Number:
FIX249286
Manufacturer #:
WB44T10011
Manufactured by:
GE

Product Description

The bake element sits at the bottom of the oven to provide heat for cooking and baking. You may need to replace the element if you notice your oven is not coming up to temperature, has hot spots, or if the element has shorted out or is arcing. A multimeter can be used to determine if there is an electrical issue with your element. If you need to replace the element, be sure to disconnect the power to your appliance before beginning this repair. This is a genuine OEM part which measures approximately 20 inches in length, 18 inches wide, and is made of metal. It has two terminals that fit into the power source receptacle found at the back of the oven. When replacing the element, be careful to keep the terminal wires from falling through into the back of the oven.

Questions and Answers

We're sorry, but our Q&A experts are temporarily unavailable.
Please check back later if you still haven't found the answer you need.

1 question answered by our experts.
  • 1
Sort by:
Sorry, we couldn't find any existing answers that matched.
Try using some different or simpler keywords, or submit your new question by using the "Ask a Question" button above!
Alyssa
February 7, 2022
About in inch of my baking heating element is glowing red. Does this mean I should replace it? Should I stop using my oven until I replace it?
For model number JPB79B0B4BB
Fix.com logo
Hello Alyssa, thank you for your question. Yes, you should stop using the oven and replace the Heating element with Bake Element - Push On Terminals FIX249286. Good luck with your repair.

Was this helpful?
Thank you for voting!

Installation Instructions Provided by Fix customers like you.

Average Repair Rating: 4.0 / 5.0, 15 reviews.
  • 1
  • 2
Sort by:
Sorry, we couldn't find any existing installation instruction that matched.
Customer:
Linda from Citrius Springs, FL
Parts Used:
WB44T10011
Difficulty Level:
A Bit Difficult
Total Repair Time:
30 - 60 mins
Tools:
Screw drivers
Bake element started to spark and flames shot up in the oven and the element split (just a little frightening)
first I shut the breaker off for the stove, then removed the oven racks. I removed the two torx head screws from the bracket holding the element in place. I then gently pulled the element out from the wall of the stove. There are two flat plug in connectors that you pull off to disconnect the element (this can be a little difficult becau se they are small connectors.) Remove the old element and plug in the new element and slide it back into the oven wall and replace the screws. (HINT you can do this from the back of the stove much easier) once you remove the back on the stove the two plug in connectors are right at the bottom with orange and yellow connector wires, if you do it this way just unplug the element and slide it out of the oven and then slide the new one in and replace the connectors, replace the two screws in the oven and replace the back of the stove. Turn the breaker back on and its done. The new element works great and arrived nicely package
7 of 7 people found this instruction helpful.
Was this instruction helpful to you?
Thank you for voting!
Customer:
John from Nashville, TN
Parts Used:
WB44T10011
Difficulty Level:
A Bit Difficult
Total Repair Time:
30 - 60 mins
Tools:
Nutdriver
Install New Oven Heating Element
The repair itself is very straightforward - remove two bolts, remove the old element from the two electrical leads, replace with the new element and put it all back together again. The issue comes when you remove the old element from the two electrical leads. There is a remote chance you can pull the old element out far enough to get ahol d of the electrical leads. More than likely (and what happened to me) the leads will fall back into the insulation or into the inner workings of the stove. It's not an "oh crap, time to call a professional" moment. You just need to slide the oven out far enough so you can get to the back panel. You just need to remove the center panel and push the leads through the insulation enough so you can apply them to the new element. A little time consuming but not out of the reach of anybody who can use a wrench.
4 of 4 people found this instruction helpful.
Was this instruction helpful to you?
Thank you for voting!
Customer:
Dale from Eastlake, OH
Parts Used:
WB44T10011
Difficulty Level:
Easy
Total Repair Time:
Less than 15 mins
Tools:
Pliers, Socket set
Electric range heating element
The bottom heating element broke and needed replacing. The site had the part and it arrived in 4 days. The hints they gave were perfect. After taking out the two back screws on the element plate I pulled the broken element out slowly and at an upward tug. The wire attachments at the rear will fly back inside if you don't catch them as yo u detach the element. Once you have the wires secured so they don't retract back inside the rear oven wall, attaching the new element is as simple as two plug ins and sliding the element back in and reattaching the two screws on the element plate,.
4 of 4 people found this instruction helpful.
Was this instruction helpful to you?
Thank you for voting!
Customer:
Tamara from Stafford, VA
Parts Used:
WB44T10011
Difficulty Level:
A Bit Difficult
Total Repair Time:
30 - 60 mins
Tools:
Pliers, Socket set
The Bake Element had Burned into in the middle of the element
I had to remove the bolts at back of stove to get the Baking element loose. The hardest part was pulling off the ends of the Baking element from the electrical plugs in the stove. The electrical plugs retracted back in through the insulation so it was very difficult to pull back out to hook up the new baking element. The range had to b e completely pulled away from the way and we had to remove the back panel to get to the electrical plugs and push them back through the insulation. I had to have a second person hold the electrical plugs and then we were able to attach the new baking element. It works just fine now.
2 of 2 people found this instruction helpful.
Was this instruction helpful to you?
Thank you for voting!
Customer:
Todd from Locust Grove, VA
Parts Used:
WB44T10011
Difficulty Level:
A Bit Difficult
Total Repair Time:
Less than 15 mins
Tools:
Pliers, Socket set
Oven element flamed out
The repair itself is pretty easy. The tough part is keeping the electrical wires from disappearing back into the rear of the oven. First remove two screws using a socket driver. When I pulled out the element, one of the wires came disconnected (they are slip on connections) and slid back into the insulation. I could still see it and p ulled it back out with a pair of needle-nose pliers. I put some twisty-ties on the wires in order to keep them from slipping out of sight. Plug the wire leads onto the new element (the pliers were helpful for this as well), push the element back into place and replace the screws. Done!
1 person found this instruction helpful.
Was this instruction helpful to you?
Thank you for voting!
Customer:
Barbara from Eustis, FL
Parts Used:
WB44T10011, WB30T10099
Difficulty Level:
Really Easy
Total Repair Time:
15 - 30 mins
Tools:
Nutdriver
Burner was burned out, oven element went out
Replacement was super easy, my 10 yr old did most of the work, we read the other posts and were prepared in advance with tools and turning of the breaker. I helped with plugging in the connections, he did the rest!
1 of 2 people found this instruction helpful.
Was this instruction helpful to you?
Thank you for voting!
Customer:
GARY from Frackville, PA
Parts Used:
WB44T10011
Difficulty Level:
Really Easy
Total Repair Time:
Less than 15 mins
Tools:
Socket set
element was damage as broken at a bend
Well first I must inform to all those who want to saved money to do it yourself. Plus I order the parts on the day before and --yes --it was here the next day. If I would have order somewhere else it would have been days these big stores are a huge waste of time. Go here to this -Great Place call. -.wacth the video it show step by step. V ery easy. This company provides correct instructions. Great company to get the best of all your needs.
1 of 2 people found this instruction helpful.
Was this instruction helpful to you?
Thank you for voting!
Customer:
Patricia from Glen Ellyn, IL
Parts Used:
WB44T10011
Difficulty Level:
Really Easy
Total Repair Time:
15 - 30 mins
Tools:
Pliers
A small flame showed up on the baking element during cooking at 325
Our electrician pulled out the element, found a opening on the element that created the fire and replaced it with the new element. He checked everything and made sure the element reached the desired temperature and it was done.
0 of 1 people found this instruction helpful.
Was this instruction helpful to you?
Thank you for voting!
Customer:
Linda from Killeen, TX
Parts Used:
WB44T10011
Difficulty Level:
Really Easy
Total Repair Time:
15 - 30 mins
Tools:
Pliers
Bake Element No Longer Got Hot To Cook Food.
Replaced the bake element
0 of 1 people found this instruction helpful.
Was this instruction helpful to you?
Thank you for voting!
Customer:
James from Midland, NC
Parts Used:
WB44T10011
Difficulty Level:
Really Easy
Total Repair Time:
Less than 15 mins
Tools:
Nutdriver
Oven would warm up but never would get to the set temperature
Pulled out the oven and unplugged it. Removed the 5 screws covering the electrical components. Disconnected the two wires to the heating element. Opened the oven door and removed the two screws holding the heat element to back wall. Removed the old element and installed the new element. Reconnected the wires to the element though the back panel. Reinstalled the metal electrical cover. Plugged range back in and slid back into position.
0 of 1 people found this instruction helpful.
Was this instruction helpful to you?
Thank you for voting!
  • 1
  • 2
Customer Reviews
Average Rating: (4 Reviews)
4.8
★★★★★
★★★★★
Filter By Rating:
  • 5
    3
  • 4
    1
  • 3
    0
  • 2
    0
  • 1
    0
  • 1
Sort by:
Sorry, we couldn't find any existing reviews that matched. Try using some different or simpler keywords.

Model Compatibility

This part works with the following models:
Fix Number: FIX249286
Manufacturer Part Number: WB44T10011
Brand
Model Number
Description
General Electric
15891
Range - Electric Range
General Electric
15891 1
Range
General Electric
158911
Range
Kenmore
91195852991
Range
Kenmore
91195857991
Range
Kenmore
91195859991
Range
General Electric
ECBP70SK1SS
Range - Electric
General Electric
ECBP70SK2SS
Range - Electric
General Electric
ECBP70SK3SS
Range - Electric
General Electric
ECBP70SK4SS
Range - Electric
General Electric
ECBP70WK1WW
Range - Electric
General Electric
ECBP70WK2WW
Range - Electric
General Electric
ECBP70WK3WW
Range - Electric
General Electric
ECBP70WK4WW
Range - Electric
General Electric
ECBP82BJ1BB
Range - Electric
General Electric
ECBP82BJ2BB
Range - Electric
General Electric
ECBP82BJ3BB
Range - Electric
General Electric
ECBP82SJ1SS
Range - Electric
General Electric
ECBP82SJ2SS
Range - Electric
General Electric
ECBP82SJ3SS
Range - Electric
General Electric
ECBP82SK1SS
Range - Electric
General Electric
ECBP82SK2SS
Range - Electric
General Electric
ECBP82WJ1WW
Range - Electric
General Electric
ECBP82WJ2WW
Range - Electric
General Electric
ECBP82WJ3WW
Range - Electric
General Electric
ECBP82WK1WW
Range - Electric
General Electric
ECBP82WK2WW
Range - Electric
General Electric
ECBP85WJ1WW
Range - Electric
General Electric
ECBP85WJ2WW
Range - Electric
General Electric
ECBP85WJ3WW
Range - Electric