Some of the parts we sell are eligible for mail-in rebates since we can recycle them. We will display any applicable rebates in your shopping cart. To redeem your rebate, contact Customer Service after you have received your part.
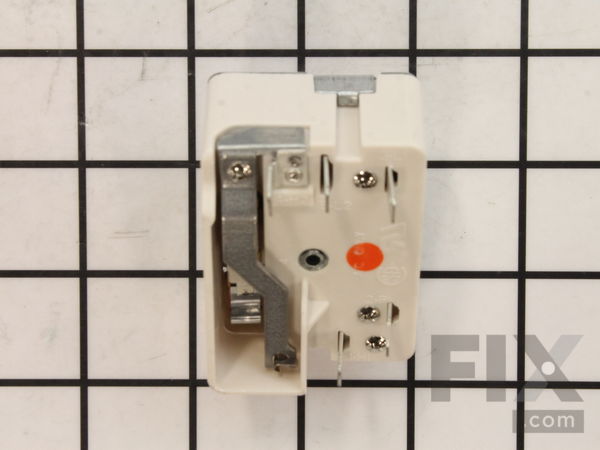
Surface Burner Switch - 8 Inch - 2500W
- Fix Number:
- FIX236750
- Manufacturer #:
- WB24T10025
- Manufactured by:
- GE
- Product Description
- If your burner element is not turning on or heating up, it is possible there is an issue with the switch. The surface burner switch, also known as an infinite heat switch, is what turns your burner elements on and off, along with adjusting the temperature settings. The switch is controlled by the knob on the panel, and this knob sits on the shaft for the switch. Please note that burner knobs are sold separately from the switch. Before beginning this repair, you will need to disconnect the power supply to your range, and move it away from the wall so you can access the back panel. A helpful tip to keep your wires straight, is as you remove one from the old switch, immediately attach it to the same terminal on the new switch. If the connection is snug, a pair of needle nose pliers will help. This OEM replacement switch is designed to work with your 8-inch burner elements.
- Works with the following brands:
- General Electric, Hotpoint, Kenmore
- Works with the following products
- Range
- Fixes the following symptoms
- Element will not heat, Will Not Start, Oven is too hot
- Part# WB24T10025 replaces these:
- AP2024072, 769692, WB24T10025
Product Description
If your burner element is not turning on or heating up, it is possible there is an issue with the switch. The surface burner switch, also known as an infinite heat switch, is what turns your burner elements on and off, along with adjusting the temperature settings. The switch is controlled by the knob on the panel, and this knob sits on the shaft for the switch. Please note that burner knobs are sold separately from the switch. Before beginning this repair, you will need to disconnect the power supply to your range, and move it away from the wall so you can access the back panel. A helpful tip to keep your wires straight, is as you remove one from the old switch, immediately attach it to the same terminal on the new switch. If the connection is snug, a pair of needle nose pliers will help. This OEM replacement switch is designed to work with your 8-inch burner elements.
-
Works with the following brands:General Electric, Hotpoint, Kenmore
-
Works with the following products:Range
-
Fixes the following symptoms:Element will not heat, Will Not Start, Oven is too hot
-
Part# WB24T10025 replaces these:AP2024072, 769692, WB24T10025
Videos For installing this part.
Replacing your Surface Burner Switch - 8 Inch - 2500W

Questions and Answers
We're sorry, but our Q&A experts are temporarily unavailable.
Please check back later if you still haven't found the answer you need.
Installation Instructions Provided by Fix customers like you.
- < Prev
- 1
- 2
- Next >
- Customer:
- Brigid from GLENCOE, MN
- Parts Used:
- WB24T10025
- Difficulty Level:
- Really Easy
- Total Repair Time:
- Less than 15 mins
- Tools:
- Nutdriver, Pliers, Screw drivers
https://www.youtube.com/watch?v=bHprnykxmyQ
- Customer:
- Bryant from CAMDENTON, MO
- Parts Used:
- WB24T10025
- Difficulty Level:
- Really Easy
- Total Repair Time:
- 15 - 30 mins
- Tools:
- Screw drivers
- Customer:
- Robert from Mansfield, TX
- Parts Used:
- WB24X10130, WB17T10006, WB24T10025, WB1X500D
- Difficulty Level:
- Really Easy
- Total Repair Time:
- 30 - 60 mins
- Tools:
- Nutdriver, Pliers
- Customer:
- James from Shelbyville, KY
- Parts Used:
- WB24T10025
- Difficulty Level:
- Really Easy
- Total Repair Time:
- 15 - 30 mins
- Tools:
- Nutdriver, Pliers
- Customer:
- marty from walnut cove, NC
- Parts Used:
- WB31T10011, WB31T10010, WB24T10025
- Difficulty Level:
- Really Easy
- Total Repair Time:
- 15 - 30 mins
- Tools:
- Nutdriver, Screw drivers
- Customer:
- christopher from elk grove village, IL
- Parts Used:
- WB24T10025
- Difficulty Level:
- Really Easy
- Total Repair Time:
- Less than 15 mins
- Tools:
- Socket set
- Customer:
- Murle from Greeneville, TN
- Parts Used:
- WB24T10025
- Difficulty Level:
- Very Easy
- Total Repair Time:
- Less than 15 mins
- Tools:
- Nutdriver, Screw drivers
- Customer:
- Joseph from Beverly Hills, FL
- Parts Used:
- WB24T10029, WB24T10025
- Difficulty Level:
- Really Easy
- Total Repair Time:
- 15 - 30 mins
- Tools:
- Nutdriver, Pliers, Screw drivers
- Customer:
- Terrence from ozark, MO
- Parts Used:
- WB24T10025
- Difficulty Level:
- Really Easy
- Total Repair Time:
- 15 - 30 mins
- Tools:
- Pliers, Screw drivers, Socket set
- Customer:
- Miranda from Liberty, MO
- Parts Used:
- WB24T10025
- Difficulty Level:
- Really Easy
- Total Repair Time:
- Less than 15 mins
- Tools:
- Nutdriver, Pliers
- < Prev
- 1
- 2
- Next >
- < Prev
- 1
- Next >
Model Compatibility
Manufacturer Part Number: WB24T10025


