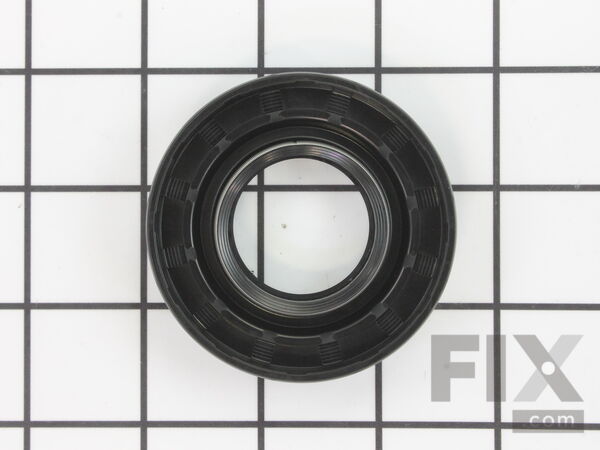
Part Location Diagram of WH02X10383 GE Tub Seal
See part 311 in the diagram
Replacing your General Electric Washer Tub Seal
( Grid squares measure 1x1 inch )

Tub Seal

Works With Model 56221T6WW!

Rated by 7 customers 

?

A Bit Difficult 

1- 2 hours 

Ratings submitted by customers like you who bought this part.

?
$16.73
In Stock
Fix Number:
FIX4704237
Manufacturer #:
WH02X10383
Manufactured by:
GE
Works With Model 56221T6WW!

Product Description

If your washer is leaking when it is filling or agitating, you may need to replace the tub seal. The tub seal is found between the transmission and the outer tub in your washing machine. This genuine OEM part serves as the main water seal between the outer tub and the transmission shaft. Another sign that the tub seal has failed is if grease marks are being left on your laundry or if the machine is noisy while operating. This repair is on the more difficult side, as you need to disassemble most of your washer in order to replace the tub seal. If you are not comfortable with this, you may want to call a qualified professional to install this part for you. Be sure to disconnect the power and water supply to your washer before beginning this repair.

Videos For installing this part.

Replacing your Tub Seal

Replacing your Tub Seal

Questions and Answers

We're sorry, but our Q&A experts are temporarily unavailable.
Please check back later if you still haven't found the answer you need.

Installation Instructions Provided by Fix customers like you.

Average Repair Rating: 2.3 / 5.0, 7 reviews.
  • 1
Sort by:
Sorry, we couldn't find any existing installation instruction that matched.
Customer:
Joe from Chillicothe, MO
Parts Used:
WH02X10383, WH02X10265, WH01X10302, WH2X1199, WH2X1198, WH2X1197
Difficulty Level:
A Bit Difficult
Total Repair Time:
1- 2 hours
Tools:
Nutdriver, Pliers, Screw drivers, Socket set, Wrench (Adjustable), Wrench set
Leaking & very Noisy
Watched the Video took parts off one by one got as far as the nut there there had a problem with it had to soak it in W D 40 then was able to get it off needed to buy a new Nut split ring broke when i took it off but i have ordered the parts a head of time all of the main parts were rusted bearings ,hub washer,so it was a good thing i go t all of the main parts the belt was starting to show wear. got a new one but as for the loud noise I found that the Transmission bearing went bad so ill have to get a new one. The job was not all that hard the nut was the main problem the seal was a bit hard to get off so i the whole tub out of the Machine had it upside down and put a screw driver thru hole and pop it out that way the tub bearing was the same way flip tub over a pop it out from the front when seal was out found it works better that way then the way it shows in the Video put a little liquid of soap around edge of seal it goes on much better Hope all this helps you out
7 of 7 people found this instruction helpful.
Was this instruction helpful to you?
Thank you for voting!
Customer:
Ryan from Stuarts Draft, VA
Parts Used:
WH02X10383, WH02X10265, WH2X1199, WH2X1197
Difficulty Level:
A Bit Difficult
Total Repair Time:
More than 2 hours
Tools:
Nutdriver, Socket set, Wrench set
when we would let the clothes soak, it would leak from the bottom seal.
I used youtube to figure out what i needed. After trying to get the large backwards threaded nut off with my rachet, i ended up taking it to my buddys house and using his impact gun. It was a breeze after i was able to get the nut off. While it was all apart, i cleaned all the old detergant off that was built up under the agrator.
5 of 5 people found this instruction helpful.
Was this instruction helpful to you?
Thank you for voting!
Customer:
Dean from Parker, CO
Parts Used:
WH02X10383, WH02X10265, WH49X10042, WH2X1197, WH1X2727
Difficulty Level:
A Bit Difficult
Total Repair Time:
30 - 60 mins
Tools:
Pliers, Screw drivers, Socket set, Wrench (Adjustable)
Washer leaking and noisy
Follow the videos. They explain how to do this repair extremely well. Don't forget that the nut that holds the basket is a left-hand thread. I used a pipe wrench and a hammer to break it loose. I used a screwdriver to stab the old seal and pry it out without damaging the tub. It came out pretty easily. I used hand soap to lubricate the new seal and fit it in after cleaning out the tub's seal seat. It's a relatively easy job and now it doesn't leak and the noise is greatly reduced. I also lubricated the bearings with Lithium grease but that required taking the entire machine apart which is also explained in another video......
5 of 6 people found this instruction helpful.
Was this instruction helpful to you?
Thank you for voting!
Customer:
Stephen from Bridgewater, NJ
Parts Used:
WH02X10383, WH38X10017, WH02X10265, WE03X29897, WH01X10302, WH2X1199, WH2X1198, WH2X1197, WE25M40
Difficulty Level:
Really Easy
Total Repair Time:
30 - 60 mins
noisy
New shaft, belt and housing. Installation was going fine until went to install belt and IT was way to short .THANKS
5 of 7 people found this instruction helpful.
Was this instruction helpful to you?
Thank you for voting!
Customer:
Carol from Pitman, PA
Parts Used:
WH45X20473, WH02X10383, WH02X10284, WH02X10265, WH2X1198, WH2X1193
Difficulty Level:
A Bit Difficult
Total Repair Time:
More than 2 hours
Tools:
Nutdriver, Pliers, Socket set
Washer tub seal leak and mode shifter noisy
Disconnect power and water supply hoses, remove back cover and control panel, remove lid switch, then lid. Unsnapped top ring on tub assembly, disconnect pressure tube, disconnect motor control wires, twist and remove center fabric softener cup, removed hex bolt underneath, then removed agitator and drive hub. Used 1 11/16" 3/4 drive sock et with extensions and breaker bar. Used sledge hammer on bar to knock loose left-hand thread aluminum tub nut(quite difficult on a 6 year old washer). Lift stainless tub out and removed split ring and old seal. Tip out plastic tub assembly and turn upside down to remove drive belt, and pulley. Removed all hardware connecting drive assembly to plastic tub and installed new parts. TIP: install tub seal after mode shifter is installed and do not use any gasket sealer or lube as seal will want to push back out. Old tub assembly was replaced due to elongated and cracked tub seal seat.
2 of 3 people found this instruction helpful.
Was this instruction helpful to you?
Thank you for voting!
Customer:
Joe from Hollywood, SC
Parts Used:
WH02X10383
Difficulty Level:
Difficult
Total Repair Time:
More than 2 hours
Tools:
Nutdriver, Pliers, Screw drivers, Socket set, Wrench (Adjustable), Wrench set
Extreme loud noise in spin cycles
First, be aware that the videos provided for instructions are done with a new, or unused appliance, no gook, liint, or frozen connections to contend with. One of the tools recommended for use was a "spanner wrench". If you Google spanner wrench, you find that what the demonstrator calls a spanner wrench, is not a spanner wrench. After further research I located a TJOTB123A which closely resembled the demonstrated tool and did the difficult job of removing the HUB NUT. Ended up a week later, after ordering more parts, replacing all the parts recommended and many others. Slightly reduced the loud spin cycle vibrating roar, but satisfied that worn and many used parts are now new, and machine is doing it's job fine.
1 person found this instruction helpful.
Was this instruction helpful to you?
Thank you for voting!
Customer:
rodney r from Platteville, WI
Parts Used:
WH02X10383
Difficulty Level:
Easy
Total Repair Time:
1- 2 hours
Tools:
Nutdriver, Screw drivers, Socket set
water leaking from center of drum
first I shut off water and unplugged the washer. 2nd I removed the cover from the front of the machine. Then I removed six 1/4 screws with a nut driver from the back control panel, And two more from the front of the machine to remove the lid. I left all wires connected and swung to the side out of the way. Next I removed the agitator with a good tug. then I used a 7/16 socket on a 3/8 drive ratchet wrench to remove the bolt from the center. Then I could slip off the cover easily to exposé the 1 11/16 nut.I used a special wrench I had made to removed the nut ( it was a little snug).Then I removed the drum from the machine. I could see the spacer and washer and seal. Then I tapped a wedge in the slot of the split nut,(it came off easy).I pulled the washer off and the seal was right under it. I pried the seal out, then reinstalled the new one with some dish washing soap on it. then I reinstalled the rest in reverse order. It took about two hours.
1 of 2 people found this instruction helpful.
Was this instruction helpful to you?
Thank you for voting!
  • 1

Model Compatibility

This part works with the following models:
Fix Number: FIX4704237
Manufacturer Part Number: WH02X10383
Brand
Model Number
Description
General Electric
51451Y1WW
Washer
General Electric
51451Y2WW
Washer
General Electric
52120TAWB
Washer
General Electric
56021A0WW
Washer
General Electric
56031A0WW
Washer
General Electric
56041A0WW
Washer
General Electric
56051A0WW
Washer
General Electric
56121T2WW
Washer
General Electric
56121T3WW
Washer
General Electric
56121T4WW
Washer
General Electric
56121T5WW
Washer
General Electric
56121T8WW
Washer
General Electric
56121TAWW
Washer
General Electric
56121TBWW
Washer
General Electric
56200T2WB
Washer
General Electric
56200T3WB
Washer
General Electric
56200T5WB
Washer
General Electric
56220T6WW
Washer
General Electric
56220T8WW
Washer
General Electric
56220TAWW
Washer
General Electric
56220TBWW
Washer
General Electric
56221B0WW
Washer
General Electric
56221B1WW
Washer
General Electric
56221B2WW
Washer
General Electric
56221B3WW
Washer
General Electric
56221T6WW
Washer
General Electric
56231B0WW
Washer
General Electric
56231B1WW
Washer
General Electric
56231B2WW
Washer
General Electric
56231B3WW
Washer