Part Location Diagram of 131553900 Frigidaire Heating Element Assembly
See part 15 in the diagram
Replacing your Frigidaire Dryer Heating Element Assembly
( Grid squares measure 1x1 inch )

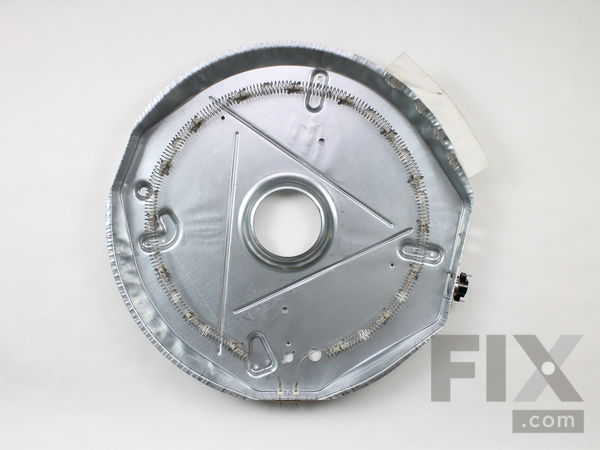
Heating Element Assembly

Works With Model AEQ7000ES0!

Rated by 8 customers 

?

Really Easy 

1- 2 hours 

Ratings submitted by customers like you who bought this part.

?
$170.04
In Stock
Fix Number:
FIX418120
Manufacturer #:
131553900
Manufactured by:
Frigidaire
Works With Model AEQ7000ES0!

Product Description

If your dryer has little to no heat, there may be an issue with your heating element assembly. The heater element is a genuine OEM part that is found at the back of the dryer. The heating element comes with a felt strip and insulators already attached. This part is used to provide heat in order to dry your laundry. It does this when the coil of nickel and chrome alloy wires resist the controlled electric current, and as a result the wires get hot. If you need to replace the heating element, please be sure to disconnect the power supply to your dryer before beginning this repair.

Videos For installing this part.

Replacing your Heating Element Assembly

Replacing your Heating Element Assembly

Questions and Answers

We're sorry, but our Q&A experts are temporarily unavailable.
Please check back later if you still haven't found the answer you need.

1 question answered by our experts.
  • 1
Sort by:
Sorry, we couldn't find any existing answers that matched.
Try using some different or simpler keywords, or submit your new question by using the "Ask a Question" button above!
Greg
April 26, 2022
Low heat in dryer? Is the heating element the likely problem or could a thermal switch create the same problem? The existing thermal switch on the heating element is closed because I checked continuity with my volt/ohm meter. The heating element also checks out ok with continuity check. Thanks. Greg
For model number 41780042990
Fix.com logo
Hi Greg, Thank you for your question. If your dryer has low heat and you have already checked the heating element and the thermal switch, there are some other parts that you will need to check to see which one is causing the issue. You will need to check the high limit thermostat, the cycling thermostat and the timer. We have included a link that you may reference on how to check these parts. Once you have determined the part you need, please feel free to call customer service. We are open 7 days a week and anyone will be happy to assist you. We look forward to hearing from you!

Was this helpful?
Thank you for voting!
Related Parts:
Additional Links:

Installation Instructions Provided by Fix customers like you.

Average Repair Rating: 3.5 / 5.0, 8 reviews.
  • 1
Sort by:
Sorry, we couldn't find any existing installation instruction that matched.
Customer:
Jimmy from Mullins, SC
Parts Used:
134120900, 131553900
Difficulty Level:
Easy
Total Repair Time:
30 - 60 mins
Tools:
Screw drivers
No heat
Watched the provided video and followed the written diagrams for my model dryer.
3 of 3 people found this instruction helpful.
Was this instruction helpful to you?
Thank you for voting!
Customer:
James from Palm Coast, FL
Parts Used:
134587700, 3204267, 134120900, 131553900
Difficulty Level:
Really Easy
Total Repair Time:
15 - 30 mins
Tools:
Pliers, Screw drivers
No Heat and error on front panel after about 2 minutes after running
removed 2 rear screws, removed top panel. Removed 2 top screws and 2 internal screws, disconnected electrical connections and removed front panel. removed drum guide. Disconnected drive belt, removed drum. removed 4 screws from rear, removed the heating element assembly. Cleaned the entire bottom section of the dryer. Installed new h eating element assembly, installed thermal limiter and control thermistor, reassembled the dryer. Dryer has been working great!
2 of 3 people found this instruction helpful.
Was this instruction helpful to you?
Thank you for voting!
Customer:
Mimi from Peoria, AZ
Parts Used:
131553900
Difficulty Level:
Very Easy
Total Repair Time:
15 - 30 mins
Tools:
Screw drivers
Our dryer stopped heating
We started with the obvious, the heating element assembly. No problem at replacing it. But it still didn't work! So we then noticed that one of the prongs on the plug was burnt! So we replaced it and also the receptacle! That still didn't do it! So we went a little further and replaced the circuit breaker in the house box, and by golly, t hat did it! We appreciate the fact that we could go to you and start the process!! Our dryer is, of course like new!! So don't give up people!! Two heads are better than one! THX
1 person found this instruction helpful.
Was this instruction helpful to you?
Thank you for voting!
Customer:
Frank from Miami, FL
Parts Used:
131553900
Difficulty Level:
Very Easy
Total Repair Time:
15 - 30 mins
Tools:
Screw drivers
NO HEATING
WATCHED THE VIDEO PRIOR TO BEGINNING THE REPAIR. REMOVED ALL NECESSARY PARTS TO ACCESS THE HEATING ELEMENT ASSEMBLY, 15 MIN. REMOVED THE HEATING ELEMENT ASSEMBLY 1 MIN. VACUUMED LINT FROM ALL AREAS OF THE ENTIRE DRYER MACHINE INCLUDING THE LOWER LINT FILTER COMPARTMENT, 1 HOUR. INSTALLED THE NEW HEATING ELEMENT ASSEMBLY 1 MIN. REASSEMBLED ALL OTHER PARTS INCLUDING DRYER TOP, BACK, DRUM WITH BELT, 4" VENT TUBE, RECONNECTED WIRE PLUG-INS, IN LESS THAN 15 MINUTES. UPON STARTING THE FIRST NEW LOAD OF WET CLOTHES IN THE DRYER IT ONLY TOOK 20 SECONDS TO REALIZE THAT THE VENT IN THE WALL WAS CLOGGED EXTREMELY BAD. AT THAT POINT WE TURNED THE DRYER OFF AND DISCONNECTED THE VENT FROM THE DRYER TO THE WALL. WE CALLED MIAMI VENT PROS AND THEY PROFESSIONALLY REMOVED LINT FROM 27 FT OF A VERTICAL 4" VENT PIPE WITH 3 ELBOWS IN AROUND 2 HOURS. THE DRYER IS NOW WORKING LIKE BRAND NEW. VENT PROS RECOMMENDED AT LEAST A VENT CLEANING EVERY TWO YEARS.
1 of 2 people found this instruction helpful.
Was this instruction helpful to you?
Thank you for voting!
Customer:
Ryan from Whitefish, MT
Parts Used:
131553900
Difficulty Level:
Very Easy
Total Repair Time:
1- 2 hours
Tools:
Pliers, Screw drivers
Lack of heat
I followed the directions in the install video. Fail proof, I felt like I had a pro there with me. Took less time than the video said. Smooth operation no complaints.
0 of 1 people found this instruction helpful.
Was this instruction helpful to you?
Thank you for voting!
Customer:
Ronald from Boynton Beach, FL
Parts Used:
134587700, 131553900
Difficulty Level:
A Bit Difficult
Total Repair Time:
More than 2 hours
Tools:
Nutdriver, Pliers, Screw drivers, Socket set
Dryer would not heat
I used the online videos supplied by this site , which were extremely helpful for me in completing this repair. The hardest part of the whole repair was aligning the drum to the door opening. I removed the door from the front panel inorder to more easily hold and align the drum, which was one of the best thing I can pass onto others. I ha d to innovate in removing the door because of the minimal clearance involved. I used a small locking wrench with a screw nutdrive to remove and reinsert the two screws that hold the door in place.
0 of 1 people found this instruction helpful.
Was this instruction helpful to you?
Thank you for voting!
Customer:
Steven from Citrus Heights, CA
Parts Used:
131553900
Difficulty Level:
Really Easy
Total Repair Time:
1- 2 hours
Tools:
Screw drivers
Dryer was making a high pitch squeal (replaced drum bearing,belt and heating element)
On the back of the dryer there is an inspection cover, remove it and you can get to the belt. release tension and remove the belt (Very easy to do, no tools required). Two screws hold the top in place, remove, slide top back and set to side. There are two screws and four clips holding the front on remove the screws and pop the clips loos e, unplug wiring harness and remove front. Remove plastic guide that is in front of the drum, pop drum up and out of bracket holding the back, slide drum out the front. Now you have access to the heating element and the rear drum bearing. unplug the wires to the heating element (there are two small retention tabs on the clips that need to be straightened so you can remove the wires) once you do that the rest is easy, just remove the screws and remove & replace unit. Reassemble in the reverse order. There is a good video online that you can follow prior to starting this project.
0 of 1 people found this instruction helpful.
Was this instruction helpful to you?
Thank you for voting!
Customer:
claudia from mashpee, MA
Parts Used:
131553900
Difficulty Level:
Easy
Total Repair Time:
15 - 30 mins
Tools:
Screw drivers
Heating element went snap crackle and pop after bearing lube job
Watched several videos about taking the dryer apart and replacing the element and then decided to order the part from this site. Within a few days the part arrived. By then I was practiced at taking the dryer apart, so the actual repair was simple -- easier than lubricating the bearing.
0 of 1 people found this instruction helpful.
Was this instruction helpful to you?
Thank you for voting!
  • 1

Model Compatibility

This part works with the following models:
Fix Number: FIX418120
Manufacturer Part Number: 131553900
Brand
Model Number
Description
Frigidaire
41749012890
Dryer - Residential, Electric
Frigidaire
41749022890
Dryer - Residential, Electric
Kenmore
41764182300
Dryer
Kenmore
41769042990
Dryer
Kenmore
41769042991
Dryer
Kenmore
41769052990
Dryer
Kenmore
41769052991
Dryer
Kenmore
41780032990
Dryer
Kenmore
41780042990
Dryer
Kenmore
41780042991
Dryer
Kenmore
4178005291
Dryer - Kenmore Dryer Model 417.8005291 (4178005291, 417 8005291) Parts
Kenmore
41780052990
Dryer
Kenmore
41780052991
Dryer
Kenmore
41780142000
Dryer
Kenmore
41780412700
Dryer
Kenmore
41781042000
Dryer
Kenmore
41781042001
Dryer
Kenmore
41781052000
Dryer
Kenmore
41781052001
Dryer
Kenmore
41781142000
Dryer
Kenmore
41781142001
Dryer
Kenmore
41782042100
Dryer
Kenmore
41782042101
Dryer
Kenmore
41782042102
Dryer
Kenmore
41782052100
Dryer
Kenmore
41782052101
Dryer
Kenmore
41782052102
Dryer
Kenmore
41782052103
Dryer
Kenmore
41782142100
Dryer
Kenmore
41782142101
Dryer