Part Location Diagram of 279311 Whirlpool Igniter Kit
See part 4 in the diagram
Replacing your Whirlpool Dryer Igniter Kit
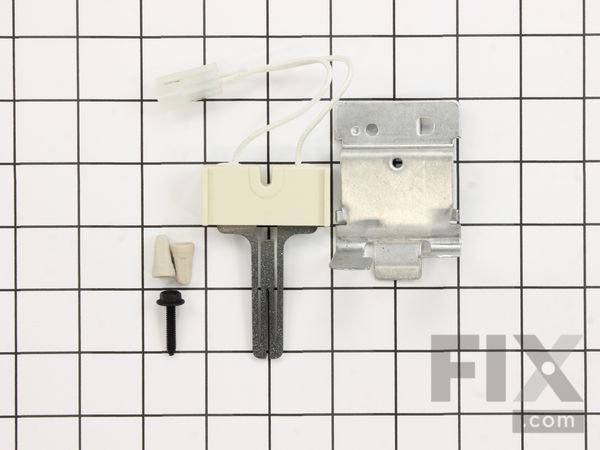
( Grid squares measure 1x1 inch )

Igniter Kit

Works With Model 11075232610!
★★★★★
★★★★★
1 Review

Rated by 26 customers 

?

Easy 

1- 2 hours 

Ratings submitted by customers like you who bought this part.

?
$40.54
In Stock
Fix Number:
FIX334180
Manufacturer #:
279311
Manufactured by:
Whirlpool
Works With Model 11075232610!

Product Description

This is a genuine OEM replacement igniter kit for your gas-heated clothes dryer. The silicon carbide igniter is used to light the gas that creates the heat in order to dry your clothes. If your dryer is not heating, takes a long time to dry clothes, or has low heat you may want to consider replacing your igniter. This kit can be used to replace both round and flat igniters, and comes with a 3-inch flat igniter, bracket, 4-inch wire lead, and the plug. Before beginning this repair, please ensure that the power and gas is disconnected from the range. As the igniter is located within the burner assembly, you will need a variety of tools to complete the installation. These tools include a putty knife, a small flat blade screwdriver, a 5/16 nut driver, and a 5/16 socket with a ratchet. This part should be handled with care, as the igniter is very fragile.

Videos For installing this part.

Replacing your Igniter Kit

Replacing your Igniter Kit

Questions and Answers

We're sorry, but our Q&A experts are temporarily unavailable.
Please check back later if you still haven't found the answer you need.

Installation Instructions Provided by Fix customers like you.

Average Repair Rating: 3.2 / 5.0, 26 reviews.
  • 1
  • 2
  • 3
Sort by:
Sorry, we couldn't find any existing installation instruction that matched.
Customer:
Joe from Red Bank, NJ
Parts Used:
279834, 279311
Difficulty Level:
Difficult
Total Repair Time:
More than 2 hours
Tools:
Wrench set
The coil kit was malfunctioning. Difficult to fully diagnosis as the problem.
The coil kit showed the correct numbers and it worked intermittently. However, when replaced everything worked OK. I also replaced the igniter, however, I do not believed it was a problem. However, I left in the new igniter.
4 of 5 people found this instruction helpful.
Was this instruction helpful to you?
Thank you for voting!
Customer:
Anthony from Bronx, NY
Parts Used:
279834, 279311
Difficulty Level:
Really Easy
Total Repair Time:
15 - 30 mins
Tools:
Nutdriver, Screw drivers, Wrench (Adjustable)
Burner would not ignite
The repair was quite easy thanks to the right parts. Seriously, I'm not a pro and I appreciated how this site had a scorecard on what the potential problem with my dryer was. I simply bought the parts and replaced them. A good nutdriver set came in handy since the entire back of the machine needed to come off to access the burner. Thanks for saving me $500 for a new machine when $40 worth of parts did the trick!
3 of 4 people found this instruction helpful.
Was this instruction helpful to you?
Thank you for voting!
Customer:
Rick from Temecula, CA
Parts Used:
WP338906, 279834, 279311
Difficulty Level:
Easy
Total Repair Time:
1- 2 hours
Tools:
Nutdriver, Pliers, Screw drivers, Socket set, Wrench (Adjustable)
Dryer was not heating.
Did a search for our make & model and came upon your site. Found rather quickly our Whirlpool model. In order to avoid a $75 Service visit + eventual parts to try my hand at it. Read similar posts of not heating but wasn't sure where problem existed so watching the very helpful videos and using the % of what would fix it decided to or der the (3) parts. After ordering though I continued to research and saw where the problem probably started by removing the back panel, where lint had accumulated around the thermal fuse so I ordered that too. Once I received all the parts began to re-assemble. The only difficulty was the space for my hands to get those small screws back right away on the Igniter kit but with a little patience made it happen. It indicated you could remove the drum for more access room but thought I may be going a little to far with removing that too with the serpentine belt. Since I put all "new parts" in for under what it would cost for just the service call I felt I came out ahead and basically have a new dryer! Only suggestion is if you do the job yourself expect your wife to say, "If you know so much about this appliance try using it once in awhile"!! I gave it a go and it's kinda fun especially knowing you got it to work again. Thanks, Rick
3 of 8 people found this instruction helpful.
Was this instruction helpful to you?
Thank you for voting!
Customer:
William from Lancaster, CA
Parts Used:
WP3392519, WP3387134, 341241, 279834, 279311
Difficulty Level:
A Bit Difficult
Total Repair Time:
More than 2 hours
Tools:
Nutdriver, Pliers, Screw drivers, Socket set
timer would not advance. would run only in timed dry cycle. but even then would not heat air. timer would advance in the timed dry cycle.
I ran a complete electrical system check of every component accessible from the rear or top of the dryer. (this dryer has no front access panel). Every component checked ok. I dreaded the thought of having to remove the drum. I went on your web site and watched your tech remove a drum. Nothing to it !. I had the drum out in 5 minutes. I read one of the customer reports about an "open' coil on the gas valve. I checked the coils. The three wire coil had an open circuit. I ordered new coils from PartSelect. as long as it was apart I replaced the Igniter and the drive belt even though both were still working. The dryer works just like it did 25 years ago.
2 of 3 people found this instruction helpful.
Was this instruction helpful to you?
Thank you for voting!
Customer:
John from Portland, OR
Parts Used:
WP3392519, 279834, 279311
Difficulty Level:
Really Easy
Total Repair Time:
30 - 60 mins
Tools:
Nutdriver, Screw drivers
No problems it went well, very easy.
Searched for problem on internet and found your diagnostic tools and repair videos. I ordered parts... when they arrived I took the machine apart per the video instructions, and replaced the old parts. The dryer works. Ta Da :) Thanks
2 of 3 people found this instruction helpful.
Was this instruction helpful to you?
Thank you for voting!
Customer:
Charles M from WESTVILLE, IN
Parts Used:
WP3392519, 279834, 279311
Difficulty Level:
Very Easy
Total Repair Time:
15 - 30 mins
Tools:
Nutdriver, Screw drivers, Socket set
Dryer wouldn’t heat up
Unplug the dryer. Remove the lent carver screws, remove catcher. Pop up washer top on front side and fold the top backwards. Remove top 2 nuts that hold front sheet metal of dryer, then pop loose the bottom just as you did the top side. Set aside front cover. Go under the drum and push the belt tensioner forward to release the drum belt a nd remove tensioner from its slots. Slower pick up drum by belt and move forward out of the back panel and set aside. The coil packs and the igniter are now in plain sight and pretty self explanatory to remove and replace. Just a few screws and plugs for coils, and one screw and plug for igniter. Be very gentle with igniter cause it’s a very brittle and easy cracked component!!! The thermal fuse is onthe backside of the dryer. Remove the screws and take the panel off. Locate the thermal fuse. Remove the one plug and one screw and replace with the new unit. reassemble is reverse of disassembly on back and front.
2 of 4 people found this instruction helpful.
Was this instruction helpful to you?
Thank you for voting!
Customer:
Dan from Lyons, IL
Parts Used:
279311
Difficulty Level:
A Bit Difficult
Total Repair Time:
1- 2 hours
Tools:
Screw drivers, Socket set
No heat
Unplugged,disconnected the vent hose. There was no need to take off the back. Removing the screws at the vent/screen and the two in back enabling the top to be opened. Loosening all the screws to get the front panel off. I was able to replace the part in a few minutes, then put the dryer back together. No luck dryer still would not heat.T he recommendations from this site have worked once in the past. One can follow the recommendation however there is know way to determine what the problem actually is. It looks like this time it didn't work out and we need to look for a new machine..
1 person found this instruction helpful.
Was this instruction helpful to you?
Thank you for voting!
Customer:
Javier from West Covina, CA
Parts Used:
279311
Difficulty Level:
Easy
Total Repair Time:
15 - 30 mins
Tools:
Screw drivers, Wrench (Adjustable)
It does not heat
Just follow the instruction on youtube video discover with the Multimeter what the Igniter doesn't work, I make the order with you(very easy to order because you have the part) wait 4 days my part arrived and I fix it. and my Dryer is working again Gracias.
1 person found this instruction helpful.
Was this instruction helpful to you?
Thank you for voting!
Customer:
Randall from Carlsbad, CA
Parts Used:
WP8577274, WP338906, WP3387223, 279311
Difficulty Level:
Easy
Total Repair Time:
30 - 60 mins
Tools:
Nutdriver, Screw drivers
Would not dry clothes completely in any setting.
As this site recommends the parts that would be needed to fix the problem, it recommends the most likely to the least likely. Of course I bought the least likely and proceeded to buy all parts up the the most likely. All though I only spent about $100.00 total, it was the most likely that fixed the problem. The fixes were fairly easy to do and were all made from the front side of the unit. Not much space to work in but made all the fixes with out issues. Unit seems to be running well. Glad I did it myself, would do it again!
1 person found this instruction helpful.
Was this instruction helpful to you?
Thank you for voting!
Customer:
John from Wauconda, IL
Parts Used:
279834, 279311
Difficulty Level:
Easy
Total Repair Time:
30 - 60 mins
Tools:
Nutdriver, Screw drivers, Socket set
Dryer heat was intermittent - Hint - pry small plastic square off (lower front) to see flame action.
Removed lint trap from top. Removed two screws by liny trap hole. Pried front edge up with putty knife. Lifted top enough to get to inside front. Disconnect the door switch. Using nut driver, removed two hex head screws that held front on from the inside. Lifted front up and away, Watch out for the drum. Removed two screws from gas valve. Unclipped both coil connections. Changed coils and attached clips. Used socket set to remove hex bolt that holds igniter. Unclipped old one, Reattached igniter. I did not have to replace igniter but chose to since I was opening dryer. Changed the thermal fuse 9 months ago. This is located in the back of the dryer..
1 of 3 people found this instruction helpful.
Was this instruction helpful to you?
Thank you for voting!
  • 1
  • 2
  • 3
Customer Reviews
Average Rating: (1 Review)
5.0
★★★★★
★★★★★
Filter By Rating:
  • 5
    1
  • 4
    0
  • 3
    0
  • 2
    0
  • 1
    0
  • 1
Sort by:
Sorry, we couldn't find any existing reviews that matched. Try using some different or simpler keywords.

Model Compatibility

This part works with the following models:
Fix Number: FIX334180
Manufacturer Part Number: 279311
Brand
Model Number
Description
Kenmore
10687884100
Dryer
Kenmore
10687884300
Dryer
Kenmore
10687884600
Dryer
Kenmore
110279119
Dryer
Kenmore
110279121
Dryer
Kenmore
1103387617
Dryer
Kenmore
1103397617
Dryer
Kenmore
1103398423
Dryer
Kenmore
1103401771
Dryer - Kenmore Dryer Model 110.3401771 (1103401771, 110 3401771) Parts
Kenmore
1103401772
Dryer
Kenmore
1103401795
Dryer
Kenmore
1103401796
Dryer
Kenmore
1103401797
Dryer
Kenmore
1103401798
Dryer
Kenmore
1103401799
Dryer
Kenmore
1103402243
Dryer
Kenmore
1103402844
Dryer
Kenmore
1103402851
Dryer
Kenmore
1103402855
Dryer
Kenmore
1103402856
Dryer
Kenmore
110341566
Dryer
Kenmore
110343114
Dryer
Kenmore
110344612
Dryer
Kenmore
110344613
Dryer
Kenmore
110349621
Dryer
Kenmore
110349797
Dryer
Kenmore
110349798
Dryer
Kenmore
110349799
Dryer
Kenmore
110349832
Dryer
Kenmore
110349833
Dryer