Part Location Diagram of W10196406RW Whirlpool Drip Bowl - 6 Inch
See part 2 in the diagram
Replacing your Whirlpool Range Drip Bowl - 6 Inch
( Grid squares measure 1x1 inch )

Drip Bowl - 6 Inch

Works With Model 4RF302BXKQ0!
★★★★★
★★★★★
2 Reviews

Rated by 14 customers 

?

Really Easy 

Less than 15 mins 

Ratings submitted by customers like you who bought this part.

?
$10.10
In Stock
Fix Number:
FIX2366565
Manufacturer #:
W10196406RW
Manufactured by:
Whirlpool
Works With Model 4RF302BXKQ0!

Product Description

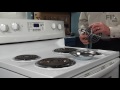
The drip bowl is used for electric ranges or cooktops with the coiled style burners, to catch any drips, spills, or crumbs that may occur while cooking. If your bowls have become discolored, corroded, difficult to clean, or otherwise damaged it may be time to replace them. This repair is easy and does not require any tools to complete the job. Ensure that all burners are turned off and cool to the touch before starting. First you need to lift up and disconnect the burner from the socket. While you have the burner out, it is a good time to check it for any signs of damage. Look at the terminals for any signs of arcing or burning. If you notice this, you will want to replace both the element and the receptacle it plugs into. Remove the old drip bowl by pulling it out. Then insert the new one by lining up the small hole on the side with the element block. Ensure that it is siting flat and then plug the element back into the socket. Please note that the manufacturer has substituted this part, and it no longer has a solid bottom. It is not recommended to cover the hole with products like aluminum foil, as it can trap heat or melt, becoming a fire hazard. As it is an OEM part, it ensures it will fit your model. The drip bowls are sold individually, chrome in color and about 8 inches in diameter, made to fit under a 6 inch burner element.

Videos For installing this part.

Replacing your Drip Bowl - 6 Inch

Replacing your Drip Bowl - 6 Inch

Questions and Answers

We're sorry, but our Q&A experts are temporarily unavailable.
Please check back later if you still haven't found the answer you need.

Installation Instructions Provided by Fix customers like you.

Average Repair Rating: 5.0 / 5.0, 14 reviews.
  • 1
  • 2
Sort by:
Sorry, we couldn't find any existing installation instruction that matched.
Customer:
chris from ABERDEEN, SD
Parts Used:
WP3149400, W10196406RW, W10196405RW
Difficulty Level:
Easy
Total Repair Time:
15 - 30 mins
Tools:
Screw drivers
Burner would not heat up and the cook top on light would not turn off.
First turn off breaker. Pull out stove and unplug. There was about 8 screws on the panel on the back side of the control panel. Remove panel. Remove knob on the bad control and there is 2 screws behind knob. Remove those 2 screws and take the new control and remove 1 wire at a time from old switch to new one then put back together.
6 of 6 people found this instruction helpful.
Was this instruction helpful to you?
Thank you for voting!
Customer:
Henry from St Louis, MO
Parts Used:
W10196406RW, WPW10196405, WPW10196406
Difficulty Level:
Very Easy
Total Repair Time:
Less than 15 mins
Replace old drip Bowls
Remove heating elements, remove old drip bowl, install new drip bowls replace heating elements.
2 of 2 people found this instruction helpful.
Was this instruction helpful to you?
Thank you for voting!
Customer:
Janet from Winsted, MN
Parts Used:
WPW10196405, WP9761346, W10196406RW
Difficulty Level:
Very Easy
Total Repair Time:
15 - 30 mins
Surface elements were uneven and drip bowls were damaged.
I was the person that ordered parts - not the person that installed parts. All parts were easily installed except for the 6" surface element. The problem appears to be more internal and not with this part, so we will have to return the 6" surface element. Installing this 6" element still left the burner uneven.
2 of 3 people found this instruction helpful.
Was this instruction helpful to you?
Thank you for voting!
Customer:
Robert from Boston, MA
Parts Used:
W10196406RW, W10196405RW, WP660533
Difficulty Level:
Very Easy
Total Repair Time:
Less than 15 mins
Range surface burner not working properly
Pulled out the old burner and slipped in the new one. Also replaced burner drip bowls. Pulled out the burners, took out old bowls, replaced with new bowls, slipped back burners. All fit perfectly.
1 person found this instruction helpful.
Was this instruction helpful to you?
Thank you for voting!
Customer:
Kim from Matthews, NC
Parts Used:
W10196406RW, W10196405RW, 330031
Difficulty Level:
Easy
Total Repair Time:
15 - 30 mins
Tools:
Screw drivers
Coils were uneven drip pans were corroded
This is a drop in stove. Turned off power at breaker. Pulled the coils and drip pans to access screws holding the top on. Lifted top and unscrewed old block kit. Replaced block kit and secured it. Screwed down the top and installed new drip pans. Reinserted coils and reset power. All good.
1 of 5 people found this instruction helpful.
Was this instruction helpful to you?
Thank you for voting!
Customer:
Diedra from Elkhorn city, KY
Parts Used:
W10196406RW, W10196405RW
Difficulty Level:
Really Easy
Total Repair Time:
Less than 15 mins
All 4 Drip bowls had rusted out .
I watched How To Video and followed instructions. Very simple very easy !
0 of 6 people found this instruction helpful.
Was this instruction helpful to you?
Thank you for voting!
Customer:
Peggy from Baton Rouge, LA
Parts Used:
W10196406RW, W10196405RW
Difficulty Level:
Very Easy
Total Repair Time:
Less than 15 mins
Replacing drip pans
Unplugged and removed burner coils, inserted new pans and plugged coils back in
0 of 1 people found this instruction helpful.
Was this instruction helpful to you?
Thank you for voting!
Customer:
Marie from Springfield, MO
Parts Used:
W10196406RW, W10196405RW
Difficulty Level:
Very Easy
Total Repair Time:
Less than 15 mins
old, stained and rusty drip bowls
simply unplugged the burners, removed existing drip bowls, cleaned stove top and inserted new bowls
0 of 1 people found this instruction helpful.
Was this instruction helpful to you?
Thank you for voting!
Customer:
George from Lyman, ME
Parts Used:
W10196406RW, W10196405RW
Difficulty Level:
Very Easy
Total Repair Time:
Less than 15 mins
Replacement of old drip bowls
Made sure the range top was off and totally cool. Removed each of the four range cooking coils. Removed all four drip bowls. Cleaned all around the bowl openings, installed all four new bowls and old cooking coils. Used a Dremel with a wire brush to really clean around the SS range top, along with oven cleaner.This is the 3rd time I h ave done this. This range top is SS but over 30 years old. My wife thinks we got a new range everytime I do this.
0 of 1 people found this instruction helpful.
Was this instruction helpful to you?
Thank you for voting!
Customer:
Donald from Midway, GA
Parts Used:
W10196406RW, WPW10196405, WPY04000036, WPY04000035
Difficulty Level:
Very Easy
Total Repair Time:
Less than 15 mins
Dip pans rusted & had 2 wron types of elements
Removed & replaced them.
0 of 1 people found this instruction helpful.
Was this instruction helpful to you?
Thank you for voting!
  • 1
  • 2
Customer Reviews
Average Rating: (2 Reviews)
5.0
★★★★★
★★★★★
Filter By Rating:
  • 5
    2
  • 4
    0
  • 3
    0
  • 2
    0
  • 1
    0
  • 1
Sort by:
Sorry, we couldn't find any existing reviews that matched. Try using some different or simpler keywords.

Model Compatibility

This part works with the following models:
Fix Number: FIX2366565
Manufacturer Part Number: W10196406RW
Brand
Model Number
Description
Kenmore
101936630
Range - Kenmore Range/Stove/Oven Model 101.936630 (101936630, 101 936630) Parts
Kenmore
101936634
Range - Kenmore Range/Stove/Oven Model 101.936634 (101936634, 101 936634) Parts
Hoover
1151AJ-30
Cooktop
Admiral
1151AL-30
Cooktop
Hoover
1151WJ-30
Cooktop
Admiral
1151WL-30
Cooktop
Magic Chef
1500PAA
Range
Magic Chef
1500PAW
Range
Magic Chef
1500PRA
Range
Magic Chef
1500PRW
Range
Magic Chef
15GA-1
Range
Magic Chef
15GA-1-94
Range
Magic Chef
15GA-1-GG
Range
Magic Chef
15GN-1
Range
Magic Chef
15GN-1-94
Range
Magic Chef
15GN-1-GG
Range
Magic Chef
15GY-1
Range
Magic Chef
15GY-1-GG
Range
Magic Chef
15HA-10
Range
Magic Chef
15HA-10-94
Range
Magic Chef
15HA-10-GG
Range
Magic Chef
15HN-10
Range
Magic Chef
15HN-10-94
Range
Magic Chef
15HN-10-GG
Range
Magic Chef
15HY-10
Range
Kenmore
22311
Cooktop - Electric Cooktop
Magic Chef
3500PPA
Range
Magic Chef
3500PPW
Range
Magic Chef
3500PPW-D
Range
Magic Chef
3500SPA
Range