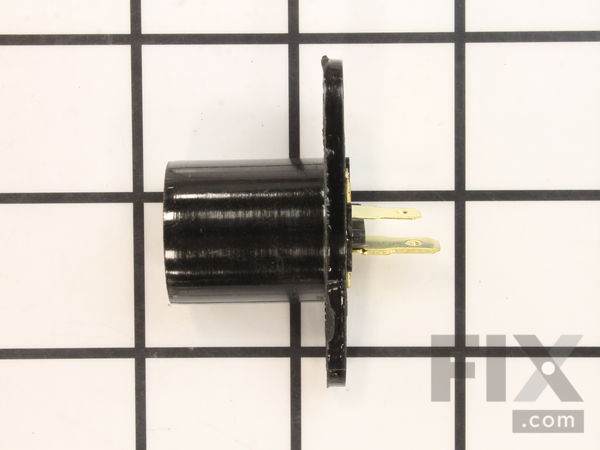
Part Location Diagram of WB08X10016 GE Light Socket - 250V 75W
See part 30 in the diagram
( Grid squares measure 1x1 inch )

Light Socket - 250V 75W

Works With Model EMO3000CWW04!

Rated by 9 customers 

?

Really Easy 

30 - 60 mins 

Ratings submitted by customers like you who bought this part.

?
$23.29
In Stock
Fix Number:
FIX230544
Manufacturer #:
WB08X10016
Manufactured by:
GE
Works With Model EMO3000CWW04!

Product Description

Light bulb not included.

Questions and Answers

We're sorry, but our Q&A experts are temporarily unavailable.
Please check back later if you still haven't found the answer you need.

Installation Instructions Provided by Fix customers like you.

Average Repair Rating: 4.1 / 5.0, 9 reviews.
  • 1
Sort by:
Sorry, we couldn't find any existing installation instruction that matched.
Customer:
Pamela from Ocala, FL
Parts Used:
WB08X10016
Difficulty Level:
Really Easy
Total Repair Time:
Less than 15 mins
Tools:
Screw drivers
The light bulb overheated and fused with the socket.
I removed the bottom cover of the microwave. Unplugged the wiring harness. Replaced the damaged socket and inserted led bulbs so they would not overheat again. Put the screws back in the cover.
1 person found this instruction helpful.
Was this instruction helpful to you?
Thank you for voting!
Customer:
Mary Ann from Wyomissing, PA
Parts Used:
WB36X10003, WB08X10016
Difficulty Level:
Really Easy
Total Repair Time:
15 - 30 mins
Tools:
Screw drivers
Light bulbs broke off inside socket. Tried to screw bulb ot and the sockets broke into pieces
Turn off electricity and pull plug from appliance. Remove 5 or six screws from the bottom panel of appliance. This allows you easy access to remove bulbs and sockets. Remove the two screws from the sockets and remove the wires clipped into the sockets. remove damaged sockets and bulbs if both need to be replaced. Insert wires onto new parts and place back into unit.Replace bottom panel and your repair is complete. Thank you for the parts and helpful instructions from you customers. Made the repair really easy.
1 person found this instruction helpful.
Was this instruction helpful to you?
Thank you for voting!
Customer:
Alan from Albuquerque, NM
Parts Used:
WB08X10016
Difficulty Level:
A Bit Difficult
Total Repair Time:
30 - 60 mins
Tools:
Pliers, Screw drivers
Down light would not turn on.
Replacing the bulb socket should take less than 15 minutes and require only a Phillips head screwdriver. Unless, as was my experience, you find that the connections at the rear of the socket are fried. The insulated connectors were brittle and one wire was hanging loose. In that case you will need (female) spade connectors of two sizes and have to carefully strip new ends on the wires which are very fine. Finish by wrapping the connectors with electrical tape.
0 of 1 people found this instruction helpful.
Was this instruction helpful to you?
Thank you for voting!
Customer:
Janet from Charlotte, NC
Parts Used:
WB36X10003, WB08X10016
Difficulty Level:
Very Easy
Total Repair Time:
Less than 15 mins
Tools:
Screw drivers
the light bulbs were burnt out and broke at the base when I tried to replace them. Then the brittle sockets broke when I tried to loose the metal bases from the now broken light bulbs.
I took 5 screws out of the bottom of the microwave so I could get to the socket, took the single screw out that was holding the socket, slid the silicone sleeve wrapped electrical connectors off the broken socket and threaded them back onto the replacement sockets. Screwed the new sockets back it, replaced the bulbs, screwed the 5 screws back to hold the microwave base back up. All done! Maybe 5-7 minutes. Everything fit. Everything worked. Super Easy.
0 of 1 people found this instruction helpful.
Was this instruction helpful to you?
Thank you for voting!
Customer:
Arthur from Beavercreek, OH
Parts Used:
WB18X10193, WB08X10016
Difficulty Level:
Really Easy
Total Repair Time:
15 - 30 mins
Tools:
Pliers, Screw drivers
Surface lights did not work
Dropped the bottom panel (4 Phillips screws) and removed the light sockets (1 Phillips screw on each socket) and the unplugged the wiring harness, this was a bit difficult as the shorting process required some jiggling to unplug ( I used a pair of needle nose pliers). Replaced the the harness and sockets in reverse order. This repair w as very easy and it was obvious where the arcing took place when the bulb burned out. The harness and the sockets were bad and needed replacing however when they shorted out they also burned out the section of the control panel circuit board that controlled the lights and exhaust fan and that repair was a bit harder.
0 of 1 people found this instruction helpful.
Was this instruction helpful to you?
Thank you for voting!
Customer:
Cliff from Saugerties, NY
Parts Used:
WB36X10003, WB08X10016
Difficulty Level:
Very Easy
Total Repair Time:
Less than 15 mins
Tools:
Screw drivers
stove light not working under microwave..bulb burned out and socket broke
5 screws to take out and one for the socket. screw in bulb and replace socket with one screw and done...so simple, simple, simple.
0 of 1 people found this instruction helpful.
Was this instruction helpful to you?
Thank you for voting!
Customer:
Keith from Gibsonburg,, OH
Parts Used:
WB08X10016
Difficulty Level:
Very Easy
Total Repair Time:
More than 2 hours
Tools:
Screw drivers
Light Sockets And Wire Replace
Remove screws and reinstall
0 of 1 people found this instruction helpful.
Was this instruction helpful to you?
Thank you for voting!
Customer:
John from Eagan, MN
Parts Used:
WB36X10003, WB08X10016
Difficulty Level:
Really Easy
Total Repair Time:
Less than 15 mins
Tools:
Screw drivers
Replace surface lights and sockets
Ordered on Monday, received Wednesday morning. Took less than 10 minutes to replace the bulbs and sockets. The only problem is that the the micro switch is a 3-position. On, Nite Lite and Off. The replacement bulb is just On/Off. Really doesn't bother us all that much. Didn't see that we had a choice of bulbs.
0 of 1 people found this instruction helpful.
Was this instruction helpful to you?
Thank you for voting!
Customer:
Lawrence from South Nyack, NY
Parts Used:
WB08X10016
Difficulty Level:
Really Easy
Total Repair Time:
Less than 15 mins
Tools:
Screw drivers
Light bulbs kept burning out
This was really simple. After making sure the power to the lights was off, I removed three phillips head screws from the light panel. This is located at the bottom of the microwave. I then slid the panel forward about a quarter inch to free it. I then lowered it and removed the one screw holding the light socket in place, pulled the lig ht socket out, replaced with the new one and slid the 2 connecting wires onto the terminals on the socket. The terminals are different sizes so you can't make a mistake there.
0 of 1 people found this instruction helpful.
Was this instruction helpful to you?
Thank you for voting!
  • 1

Model Compatibility

This part works with the following models:
Fix Number: FIX230544
Manufacturer Part Number: WB08X10016
Brand
Model Number
Description
Kenmore
36362702200
Microwave
Kenmore
36362709300
Microwave
General Electric
DVM1850BMC01
Microwave
General Electric
DVM1850BMC02
Microwave
General Electric
DVM1850DM2BB
Microwave
General Electric
DVM1850DM2WW
Microwave
General Electric
DVM1850DM3BB
Microwave
General Electric
DVM1850DM3WW
Microwave
General Electric
DVM1850DM4BB
Microwave
General Electric
DVM1850DM4WW
Microwave
General Electric
DVM1850DMBB01
Microwave - Counter Top
General Electric
DVM1850DMWW01
Microwave - Counter Top
General Electric
DVM1850MM2BG
Microwave
General Electric
DVM1850MM3BG
Microwave
General Electric
DVM1850MM4BG
Microwave
General Electric
DVM1850MMBG01
Microwave - Counter Top
General Electric
DVM1850SM2SS
Microwave
General Electric
DVM1850SM3SS
Microwave
General Electric
DVM1850SM4SS
Microwave
General Electric
DVM1850SMC01
Microwave
General Electric
DVM1850SMC02
Microwave
General Electric
DVM1850SMSS01
Microwave - Counter Top
General Electric
DVM1850WMC01
Microwave
General Electric
DVM1850WMC02
Microwave
General Electric
DVM7195BL1TS
Microwave - Microwave/Hood Combo
General Electric
DVM7195BL2TS
Microwave
General Electric
DVM7195DK1BB
Microwave - MICROWAVE
General Electric
DVM7195DK1WW
Microwave - MICROWAVE
General Electric
DVM7195DK2BB
Microwave - MICROWAVE/HOOD COMBO
General Electric
DVM7195DK2WW
Microwave - MICROWAVE/HOOD COMBO