Ratings submitted by customers like you who bought this part.
?
$98.44
In Stock
Fix Number:
FIX1583805
Manufacturer #:
205613
Manufactured by:
Whirlpool
Works With Model A7800!
Product Description
This part has two ports for water to enter. It is blue and is intended for use with many washing machines and comes with a multi-mount bracket and an outlet adaptor.
Works with the following brands:
Maytag, Amana, Kenmore, Speed Queen
Works with the following products
Washer, Washer Dryer Combo, Freezer
Fixes the following symptoms
No hot or cold water, Leaking, Water Filling Issues
This part has two ports for water to enter. It is blue and is intended for use with many washing machines and comes with a multi-mount bracket and an outlet adaptor.
Works with the following brands:
Maytag, Amana, Kenmore, Speed Queen
Works with the following products:
Washer, Washer Dryer Combo, Freezer
Fixes the following symptoms:
No hot or cold water, Leaking, Water Filling Issues
Part# 205613 replaces these:
AP4023852, 3440, 205613, 2-3177, 2-3847, 2-4028
...
Show more, 2-5613, 2-5614, 203177, 203847, 204028, 205613, 205613VP, 205614, 21001605, 22002882, 25832, 25832R, 8400-525 Show less
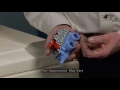
Videos For installing this part.
Replacing your Water Inlet Valve
Questions and Answers
We're sorry, but our Q&A experts are temporarily unavailable.
Please check back later if you still haven't found the answer you need.
1 question answered by our experts.
< Prev
1
Next >
Sort by:
Search filter:
Clear Filter
Your search term must have 3 or more characters.
Keep searches simple. Use keywords, e.g. "leaking", "pump", "broken" or "fit".
Sorry, we couldn't find any existing answers that matched. Try using some different or simpler keywords, or submit your new question by using the "Ask a Question" button above!
Dennis
October 1, 2021
Fills with water on wash cycle but doesn’t fill with water on rise cycle. Any suggestions?
For model number MVWC360AW0
Hello Dennis, thank you for writing. This could be a result of not enough water pressure. If the water pressure is adequate, try cleaning the screens inside the water inlet valve hose connection ports. If the washer still fills slowly, replace the water inlet valve. Hose Washer Screen Kit PartSelect Number PS1803069. Washer Water-Level Pressure Switch Hose PartSelect Number PS11741846. We hope this helps.
The other given instructions are good, except I would add 2 more things to do. Also the valve comes with written instructions, but they are somewhat incomplete. 1. before disassembly & removal look at the valve assembly and note its orientation. Inlet valve at the top. Make sure your hot and cold hoses are correctly identified and
... Read more I marked the hot and cold inlet, BEFORE I removed the hoses. You don't want to get them mixed up. 2. even more important note the color coded wires that attach to the top and bottom contacts. I marked the valve assembly with the 1st letter of the color of the wire that is attached to each contact. My Maytag is over 30 years old & this is the 1st problem that I had with it. The new valve works perfectly.
Cold water was very very slow. A load took over 1.5 hours to complete. After instalation, my first full load took only 25 minutes from start to finish.
Disconnect electrical. Removed water hoses, marked hot and cold faucets. Took bracket off from back of washer. This I did the day I ordered the part, on Friday. Inlet valve came Tuesday afternoon, just as I was told it would. Took it step by step removing electrical connections on old and placing them on corresponding part on the new in
... Read morelet valve. Same with the water outlet hose and then reseated the part on the bracket and then on the back of the washer. I did not use photos on phone but considered it to match the new install to the original since the directions that came with part were detailed, and I am an experienced DIYer. Now with your site, I will tackel my older kitchen aid dish washer. Thanks so much, Sincerely 66 year old granny. tip: when tackleing a new project use an old news paper or drop cloth you can write on it, and place each removed part in order with notes as to how you need to reinstall it for future reference when your replace it, or fix it.
Water inlet valve not closing tight, water seeping into washer when not in use.
Unplug washer. Shut off water faucets. Remove hoses from back of washer. Remove hex screw(s) holding hose connection bracket. Remove bracket assembly through opening in back of washer. Mark and then unplug four wires connected to the valve. Remove two hex screws holding valve to bracket. Replace valve and wires. Replace bracket into openi
... Read moreng in back of washer. Reconnect hoses. Plug in washer. Turn on faucets and you're ready to go.
Turned off valves at wall to supply hoses. Moved washer away from wall and removed supply hoses from washer. Removed one screw and pulled out the small panel holding the Water Inlet Valve. Used small nut driver socket to loosen hose clamp then pulled loose all wires noting where they were to be reconnected. Then removed two screws hold
... Read moreing the Inlet Valve to the metal panel. Reconnected all wires, hoses and screws in reverse process as mentioned above.
This stackable washer dryer started to leak water on the floor
Well finding information on the problem and getting the parts was not the problem, the problem was that the water valve and Rubber injector Valve were just under the lid of the washing machine, which was just underneath the dryer which had to be removed to remove the washer lid. This was the challenge. But once I figured out that 4 bolt
... Read mores, 2 on each side in the back held the dryer in place over the washer, it was simply a matter of picking the dryer up and setting it on the floor. Then replacing it when the repair was done. If you have help, this will not be such a big deal. I am 62 and had no one around at the time. The repair itself was easy and well outlined on this site webpage and others. There is one nut in each corner that holds the top on. Remove the front panel's two screws at the bottom and you will have access.Your going to pull the two hex nuts off the back plate that holds the connectors for the hot and cold water hoses. That is the Water Inlet Valve. Pull it through and up so you can remove the two hoses, and then unplug the upper and lower wire connectors. I marked them so I would remember but probably not necessary. I also elected to change the injector valve and injector sleeve bracket, for less then 10 bucks I did not want to be back at this thing in a few months. After you get the new parts on, push the water valve back to the rear and re attach the mounting plate, then nut that plate back to the rear of the washer. Then its just a matter of getting the dryer back on top. Take the opportunity to clean all the dust out of both parts to avoid any risk of fire. Been up and running a couple weeks now and no more issues. Less than $50 fix much better than spending another 1200 on new washer dryer.
No cold water coming into the washer. Only hot water
Followed all the steps from the video and instructions. The only thing giving me a problem were the locking tabs on the wires. Had to get a neighbor to help me with that.
The cold water input made lots of noise, didn't shut off easily
EZPZ I jJust tilted the washer to access the back, did not have to move the feet, and disconnected the hoses, unscrewed the part and replaced it. One unrelated problem was the water faucets, both hot and cold had a very slow leaks after I shut them off and turned them back on again when the job was done. This was fixed by removing t
... Read morehe handle and nut, and adding a little "self-forming graphite valve packing" to the nut.
Very slow to fill with cold water, loud noise from valve in back
I followed the video instruction from partselect. However upon completion, I found a leak from the aerator due to the new higher pressure. Had to order an Injector Valve Kit causing the washer to be out of service for a week. Consider ordering both to save on time and shipping if repairing an older washer.
The hardest part was pulling the machine away from the wall. One screw held the panel with the valve on it, Two screws held the valve on the panel. Four wires unplugged and one hose disconnected from the old valve. I put the hose on the new valve, plugged the wires into the corresponding spots, screwed the valve back on the panel and put
... Read morethe panel back on the machine.
Read less
2 of 2 peoplefound this instruction helpful.
Was this instruction helpful to you?
Thank you for voting!
< Prev
1
2
Next >
Model Compatibility
This part works with the following models:
Fix Number: FIX1583805
Manufacturer Part Number: 205613
Some of the parts we sell are eligible for mail-in rebates since we can recycle them. We will display any applicable rebates in your shopping cart. To redeem your rebate, contact Customer Service after you have received your part.