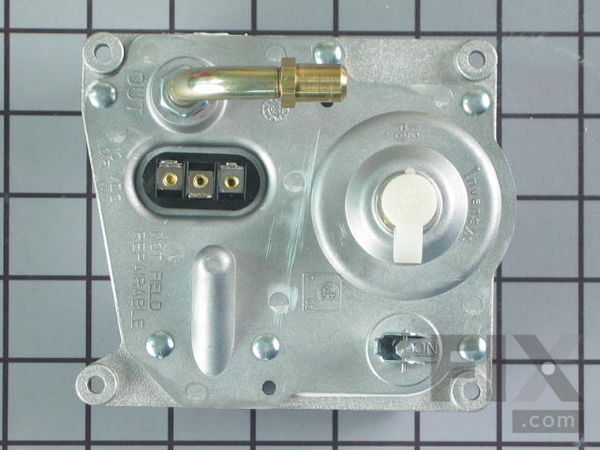
Part Location Diagram of WPW10293048 Whirlpool Gas Valve
See part 15 in the diagram
( Grid squares measure 1x1 inch )

Gas Valve

Works With Model CGS365HQ7!

Rated by 3 customers 

?

Easy 

15 - 30 mins 

Ratings submitted by customers like you who bought this part.

?
$240.90
In Stock
Fix Number:
FIX11752203
Manufacturer #:
WPW10293048
Manufactured by:
Whirlpool
Works With Model CGS365HQ7!

Product Description

Once this valve senses the desired heat, it will open up and allow the gas to travel to the oven burner.

Questions and Answers

We're sorry, but our Q&A experts are temporarily unavailable.
Please check back later if you still haven't found the answer you need.

Installation Instructions Provided by Fix customers like you.

Average Repair Rating: 3.8 / 5.0, 3 reviews.
  • 1
Sort by:
Sorry, we couldn't find any existing installation instruction that matched.
Customer:
Frank from Conyers, GA
Parts Used:
WPW10293048
Difficulty Level:
Easy
Total Repair Time:
15 - 30 mins
Tools:
Screw drivers, Wrench set
Oven & Broiler wouldn't heat
This is important to know so you can tell whether this gas valve is your problem. "According to the manual tucked behind the oven, if one solenoid on the gas safety valve/regulator doesn't work, neither will work. It indicated that from the center (common) pin to each of the others, it should read 216 ohms." Mine read 200 to one side, non e to the other. I ordered a replacement, and was shipped a faulty valve, so testing it was very helpful to see that the new one was faulty too, got the same readings. Re-ordered another valve and it tested 200 ohms on both sides. Installed it and range works great now. Installation was easy, follow the directions listed in some of the previous entries on this site.
0 of 1 people found this instruction helpful.
Was this instruction helpful to you?
Thank you for voting!
Customer:
James from Ft Lauderdale, FL
Parts Used:
WPW10293048, WPW10160649
Difficulty Level:
Easy
Total Repair Time:
30 - 60 mins
Tools:
Screw drivers, Wrench set
Replace gas regulator
The first thing you want to do before installing the new gas regulator is unplug the electrical cord (power for the electric ignitors and the digital front panel) and the gas connection.
Now you need to take off the old regulator. When looking at the back of the range where the regulator is located you see three gas connection points on the regulator- the in-coming gas, the out-going gas to the stovetop and the out-going gas to the oven. Disconnect all three with a wrench (the out-going connections need a smaller wrench than the in-coming connection) Open-end wrenches work better than a crescent-type wrench.
Next, unscrew the four mounting screws that hold the regulator onto back of the range. Now you need to move to the front side of the range and pull-out the broiler drawer.
Now you need to lie on the floor and look into the broiler area. You can see the front side of the gas regulator all the way in the back. You will need a flash light or small lamp to see what needs to be done next.
From this vantage point, you need to do three things. First, you need to disconnect three colored wires that are attached to a pin bracket attached to the gas regulator. Remember the color order when removing the wires (blue on top, orange in the middle and red on the bottom). Second, there is one more single wire to disconnect that is located to the left of the three wires (same type of disconnect). And third, disconnect the brass nut from the “j-shaped” copper flange sticking out of the front of the gas regulator.
Now everything is disconnected, almost. Now there is one final thing to do in order to “remove” the gas regulator from the range. From the back of the range, grab the regulator and pull away from the range AND at the same time “jimmy” in a few directions in order to dislodge the ‘j-shaped” copper flange from its mounting position. You might need to go back and look at this copper flange from the front to see just how this thing works.
When your mouth and tongue are in proper alignment and the proper “jimmying” has occurred, the gas regulator will be dislodged.
Now the new gas regulator can be installed.
Now, the first thing to do is mount the new gas regulator to the back of the range. Again we’re back to the notorious “j-shaped” copper flange. As you place the new gas regulator in position with the four mounting screw holes you also have to position the “j-shaped” copper flange into its mounting position inside the oven. It’s a two-fold proposition. You just have to “jack” with it until the flange is inserted in the proper position and the screw holes are in alignment.
If everybody is in-place, you install the four mounting screws. Next, attach the out-going gas connections to the regulator. Use Teflon tape or pipe thread sealant (for gas) before attachment.
Now move to the front of the range, with your light in place, attach the collared wires to the pin bracket and the single wire. Next, tighten the brass nut of the “j-shaped” copper flange. While you’re here, might want to re-check the wire connections again.
Last thing to do, connect the in-coming gas to the gas regulator.
Now you can plug the electric chord back in and turn the gas valve on.
If you don’t witness an explosion, go to the front of the range and push the BAKE button and the START button. If all went “according to Hoyle”, it’s time to cook a pizza.
Hope this helps someone.
0 of 1 people found this instruction helpful.
Was this instruction helpful to you?
Thank you for voting!
Customer:
Thomas from Farr West, UT
Parts Used:
WPW10293048
Difficulty Level:
Really Easy
Total Repair Time:
15 - 30 mins
Tools:
Pliers, Wrench (Adjustable)
no heat from bake and broil elements
My range would click when I turned on bake but there was no heat. I tried turning on broil and the same thing happened. I did not smell any gas when I opened the door either. I pulled a parts schematic and found that the ignition for the bake and broil are two different systems so I ruled out the igniters and read from others that the gas valve may be the problem. Since this part is more expensive than the other parts, I figured that this must be the most likely problem.
This repair was easier than I expected. I slid out the range and turned off the gas and unplugged the power. I then disconnected the main gas line and the two lines leading out of the gas valve. I unscrewed the four mounting screws and gently moved the part down and out from a feeder tube underneath. I was worried that I would mix up the wires when I went to disconnect them so I took a picture as a reference. I found that the wires have different size connectors so you just have to match up the right sizes when you reconnect them and you shouldn’t have a problem. Taking the picture was a good backup though. I installed the new part and now everything has been working great for three weeks and counting.
0 of 1 people found this instruction helpful.
Was this instruction helpful to you?
Thank you for voting!
  • 1

Model Compatibility

This part works with the following models:
Fix Number: FIX11752203
Manufacturer Part Number: WPW10293048
Brand
Model Number
Description
Kenmore
66475272502
Range
Kenmore
66475273502
Range
Kenmore
66475274502
Range
Kenmore
66475279502
Range
Kenmore
66572002100
Range
Kenmore
66572002101
Range
Kenmore
66572002102
Range
Kenmore
66572002103
Range
Kenmore
66572002104
Range
Kenmore
66572004100
Range
Kenmore
66572004101
Range
Kenmore
66572004103
Range
Kenmore
66572004104
Range
Kenmore
66572012100
Range
Kenmore
66572012101
Range
Kenmore
66572012102
Range
Kenmore
66572012103
Range
Kenmore
66572012104
Range
Kenmore
66572014100
Range
Kenmore
66572014101
Range
Kenmore
66572014103
Range
Kenmore
66572014104
Range
Kenmore
66572022100
Range
Kenmore
66572022101
Range
Kenmore
66572022102
Range
Kenmore
66572023100
Range
Kenmore
66572023102
Range
Kenmore
66572024100
Range
Kenmore
66572024102
Range
Kenmore
66572029100
Range